In my previous Guide to Planning a Trip post, I explained how I researched and created a wishlist of what I want to do and eat and organized it in a Google Doc. I mentioned in that post how I organize destinations by area so that I can minimize travel time and make the most of where I am by knowing what my options are in that area, whether or not I actually visit them. Today, I share how I create my custom Google My Maps to help me do this.
Knowing where various interest points are oriented to each other can help plan your travel – such as below where we did a walking day visiting scenic streets, shrines, temples, and gardens all in Southeastern Kyoto in Japan a few weeks ago.
The My Maps also is super helpful when I’m there, since I can use it to get directions from place to place. Even if I don’t have wireless/data, I can also if I load the custom map before I go offline, use it alongside GPS to help me get to my destination.
It may seem like with a spreadsheet and custom maps, I must have my trips planned to the hour. But, the opposite is true! Because I am armed with information on where everything is located, when each business may open and close, how much each will cost in money or time, what the various options to choose from are among many choices in the area (including ones I find out from locals or discover passing by once I’m there!) and what others may have thought of them from reading reviews, I feel even more empowered to wing it without FOMO.
And, since getting lost stresses me out, or traveling to a location taking longer than I thought only to find out it just closed is so frustrating for me, mapping stuff to find out where it is and how long it takes to get there by train, car, public transit, walking, whatever is important to me.
Guide to Planning A Trip Part 2: Mapping
Did you know you can create a custom map with multiple destinations that you input? You can also share this map!
To start, open google maps. In the search bar, you should see a “hamburger” menu icon – it has 3 lines and appears on the left side of the search bar.
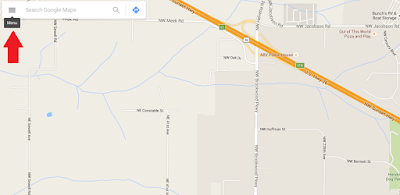
Click on that and click on “My Maps“. If you don’t see My Maps, it may be because you aren’t signed into your Google account – you need to be signed in so the map will associate with you.

Now I have a lot of maps I have created over the years, but the important thing is to look for the “Create Map” at the bottom. What you can see from this is later – for instance my second trip to Hawaii, I was able to reuse my map to revisit some of my favorite stops later with my family that I had visited earlier! I love that this is an investment in making maps rather than re-doing the searches and directions later.

Later, when you come to edit your maps, you will want to open one of the maps you saved, which will show the screen below. You have one extra step where you then click on “Open in My Maps” in order to edit the existing My Map.
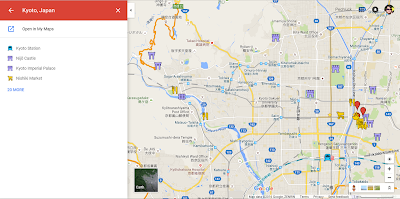
While I’m on vacation, I only need to click to load the map on my phone and not use “Open in My Maps” in order to use it to navigate with GPS.
When you click on Create Map, it should open a new tab for you to work in. Now, you can just start searching for destinations by typing in the destination name (I always try this first!) or the address or GPS coordinates. Naturally, make sure the result matches what you are looking for, especially if might be multiple locations of a restaurant or multiple destinations called Yasaka Shrine for instance in Japan!
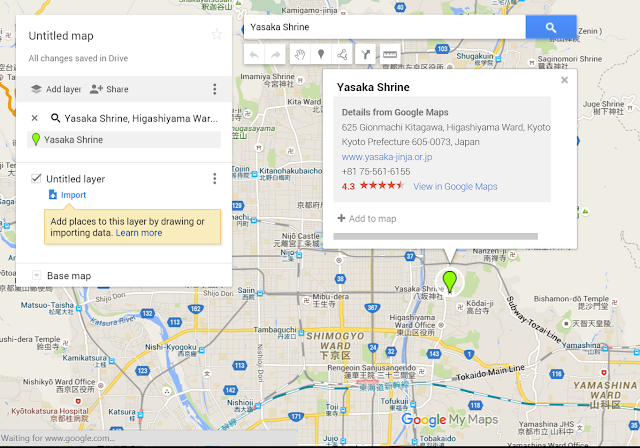
Adding Destinations To Your Map
When the Google Maps search finds a destination, you can add it to a default Untitled Layer by clicking on “Add to map”
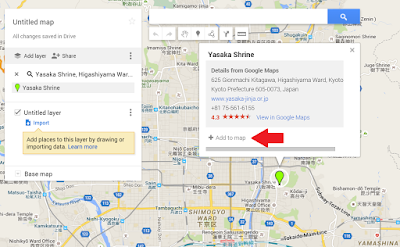
Once you add it to the Untitled layer, feel free to name your Untitled map (such as Kyoto, which is the city here) and the Untitled layer if you want. I usually just use one layer because I don’t tend to need to organize too many destinations. But, you might choose to have one layer for Restaurants, one layer for Museums, one layer for Hikes, etc. if you have a lot of different categories you want to divide in.
I personally like to keep it in one layer because I’m too lazy to want to click between layers. Instead, I use customizing icons to differentiate between the different places by clicking on the paint icon when you mouse over the new pin you have added.
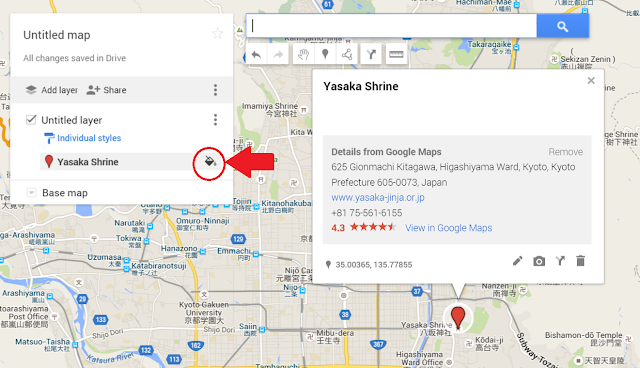
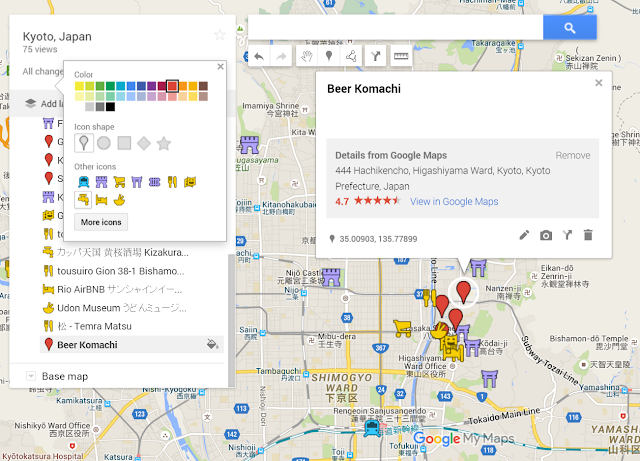
Instead of changing colors of pins, I select “More icons” button at the bottom.

Then I pick a bed to stand for my lodging, train for train station, fork/knife for restaurant, faucet for beer places, etc! There are lots of different icons you can use here, or you can even add your own icon you have an url to grab. Pick something that is meaningful that you will remember.

I usually don’t end up using too many icons and thankfully the application remembers your most used other icons so you can quickly get to them again later!
If you searched by an address or GPS, you can edit the resulting destination to a name that means something to you, such as “Beginning of XXX Hiking Trail” or even edit details in the description if you’d like by adding an url, comments, etc.

Using Your My Maps
I can only speak to my Android where when I open Google Maps, I can choose “Your Places“, which is the equivalent of the My Maps on the desktop and I can pick what I want to open based on my map name (such as Kyoto, Tokyo, etc.”. This then loads up the map.

I can zoom in to click on any of my destinations I have placed (as well as search for new ones if I’m online still) then use the directions icon (in the bottom right of the screen, it’s the arrow button) to navigate myself there via car, public transit or walking.

The few times I used taxis, the My Map turned out helpful to even show the driver the general area we needed to go since they could be unfamiliar with the street address. And even with my data turned off, I used the GPS to make sure I was on track even as we wandered our way exploring the neighborhoods on the way from one destination to the other walking.

Using My Maps was also great in giving me a visual overview of where all the various places I am interested in are located. Based on this, I pick my lodging to be convenient to getting to everything, or to be in the heart of where there are a lot of restaurants, etc. It also helped narrow some things off my wishlist because they were too out of the way.
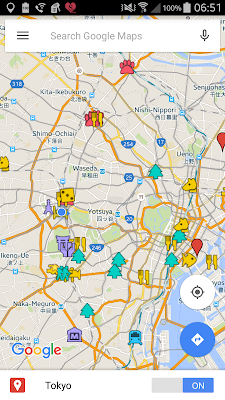
When I’m on the go on vacation, this pre-work on a computer saved me the annoyance of trying to search and find places on my phone. This pre-work also gives you an initial orientation to your destination so that you know where various things are in location to each other in the city!
I’ve also used this to craft a progressive meal in New York, and a drinking/nightclub crawl in Montreal. While I may only make a travel Google Doc spreadsheet for a trip of 5 days or more, I make custom Google Maps all the time even for a day trip to map stops to see, eat, and drink even for a single day.
Have you ever made a custom Google Map? How do you plan the locations you visit in a day on a trip? Do you think I’m crazy?
Here’s a summary of my Japan Travel post series:
- Guide to Planning a Trip: Research
- Guide to Planning a Trip: Mapping
- Hagoita Ichi Winter Festival at Sensoji Temple, Japan
- Japanese Treats at Temples and Shrines
- Winter Illuminations in Tokyo (Winter Season – November – February!)
- Snow Monkeys in Hot Springs
- Onsen by Mount Fuji covers Onsen 101 and how we loved our stay at Lake Kawaguchiko
- Dining at a Ryokan a look at what a traditional dinner and breakfast might be during a ryokan stay
- Visiting Cup Noodles Museum in Yokohama (just outside Tokyo)
- Visiting Shin Yokohama Ramen Museum
- Kyoto Temples and Shrines (walking tour starting in Higashimaya with stops especially at Kiyomizudera Temple, Kodaji Temple, Heian Shrine)
- Kyoto Temples in Arashiyama
- Kyoto Tofu
- Kyoto Famous Sights of the Kinkakuji (The Golden Pavilion) and Fushimi Inari (Red Torii Gates)
- Famous Signs of Osaka and eating Osaka Food specialities like okonomiyaki, takoyaki and kushikatsu
- Visiting Himeji Castle, the famous white castle in Japan
- Fun at Japanese Cafes and More including Maid Cafe, Cat Cafe; theme parks of J World and Namja Town, a geeky stop at Kanda Myojin, and Ghibli Museum
- Japan Eating Checklist is my top 25 list of things to try to include as an eating experience when visiting Japan




Pech, you are not crazy, you are a GENIUS! I have created custom maps before but not for long trips. I need to. This is so inspiring! Thank you!
Thanks for visiting – I am inspired by your always wonderful printables for your trips!
Why did I never think of doing this? What a great idea! Thanks so much for sharing…definitely going to do this the next time we are on vacation!
It’s such a great tool for orienting yourself before the trip and easily getting around during the trip!
It is amazing what one can do with Google maps! I’ve made several custom maps before, but never for planning a trip!
That’s funny because the reason I first started using custom maps was for planning a trip, and I haven’t looked back so trip planning just seems like a natural use!
Wow–just WOW!! You’re so detailed and organized! I love the idea of using a Google doc but this is brilliant! I’ve done some smaller versions of this to map estate sale-ing routes but it’s hard to save them sometimes, sounds like you have that figured out! (Also I love maps!)
Woo! I’m your 700th Instagram follower!! I love this! You get so detailed, and I looooove details! I think this is a perfect way to make sure that you get the most out of your trips. I’m a planner so I’ll try this for our next vacation. Thanks for the tutorial! 🙂
Hi Pech
I started following your tutorial and found that you can also add your own notes to your site. Right by the untitled layer open the data table, put in your spreadhseet and then all the places are annotated by your notes. I put in hours and comments from the people in the trip. I’ll send you a email to illustrate.