Making CoCo Ichibanya’s Curry

When I was in Japan for work back in March of this year, CoCo Ichibanya was highly recommended and raved about by my youngest sister J. So on my last night, I wandered lost along the neighborhood of Shibuya Crossing, trying to find CoCo Ichibanya’s Curry House, as mentioned in a previous post. When I finally found it (apparently having passed it at least twice- there are so many bright signs that I missed it), I finally got to enjoy a comforting Japanese curry  dinner of level 4 heat curry with chicken katsu and mushroom. While paying for my meal, I also bought two curry mix packages to take back to to the US, one pork and one vegetable, to take home.

My sister informed me there is now a branch of CoCo Ichibanya’s Curry House in LA (the first on the US Mainland), so it looks like when my family gets together this Christmas holiday, we will be able to visit. There’s no reason for me to horde my CoCo curry mix anymore. So, thanks to the internet, I decided to give it a try, including even trying to katsu up some tofu.

Ingredients (enough for 2 people):

  • 2 tablespoons of olive oil
  • Diced onions
  • Mixed diced vegetables of your choice
  • Coco Ichiban’s Curry Mix (I happened to use Vegetable)
  • Tofu (you can also use meat of course such as pork or chicken cutlet)
  • Flour
  • 1-2 egg (start with one and add another if you run low)
  • Seasoned breadcrumbs and/or panko
  • 1/4 cup vegetable oil
  • Steamed Rice (I used my standby jasmine rice)

Directions:

  1. Heat a sauce pan, pour in the olive oil, and saute the onions until caramelized. Add in the mixed vegetables and lightly saute for a few minutes.
  2. Drop the heat to medium-low. Squeeze in the curry mix. Let thicken, stirring occasionally while preparing your katsu tofu/meat. The one from Coco is liquid and already included some veggies, but I’m glad I added more as mine were fresher and crunchier versus the mush in the bag… though maybe I went a little overboard in quantity of veggies.

    But, often times the Japanese curry mix you find is actually hard and in blocks, similar to chocolate. So if you have that kind break it into pieces so it will melt. As it melts, for this curry block kind because the flavor is more condensed, start adding water, starting with one
    cup, to taste. You will want to do this in steps as the flavors opens up and develop. When it is all melted, depending on how it tastes to you, you can add more water, or some brown sugar to sweeten it, or add more heat with cayenne, or even sprinkle in some cheese for richness. Let the curry simmer on low, and remember that the Japanese curry should become thick almost like gravy, not like soup.
  3. Meanwhile, with the tofu, since I was not using meat there was no need to pound it into tenderness. If your tofu is not fresh and comes in a liquid, you will want to put it on paper towels and put something heavy (I use pans) to press it to squeeze the moisture out. Otherwise, if you are using meat, pound it out so it is about 1/2 inch in thickness.
  4. In a shallow bowl, combine breadcrumbs with salt, pepper and other desired seasonings, and or panko. I only had a little bit of panko left, and so I mixed the panko and some seasoned breadcrumbs together to get enough for two people’s worth. Dredge the tofu or meat in flour, then the whisked egg, then in the mix of seasoned breadcrumbs/panko and until evenly coated. I like doing this dredging using chopsticks, but need the fork to help turn over the tofu in the egg bowl.
  5. Cook your tofu or meat a skillet with 1/4 cup vegetable oil, shallow pan frying them about 5 minutes each side if you are using meat but shorter for tofu since you are just browning it no fully cooking it. To start you probably want to start with a smaller piece just to check the heat of the oil first. Drain your fried goodies on paper towels.
  6. The prettiest presentation for serving the curry is by first plating the white rice on half a plate, putting the curry on the other half, and place your crunchy tofu/meat on top of the curry so it will stay crispy. Or, I went the practical way which is using a bowl and putting in the rice, curry, and then topping with the tofu.

This was ok – definitely not as good as actually going to CoCo house and having the real deal. I wish I had mushrooms in the pantry for this, but had used them up earlier making a mushroom creme sauce on pasta. And, somehow I haven’t been able to recreate the kind of taste of katsu that I experienced in Japan- the texture was right with this panko breadcrumb mix, but not the taste. It must be something with the panko they are using- even katsu in the US  I get doesn’t taste the same way, yet at least 3 places in Tokyo were blowing me away with their versions. Now that I’m out of panko, I am going to specifically get my next batch from an Asian grocery store.

Well, I have something to look forward to next month in LA!

Signature

Spinach or Squash Cheese Pinwheels

I always find ads for food products that include a recipe a strong marketing tactic. I am not sure how long I’ve had the Spinach Cheese Swirls from Pepperidge Farms in my recipe binder. When I had 2 guests over one evening, I decided to use that as a reason to finally try this out to offer as a snack.

Supposedly this serves 6-10 as appetizers, but the four of us finished this off accompanied by some cheese, bread, and wine. The recipe calls for using Pepperidge Farms Puff Pastry Sheets, but you can also use Pillsbury Crescent Roll dough which you pinch the perforations into a solid sheet.

Spinach Pinwheels

Ingredients:

  • 1 egg
  • 1 tablespoon of water
  • 1/2 cup shredded Muenster cheese or Mozzarella cheese or whatever tasty cheese you’d like: I went with sharp cheddar that I grated fresh and I doubled the amount because I love cheese
  • 1/4 cup grated Parmesan cheese- but I had run out, so used a shredded mix of mozzarella, asiago and provolone
  • 2 tablespoons of green onion, chopped
  • 1/8 teaspoon of garlic powder- though I admit I used twice as much at least as I did it to taste
  • All-purpose flour
  • 1/2 of a 17.3-ounce package Pepperidge Farm® Puff Pastry Sheets (1 sheet), thawed
  • 1 pkg. (about 10 ounces) frozen chopped spinach, thawed and well drained

Directions:

  1. Make sure your chopped spinach is dry. I wrapped my frozen chopped spinach with paper towels and then under a big pan to press some water out of it, and then heated it in the microwave to steam it to ensure there was as little liquid as possible so it would not make the dough soggy.
  2. Beat the egg and water in a small bowl with a fork. Sprinkle the flour on your work surface. Unfold the pastry sheet on the floured surface and brush the pastry sheet with the egg mixture.
  3. Stir the your cheeses, green onion and garlic powder in a medium bowl to taste. The original recipe tasted a bit bland to me, so make sure you season and taste until the filling is appealing to you.
    Spinach or Squash Cheese Pinwheels
  4. Carefully top the pastry sheet with the spinach cheese mixture. Don’t make it thick or it will not roll smoothly, and leave a little bit on the end farthest away from you, about 1/2″ of room at that end, that you will roll to (on the short side) so you can seal it. I happened to have left a little on the sides too, but now I know it isn’t necessary because as you see from my final roll, there was too much extra dough on the sides.
    Spinach or Squash Cheese Pinwheels
  5. Starting on the short side, roll it all up. Next, I recommend wrapping it in saran wrap and put in the fridge overnight, or in the freezer for enough time for it to all harden just a bit to make it hold together better when you cut the roll.
    Spinach or Squash Cheese Pinwheels
  6. Heat the oven to 400°F. As it is heating, cut the roll into 1/2 inch slices. Place the slices, cut-side down, onto your baking sheet. Brush the slices with the egg mixture.
    Spinach or Squash Cheese Pinwheels Spinach or Squash Cheese Pinwheels
  7. Bake for 15 minutes or until the pastries are golden brown. Remove the pastries from the baking sheets and let cool for 10 minutes.
    Spinach or Squash Cheese Pinwheels Spinach or Squash Cheese Pinwheels

I also made a variant version of this, but instead using Pillsbury Crescent Roll dough, chive cream cheese, and also pureed squash to make Squash and Cheese Pinwheels. I saw on TV a few times recently a Pillsbury cresent dough commercial where a man “impressed” his wife by making bacon cheese pinwheels, and because of that he delegates the cable being out for her to fix instead. The look on the woman’s face cracks me up even though I know that’s what my face looks like when F asks me stuff about the house sometimes.

Squash Pinwheels

Ingredients:

  • 1 8 ounce package Pillsbury Crescent Dough. If you see it, get the no-seam dough version called Recipe Creations
  • 1 pkg. (about 10 ounces) frozen pureed squash, or you can use roasted squash that you have let cool down to room temperature and pureed. You can use any type of squash you’d like. I like pureed squash because then you don’t have to worry about cutting squash into pieces- just throw it into the oven at 400 degrees F until fork tender, and then pull out and scoop the squash and into your blender to puree and use. Or, use frozen squash that you microwave.
  • 6 ounces of chive cream cheese, or you can use other flavors or plain
  • 1/4 cup chopped walnuts

Directions:

  1. Take the cream cheese out so it can soften.
  2. Add walnuts in a single layer to a baking sheet and then toast in the oven at 350 degrees F for about 5 minutes and then stair, and wait another 5 minutes (so total toasting ~10 minutes) until they smell fragrant and are golden in color, then remove from heat. Otherwise, give them another minute or two to finish toasting, checking frequently and watching so they don’t burn! You can also do this on the stovetop, which will toast it faster, but I already had to use a baking sheet for the swirls and didn’t want to wash a pan too. Let the walnuts cool.
  3. Sprinkle the flour on your work surface. Unfold the crescent dough and pinch the perforations to join all the triangles together – if you use the Recipe Creations package there will be no seams so it will save you a step. Spread the cream cheese onto the dough within 1/2 inch of the edge.
    Spinach or Squash Cheese Pinwheels
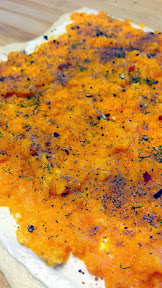
  4. Now top with the squash. Follow that with any seasoning if you’d like (for instance I used nutmeg and a bit of paprika and rosemary, but it’s up to you. Also sprinkle on top the 1/4 cup finely chopped walnuts – I admit I put mine on top because I forgot to add them when I was rolling it, but it would be better probably inside the roll rather then on top! Put the roll in the freezer for a bit so it will harden a bit, making it easier to cut and it will stay together more.
    Topping of cream cheese and squash for a Squash Pinwheel, further sprinkled by various spices and seasonings to taste Topping of cream cheese and squash for a Squash Pinwheel, further sprinkled by various spices and seasonings to taste
  5. When you’re ready to bake, heat the oven to 375 degrees F.  Cut the roll into 1/2-inch slices. Place the slices, cut-side down, onto a sprayed baking sheet.
    Squash Cheese Pinwheels
  6. Bake for about 15 or so minutes until the crescent dough is golden brown.
    Squash Cheese Pinwheels Squash Cheese Pinwheels Squash Cheese Pinwheels

These crescent roll pinwheels are going to be softer than the ones using pastry sheet, so using the walnuts or other kind of nut gives it more texture than mush. If you’d like you can also sprinkle brown sugar on the squash, or use other seasonings if you are not using chive cream cheese like I did. I neglected to use the chopped walnuts when I actually made these, but added them here because after testing this out, this is what the recipe needs and I wish I had.

I also wish I had a nicer camera because these photos do not do it justice. Unfortunately both days were dark so the lighting was terrible, leaving me only my kitchen lights and Picasa fill light brightening software tricks. It’s days like this that make me wish I had a better camera than my point and shoot. I use my trusty Panasonic Lumix that fits in my purse so is always available where my Android cameraphone will fail (any eating situation that isn’t in great daylight). The pictures just do not do justice to how wonderful both of these smelled baking, and how warm and comforting they were to eat and that you just kept picking up the next one to eat!

Both would make great holiday appetizers that you can prep before hand, roll and have in the fridge, and can be done baking in 15 minutes and are a savory option instead of cookies.

Signature

Bunk Sandwiches’ Vegetarian Sandwich Winter Edition

For Winter, it looks like Bunk Sandwiches have changed up their vegetarian sandwich combination from the roasted summer squash with romesco and ricotta they had earlier for a Roasted Brussels Sprouts, Apple Chutney, Gruyere & Horseradish sandwich. Thanks H for the tipoff and bringing it over for us to enjoy at Bailey’s Taproom’s Belgianfest… what you see here is with the extra addition of bacon though!

Bunk Sandwiches, Tommy Habetz, Roasted Brussels Sprouts, Apple Chutney, Gruyere & Horseradish sandwich

Signature

Smokehouse 21

Sometimes, you want to enjoy some bbq at home and lick all the meat juice and sauce from your fingers without any other eyes on you. Smokehouse 21's carryout (and delivered right to my front door through Delivered Dish, and I was able to use a free delivery code from a promotion at the time) was exactly what was needed.

I tried to put my order together on my phone on the way home, but couldn't seem to get the ordering to work for the whole order, so I had to wait until I can enter the full order from my computer at home. After confirming it online, I kept looking at the clock in anticipation- it's not often I can enjoy bbq since F is a vegetarian, but he was out of town, and again the free delivery code helped soften the guilty pleasure (usually there is a $6.50 charge- the delivery charge varies depending on the restaurant and distance). I know, how young and modern and urban to get delivery that isn't just pizza or Chinese right? I love city living.

Since it was my first taste of Smokehouse's bbq, I went with the bbq combo plate of half smoked chicken, brisket (Cascade Natural beef), and ribs (Carlton Farms) . Even though it came in a box since it was delivery, I think that at bbq competitions the same "presentation constraint" is given and bbq masters are judged on it, so it's fair game. As you can see, the clear takeout box was arranged cleanly, and seemed bursting with the bbq chicken and ribs.  I confess I don't remember if the sauces came inside or outside the box, so I might or might not have edited the original arrangement by putting that sauce in the container (or not).

I only took a few quick photos before getting all 10 fingers dirty and into the bbq, the aroma was irresistably enticing from the moment I opened the bag. Everything smelled wonderful- even Lobo the cat came out of who knows
where in the house (possibly his dog bed upstairs) suddenly to stare at
me, hopeful. The next morning as I came downstairs to go to work, the
scent of bbq still lingered from the combo plate.


My combination plate included 2 sides, and I selected to try out their tart yet tangy braised greens (with plenty of bacon pieces), and macaroni and cheese. I also got an additional side of a quarter pound of their pulled pork (Carlton Farms) so I would get to try four of the seven smoked meats they offer. Left out this time were the in-house made sausage, Lava Lake farms baby back lamb ribs, and Idaho smoked trout in lemon fennel butter.

Of all the things I ate, the mac and cheese was just sad, tasting as old and stiff as you see in the photo and I barely detected any of the supposed bacon in it. I made my own mac and cheese the next day to the creamy cheesiness I wanted to counter the vinegary acid of the braised greens and continue to finish my bbq dinner. I also found the pulled pork overdone, dry and needing the classic bbq sauce to punch it up with flavor- I could barely detect anything from sniffing the meat. On the other hand, the roasted chicken was adequately moist and only needed the teeniest of dips into the Carolina style mustard sauce.  

The brisket was as melt in your mouth tender as would be hoped for from smoking it for half a day, and whatever rub they use made it tasty enough to eat without any sauce at all, exactly how good I want my brisket to be. The same was true with the so easy to pull apart from the bone ribs. Both were  just good meat (and sourced locally) in its own juices and a bit of smoke and some seasoning and that's it.

Although the chicken and the ribs may have been the stars visually in the box, the brisket was definitely the highlight of the entire Smokehouse 21 experience for me.  

Signature

Alyssa + Matt 11/03/12

Congratulations to Alyssa and Matt! We were so honored to be able to witness your wedding day and share in the love at Cornelius Pass Roadhouse’s Octagonal Barn. Paper cranes and owls and gorgeous handmade floral arrangements designed by the bride were all charming touches everywhere, reflections of the thoughtful, whimsical, easy going and comfortable nature of this duo. The only missing manisfestation of them was barnyard kittens.

Everyone loved the wedding pies… not shown are the Lemon Cream which were stored in a cooler until pie time!

Signature