Butternut Squash and Ale Soup with Candied Almonds and homemade Mascarpone with Cambozola

Soup sounds simple, but it is deceptively so. For me, it’s important that the soup have structure and depth of flavor- that it’s not just a liquified puree and/or a bunch of swollen vegetables and meat. The way each spoonful feels texturally in your mouth and the flavors that are briefly there as it passes on your tongue and lingers afterward need to combine to be memorable.

I think this soup meets those above criteria I have, and is worth the time to create rather than from the store pre-made in a container. I happened to make homemade mascarpone, but you can certainly just purchase it to save some of the prep work.

Ingredients (for 6 people):

  • 2 teaspoons of extra virgin olive oil
  • 3 cups of stock- I used vegetable stock
  • 1/2 cup of diced white onion
  • 1/4 cup of diced celery
  • 1/4 cup of diced carrots
  • 1/2 cup of an ale or you can also use hard cider. I used Sam Adams Dunkelweizen
  • 1 cinnamon stick
  • 1/4 tablespoon of ground coriander
  • 2 pounds of peeled, seeded, chopped butternut squash
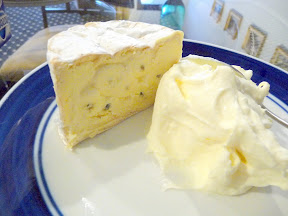
  • 1/2 cup of Mascarpone cheese, or make your own using 2 cups of cream and 1/8 teaspoon of tartaric acid as I did. This will yield 2 cups of Mascarpone.
  • 1/2 cup of Cambozola
  • 1 cup of cream – you can also use sour cream or some of the yield of the homemade Mascarpone (I did the latter)
  • 1/2 cup of water
  • 1 cup of sugar
  • 1 tablespoon of ground cinnamon
  • 2 cups of whole almonds- they should be raw, not roasted
  • To Taste: salt, and pepper

Directions:

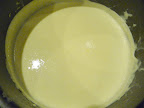
  1. If you are making homemade mascarpone, start with this step first the night before. Heat the 2 cups of cream in a saucepan to 180 degrees F over medium high heat, stirring and making sure it does not scorch. As soon it reaches 180 degrees F, remove from heat immediately and stir in the tartaric acid. You can find tartaric acid in the baking section of your grocery store, or you can go to a home brew or home wine store.
    Continue stirring for 1-2 minutes, and then transfer to a glass or plastic container and refrigerate for at least 2 hours so it can thicken. You can set a sieve over a bowl and line it with cheesecloth and pour in the mascarpone and let drain for an additional 10 hours in the refrigerator… This yields 2 cups of mascarpone cheese.
    making mascarpone recipe homemade making making homemade mascarpone
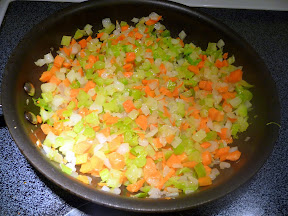
  2. Heat the olive oil in a saucepan, while in a large pot that is at least 2.5 quarts, you heat up the stock. In the saucepan, add in the mirepoix – aka the onion, celery, and carrots- and sweat them until they are soft
    mirepoix mirepoix
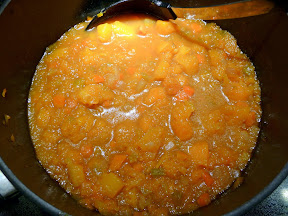
  3. Meanwhile, watch your pot with stock. Once the stock is boiling, turn down the heat to low and add the beer, cinnamon, and coriander and let it simmer to develop the flavor for about 5 minutes. Then add in the mirepoix and the squash and continue to cook, uncovered, for the next 25-30 minutes. The squash should start to get mushy and fall apart and incorporate into the liquid.
    For my ale, I chose to use Samuel Adams Dunkelweizen, which was one of the beers offered on one of their seasonal variety packs. I picked the Dunkelweizen because it is a dark wheat beer brewed with Bavarian yeast that has flavors and aromas of clove and nutmeg with a tiniest hint of citrus and finished with malted wheat, so sounded like it would be a good mix with the rest of the vegetables and seasonings.
    Butternut Squash and Ale Soup with Candied Almonds and homemade Mascarpone with Cambozola Butternut Squash and Ale Soup with Candied Almonds and homemade Mascarpone with Cambozola Butternut Squash and Ale Soup with Candied Almonds and homemade Mascarpone with Cambozola
  4. Remove the pot from heat and remove the cinnamon stick and let the soup cool until it is warm. You don’t want it to be hot because you are about to puree everything!
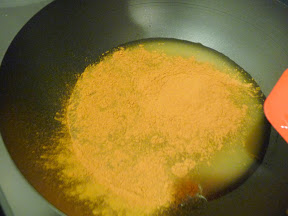
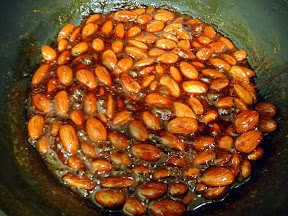
  5. In the meantime, combine the water, sugar, and cinnamon in a saucepan over medium heat and bring to a boil and then add the almonds.
    Butternut Squash and Ale Soup with Candied Almonds and homemade Mascarpone with Cambozola Butternut Squash and Ale Soup with Candied Almonds and homemade Mascarpone with Cambozola Butternut Squash and Ale Soup with Candied Almonds and homemade Mascarpone with Cambozola Butternut Squash and Ale Soup with Candied Almonds and homemade Mascarpone with Cambozola
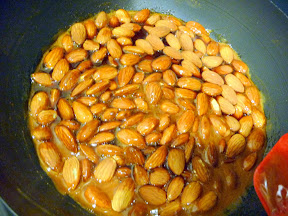
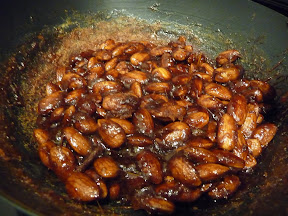
  6. Cook and stir the almond/sugar water mixture until the liquid evaporates and leaves a syrup-like coating on the almonds. Pour the almonds onto a baking sheet lined with waxed paper and flatten to help the almonds cool. Cool for about 15 minutes- and it is totally ok to sneak a few warm nuts as a snack! This is more than you will need to garnish the soup, but it will probably be gone in just a day or so (a handful at a time- because you can’t just have a couple), so don’t hesitate to make this amount.
    I know right, super easy! This will smell so good too. I always want to get these whenever I smell those little carts selling paper cones of candied nuts and you can eat them warm if you’d like. Or, you can add them like I did to soup. or to salad, or mix it with pretzels and peanut butter chips or chex etc. for a snack mix. I used almonds, but you can use any nut you’d like. You can also add vanilla or chili/cayenne/hot sauce for additional seasonings instead of cinnamon.
    Butternut Squash and Ale Soup with Candied Almonds and homemade Mascarpone with Cambozola Butternut Squash and Ale Soup with Candied Almonds and homemade Mascarpone with Cambozola Butternut Squash and Ale Soup with Candied Almonds and homemade Mascarpone with Cambozola Butternut Squash and Ale Soup with Candied Almonds and homemade Mascarpone with Cambozola Butternut Squash and Ale Soup with Candied Almonds and homemade Mascarpone with Cambozola
  7. Once the soup so far is cool enough, mix in a blender on high in batches to puree the soft vegetables until smooth.
    Butternut Squash and Ale Soup with Candied Almonds and homemade Mascarpone with Cambozola
  8. Take out the mascarpone and the cambozola and let it warm to room temperature.  You will then mix the 1/2 cup of the mascarpone with 1/2 cup of the cambozola to make a cheese mixture
    Butternut Squash and Ale Soup with Candied Almonds and homemade Mascarpone with Cambozola Butternut Squash and Ale Soup with Candied Almonds and homemade Mascarpone with Cambozola
  9. Warm the soup at low heat, stirring 1 cup of the mascarpone, until it is at a temperature to serve (definitely do not get to boiling). You can also just use another substitute to make the soup creamier in texture and taste, such as light sour cream or tofutti- I didn’t have another use for the rest of the mascarpone and decided to use it here but the soup definitely missed the cream. Instead, use the rest of the mascarpone to make tiramisu or with fruit or in other desserts, try to use it in a few days while it is fresh and has that subtle sweetness.
  10. When serving, sprinkle the candied almonds on top of the soup and garnish with the cheese mixture. How pretty and fancy!
    Butternut Squash and Ale Soup with Candied Almonds and homemade Mascarpone with Cambozola Butternut Squash and Ale Soup with Candied Almonds and homemade Mascarpone with Cambozola

Making the candied almonds makes your place smell so festive with the cinnamon scent! The optional step of making homemade mascarpone is extra credit but also pays off as  you will taste how fresh and subtle the sweetness can be, and the garnish of the mascarpone cambozola cheese allows you to add just a touch of creaminess and cambozola is a nice mix of the richness combining the butteryness of a brie type cheese but with a bit of tangy punch akin to blue cheese. Using the squash makes this soup so seasonal too, and the ale gives you the ability to give this a depth of flavor beyond just the average butternut squash soup.

I started to get a cold (sore throat, sniffles, cough) a little bit after making this soup and having this for lunch was so comforting. Whether you are feeling sick or not, it’s a nourishing remedy for the dark cold days this time of year and a perfect holiday soup that is wonderful for all winter season.

Signature

Maple Roasted Brussels Sprouts

I didn’t know how much I liked brussels sprouts until I had these at a elegant dinner at a restaurant, and a few days later I was looking up how to make these myself. And, it turns out it is incredibly simple.

Ingredients (serves six as a side dish):

  • 1 1/2 pounds of brussels sprouts
  • 1/4 cup olive oil
  • 3/4 teaspoon sea salt
  • 1/2 teaspoon freshly ground black pepper
  • 3 tablespoons of maple syrup
  • Optional: 1/2 cup of hazelnuts

Directions:

  1. Preheat the oven to 375 degrees F.
  2. Cut all the brussels sprouts in half. If you can, buy them on the stalk as shown as they stay fresher and I think taste better than when they are purchased removed. Cut the stems off and remove any yellow or brown outer leaves. When I bring these home from the farmers market boy were they a heavy “bouquet” to carry across my arm as I walked up the hill like I was crowned a pageant winner…
    brussel sprout stalk
  3. Toss the brussels sprouts with the olive oil, maple syrup, salt, and black pepper- the best way to mix this is honestly by (clean obviously) hand to make sure it is all distributed to all your sprouts.
    Maple Roasted Brussels Sprouts
  4. On a baking sheet tray that is lined with foil or parchment paper (the tray will get messy from the caramelization process), spread all the brussels sprouts so they are all even and flat.
    Maple Roasted Brussels Sprouts Maple Roasted Brussels Sprouts
  5. Put in the oven and after every 15 minutes, turn over the brussels sprouts to even out the browning. After 45 minutes or so, they should be fork tender. Optionally, you can add hazelnuts in the last 10 minutes to toast them to add some crunch to your brussels  sprouts dish
    Maple Roasted Brussels Sprouts Maple Roasted Brussels Sprouts

I know I said these could serve six as a side dish, but I have also totally made these as a lazy weekend lunch and eaten these just by themselves too!

Signature

Homemade Biscuits

For Thanksgiving, a request was made (um… even though she went to the same class and also got the  recipe 😛 ) for biscuits. Sure! I’ve always wanted to try to make biscuits. After all, having them relatively a short period time after taking them out from the oven, when they are still quite warm but moist and light, is key.

Unfortunately, dining out and the realities of a restaurant kitchen means many times the biscuits were made and waiting before I even order  so are not the temperature I am hoping for, and may even have hardened or dried some and have to be saved by other items in the dish, likely gravy. But, I also knew that the consistency from working the dough is key to making good biscuits, and worried that I would get all excited making them and then be disappointed at the end product.

So I was glad I had the experience of learning this recipe with professionals making it during a class rather than just following a recipe I picked out. Thanks to having it during the class I also knew what these biscuits would taste like instead of guessing from photos or videos. This is the recipe I used, but there are many out there that use shortening, or add rosemary or chili or cheese. There are so many variations of biscuits out there but yet each has their own distinct taste and personality. This one is very very light and fluffy, they felt like air.

Ingredients (serves 8):

  • 1/2 cup butter, frozen
  • 1 cup all purpose flour
  • 3/4 cup wheat pastry flour
  • 2 tablespoons sugar
  • 2 1/4 teaspoons baking powder
  • 1/4 teaspoon baking soda
  • 1/2 teaspoon salt
  • 1 cup heavy cream
  • 2 tablespoons white wine vinegar

Directions:

  1. First, you put the butter in the freezer. This will then allow you to very coarsely grate the butter. I have gotten so much use from this grater from Ikea
  2. Combine the cream and vinegar, which is essentially making homemade buttermilk, and keep in the refrigerator so it stays chilled, and the acid can do its work. It will look like its curdling a little after 5 minutes, which is normal. You can substitut e other acids as well in the same ratio, most commonly lemon juice or another kind of vinegar like apple cider vinegar.
  3. Meanwhile, combine the flours, sugar, baking powder, baking soda, and salt together in a large mixing bowl- I just sifted it all together by hand. Also, have a well floured working area established . If you can, put your dry mix in the fridge so it can also be cold while grating the butter.
  4. Now grate (use the largest holes for your grater)the cold butter, and put into the dry mix and again using your hand, just mix it together briefly. It will still be pretty gritty, including still having pea size pieces of butter/dry mix. Don’t overmix- that is the enemy of soft fluffy biscuits, and your want the butter to stay cold so it will melt during the baking process and create air pockets while the biscuits rise in the oven.
  5. Next, gently add the cream, parts at a time, into the butter flour mix. Each time you add the cream, use your hand (flour it first!) to fold the bottom mix on top of the cream, and fold several more times, and then add the next parts of cream. Do this until a soft dough forms, no need to knead… again being careful not to overmix so that the combination of liquid and flour doesn’t form too much gluten and get tough (this is also why the recipe uses pastry flour not just all purpose) and also that the dough stays cool so heat doesn’t activate the dough until oven time.
  6. Press the dough onto your floured work area and press, using as few rolls of the rolling pin and a pastry scraper (I use the OXO Pastry Cutter which also handily dandily has a ruler with its blade) into a rectangle that is 1/2 inch thick.
  7. Fold the sides of the dough in (1/3 from the right, 1/3 from the left), and sprinkle some flour on the top of presumably your new square. Rotate your square dough thingy 90 degrees and roll to 1/2 inch thick. Repeat until you have gone all the way around, aka a total of 4 folds into squares.
  8. On the last press, leave it in the 1/2 inch rectangle and cut into squares. I like biscuits to be very doughy rather than flakey, and cut them into these giant triangles instead that are essentially croissant size! I only was meaning to feed four people anyway, so 8 pieces so it was 2 per person seemed good to me (somehow the same amount but less greedy than if it was 4 regular pieces per person). If you are feeding more, do the squares- you’ll get 16 pieces that way. I don’t do round biscuit cutters because then you have scraps that when you try to put together, will probably be tougher. You also don’t want the biscuits any larger than these as they might still be undercooked inside then.
  9. At this point, you can now let them rest for 30 minutes in the refrigerator while you preheat the oven to 500 degrees F. Or, you can let them rest, and then place the biscuits on parchment paper and freeze until they are all frozen solid (important so they don’t stick together), and then put in freezer bags to pull out individual biscuits to bake just what you need.
  10. When it’s time to bake the biscuit, place on a well greased sheet pan, each about 1 inch apart, you don’t want them too far or the biscuit will spread instead of rising high. Reduce the heat from your now hot oven to 450 degrees F.  Bake until golden brown- about 12-15 minutes, slightly longer if you are baking them from frozen.

The recipe said “cool and serve”, but of course these are best all fresh and warm! And, it will make your place smell so awesome. If you’d like, brush the tops with melted butter.

Signature

Cornbread Stuffing – Veggie Version

It’s time for the Thanksgiving 2012 recipe roundup! The best cornbread stuffing I’ve made so far was from a whim 2 years ago. I modified a recipe I had seen by Michael Symon on Food Network. For some reason I had watched him make this in an episode- unusual because I don’t watch him at all but his show happened to be on and my TV still on Food Network. But, what I saw was so intriguing for a stuffing I looked it up online to print his recipe, and used that as my cornbread stuffing inspiration.

The cornbread is one that I made from a mix the day before thanks to Trader Joe’s. When it came to the smoked ham in his recipe I substituted a smoked veggie version, and of course vegetable stock for chicken stock. Meanwhile for the vegetables I replaced his call for red peppers with Thai red chilis (though in less quantity because I did want to keep my stomach lining). I used Thai red chilis because I had them in my herb garden, but you can easily substitute any other diced pepper you would like, or even spicy seasoning instead.

I also changed out the corn because I thought there was enough corn in the cornbread which had kernels already in it. I also used diced carrots, making use of a classic mirepoix as the base then of this stuffing. I’m not a fan of parsley and cilantro, so I went with dill, sage, and rosemary as my seasoning herbs.

The stuffing turned out visually quite pretty, and was even better the next day as a leftover. The “ham” even in the veggie version gave it a hint of smokiness, and the Thai red chilis a bit of extra zing of heat now and then.

Ingredients (serves 6):

  • 4 tablespoons butter
  • 2 cups chopped yellow onions
  • 1 cup chopped celery
  • 1 cup choped carrots
  • 2 tablespoons minced garlic
  • 1 package of diced smoked vegetarian ham- I used Tofurky Hickory Smoked flavor deli meat, but Yves or Lightlife could work as well
  • 2 eggs
  • 3 cups vegetable stock
  • 1/2 cup heavy cream
  • 2 tablespoons chopped rosemary
  • 2 tablespoons chopped sage
  • 2 tablespoons dill
  • 2 tablespoons of diced Thai chili pepper, but you can use any other pepper but adjust based on the heat you want
  • Salt and freshly ground black pepper
  • 8 cups cubed and toasted cornbread – I used Trader Joe’s cornbread mix and prepared per directions on the box. I think TJ’s mix is the best mix out there in terms of taste and texture

Directions:

  1. Preheat oven to 375 degrees F.
  2. Melt butter and sweat the celery, onions, and garlic until tender. Add ham and cook
    over low heat for 2 more minutes. Set aside to slightly cool.
  3. Whisk together eggs, stock, cream and herbs and chilis, and season with salt and pepper
    to taste. Combine all items, including cornbread, in a 4 quart pan.
  4. Cook covered for 30 minutes. Then uncover and cook for additional 20
    minutes or until crusty on top.
  5. Optionally, since when I picked the peppers I had some extra left I also sprinkled a bit more on top before serving the dish to make it look nice- you can do the same with extra herbs also.
Signature

Making CoCo Ichibanya’s Curry

When I was in Japan for work back in March of this year, CoCo Ichibanya was highly recommended and raved about by my youngest sister J. So on my last night, I wandered lost along the neighborhood of Shibuya Crossing, trying to find CoCo Ichibanya’s Curry House, as mentioned in a previous post. When I finally found it (apparently having passed it at least twice- there are so many bright signs that I missed it), I finally got to enjoy a comforting Japanese curry  dinner of level 4 heat curry with chicken katsu and mushroom. While paying for my meal, I also bought two curry mix packages to take back to to the US, one pork and one vegetable, to take home.

My sister informed me there is now a branch of CoCo Ichibanya’s Curry House in LA (the first on the US Mainland), so it looks like when my family gets together this Christmas holiday, we will be able to visit. There’s no reason for me to horde my CoCo curry mix anymore. So, thanks to the internet, I decided to give it a try, including even trying to katsu up some tofu.

Ingredients (enough for 2 people):

  • 2 tablespoons of olive oil
  • Diced onions
  • Mixed diced vegetables of your choice
  • Coco Ichiban’s Curry Mix (I happened to use Vegetable)
  • Tofu (you can also use meat of course such as pork or chicken cutlet)
  • Flour
  • 1-2 egg (start with one and add another if you run low)
  • Seasoned breadcrumbs and/or panko
  • 1/4 cup vegetable oil
  • Steamed Rice (I used my standby jasmine rice)

Directions:

  1. Heat a sauce pan, pour in the olive oil, and saute the onions until caramelized. Add in the mixed vegetables and lightly saute for a few minutes.
  2. Drop the heat to medium-low. Squeeze in the curry mix. Let thicken, stirring occasionally while preparing your katsu tofu/meat. The one from Coco is liquid and already included some veggies, but I’m glad I added more as mine were fresher and crunchier versus the mush in the bag… though maybe I went a little overboard in quantity of veggies.

    But, often times the Japanese curry mix you find is actually hard and in blocks, similar to chocolate. So if you have that kind break it into pieces so it will melt. As it melts, for this curry block kind because the flavor is more condensed, start adding water, starting with one
    cup, to taste. You will want to do this in steps as the flavors opens up and develop. When it is all melted, depending on how it tastes to you, you can add more water, or some brown sugar to sweeten it, or add more heat with cayenne, or even sprinkle in some cheese for richness. Let the curry simmer on low, and remember that the Japanese curry should become thick almost like gravy, not like soup.
  3. Meanwhile, with the tofu, since I was not using meat there was no need to pound it into tenderness. If your tofu is not fresh and comes in a liquid, you will want to put it on paper towels and put something heavy (I use pans) to press it to squeeze the moisture out. Otherwise, if you are using meat, pound it out so it is about 1/2 inch in thickness.
  4. In a shallow bowl, combine breadcrumbs with salt, pepper and other desired seasonings, and or panko. I only had a little bit of panko left, and so I mixed the panko and some seasoned breadcrumbs together to get enough for two people’s worth. Dredge the tofu or meat in flour, then the whisked egg, then in the mix of seasoned breadcrumbs/panko and until evenly coated. I like doing this dredging using chopsticks, but need the fork to help turn over the tofu in the egg bowl.
  5. Cook your tofu or meat a skillet with 1/4 cup vegetable oil, shallow pan frying them about 5 minutes each side if you are using meat but shorter for tofu since you are just browning it no fully cooking it. To start you probably want to start with a smaller piece just to check the heat of the oil first. Drain your fried goodies on paper towels.
  6. The prettiest presentation for serving the curry is by first plating the white rice on half a plate, putting the curry on the other half, and place your crunchy tofu/meat on top of the curry so it will stay crispy. Or, I went the practical way which is using a bowl and putting in the rice, curry, and then topping with the tofu.

This was ok – definitely not as good as actually going to CoCo house and having the real deal. I wish I had mushrooms in the pantry for this, but had used them up earlier making a mushroom creme sauce on pasta. And, somehow I haven’t been able to recreate the kind of taste of katsu that I experienced in Japan- the texture was right with this panko breadcrumb mix, but not the taste. It must be something with the panko they are using- even katsu in the US  I get doesn’t taste the same way, yet at least 3 places in Tokyo were blowing me away with their versions. Now that I’m out of panko, I am going to specifically get my next batch from an Asian grocery store.

Well, I have something to look forward to next month in LA!

Signature