Cheese Soufflé 101

Soufflés have a reputation of being difficult, but there are only two things you need to be concerned about. Both relate to timing.

First, you need to keep the egg whites as full as air as possible so don’t overmix and as soon as the egg whites have been beaten, you want to quickly get it into the soufflé and into the oven.

Second, it doesn’t look quite as nice if you wait too long to serve it, so timing the prep and cooking time so you can immediately eat your soufflé with your family/guests when done is important before it deflates too much. I like these as a nice lazy Sunday activity, so I only have to worry about myself and I don’t care about deflation. Though, you can also cover up deflation with sauce or cheese or other such toppings, so not really worth sweating over anyway- the only thing you’ve lost is the ability to impress with its looks- it will still taste fine!.

I decided to make soufflés for the first time because it was somewhat fresh on my mind after a Dr. Who episode (Asylum of the Daleks) in which one of the characters made soufflés.  I also had some leftover cheddar from making some beer cheese (upcoming post). I have read in several places that you can make the base of a soufflé a day ahead and refrigerate it, stopping before adding the egg yolks. Just reheat your roux a bit the next day if premade to loosen it before whisking the egg yolks in and continuing on in.

This recipe is enough for 6 servings (usually the rule of thumb is 1 egg per serving). There are plenty of recipes out there that combine more interesting flavor combinations of ingredients, but in my case since I was trying to use up some eggs and cheese leftover from other recipes, so kept it simple. You can definitely reduce this to 2, 3, and 4 egg variations as well.

Ingredients:

  • Enough butter to butter the size and bottom of your soufflé container(s), plus 3 tablespoons of butter for the soufflé itself
  • 3 tablespoons all-purpose flour
  • 1-1/2 cups milk
  • 1/2 teaspoon kosher salt
  • 1/2 teaspoon freshly ground black pepper
  • 1/4 teaspoon cayenne pepper or other spicy addition (I used chili powder)
  • 1/4 teaspoon ground nutmeg
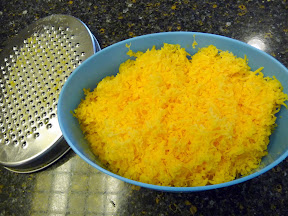
  • 2  cups lightly packed freshly grated cheese, in this case I used extra-sharp aged cheddar (8 ounces). I like freshly grated rather than that from a packaged because it has more flavor and the ones in the bag seem to have additives to them that coat the cheese.
  • 1/4 cup finely grated fresh Parmigiano-Reggiano, plus enough (a couple tablespoons at most) to dust the inside of your soufflé container(s)
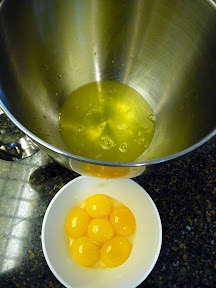
  • 6 egg yolks
  • 7 egg whites
  • 3/8 teaspoon cream of tartar or lemon juice (optional- I did not use this)

Directions:

  1. First, an hour or so in advance take out your eggs and separate the yolks from the whites. This step is because it is easier to separate the yolk and whites when the eggs are cold, but the egg whites whip up better for step 8 at room temperature. You can return the egg yolks to the fridge, but let the egg whites stand out, covered, on the counter.
    Also, even though I have an egg separator, I never use it. I still always use my hand to separate eggs, letting the whites run through my fingers and wondering how fertilized versions of these form into fluffy chicks (or any other form of life starting from an egg) as the snotty-like whites drip. It’s both messy and gross while simultaneously filling me with wonder.
    alt=
  2. Butter the bottom and sides of an 8-cup round ovenware dish or two 4-cup round dish, or multiple small 1-2 cup dishes, whatever round container dish you may be using. Make sure that it is round, and that there is at least 1/2 inch from where the souffle will be and the top of the container so it can rise the 2-3 inches in the baking process. Some people actually place them in smaller containers in order to show off the rise more.
    After the buttering, then dust it with the grated Parmesan (turn it on its side and sprinkle the grated cheese through your fingers as you rotate the container). You want this ready because once you get to the get to the egg white step, you want to be able to get it in the oven with as much air as possible.
    alt=
  3. Heat the oven to 375 degrees F – you will need it to be ready temperature wise before you add in the egg whites. Grate or shred your cheese if you haven’t already. With fine grated cheese I can use my measuring cup, but for shredded cheese I prefer my digital scale (ok, this is the first time I’ve used it, but it was awesome!) since different cheeses may pack differently.
    alt= alt=
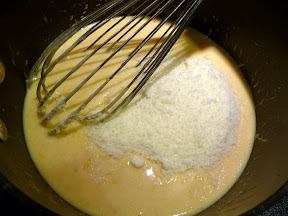
  4. In a medium saucepan, melt the 3 tablespoons butter over low heat. Then, add the 3 tablespoons of flour and whisk until smooth and a light tan- now you have a roux from your equal parts fat (butter) and flour.
    alt= alt=
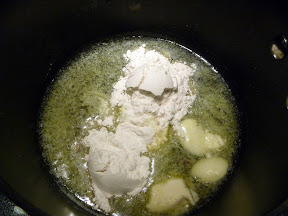
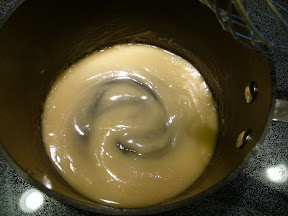
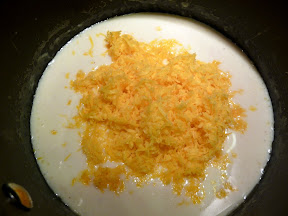
  5. Meanwhile, microwave the milk for 45 seconds so it is slightly warm but not too hot to the touch. Pour in the milk into the flour and butter, whisking constantly. Bring the sauce to a very gentle boil and cook, whisking frequently, for 2 to 3 minutes until thickened.
    Use the coat the back of the spoon test for this- if you put liquid on the back of the spoon, hold it vertically and draw a line, the liquid should not run because it has enough tension and thickness to not cross that drawn line. This is a béchamel sauce, one of the mother sauces of French cuisine.You’ve got the basic foundation for white sauce for many recipes!
  6. Remove the heat from the pan. Whisk in the nutmeg, cayenne, salt and pepper, then slowly in steps add the cheese so it is melted- so now you have turned your béchamel sauce into a Mornay sauce (Béchamel with cheese).  Yes, you’ve made roux and now béchamel and mornay on your way to make your soufflé, leveling up your experience in  French cooking a la the videogame Cooking Mama…
    This is the point to taste and make sure it is very well seasoned as you are about to add the eggs which are going to be for texture, not taste. Remember the egg addition will dilute the flavor a bit, so overseason to account for this.
    alt= alt=alt=
  7. Make sure this mixture is not very hot, as you don’t want the egg yolks to scramble or temper at all and ruin the texture when you whisk in the egg yolk. After that you may even want to set it aside a little longer until the mixture is lukewarm.
  8. As an extra note, if you want to add more to your soufflé – let’s say bits of bacon or ham, or pre-cooked spinach, broccoli florets, etc, this is where you would do so.
  9. Ok, it’s time for the important egg whites. The oven should have reached the right temperature by now before this final whisk, because this is going to go down quickly! Is it ready? Ok! Next, in a large bowl, whip the room temperature egg whites, slowly at first until they’re quite foamy, and then increase the speed (an electric mixer can really help out your whisking arm) . Whip until thick defined peaks form and then stop (otherwise you will start making it look like a meringue). I know some people use cream of tartar or lemon juice, both acids, to further fluff their whites but I did not use it (just use 1/8 teaspoon for every 2 eggs).
    alt= alt=
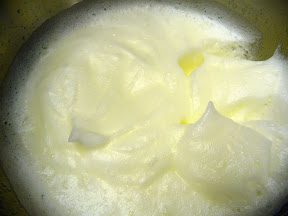
  10. Hopefully by now your cheese sauce has reached room temperature as well. Put a 1/4 of the egg whites into the cheese sauce and fold the two together once. Turn a quarter turn and repeat, scooping from the bottom and just gently folding the mixtures together from one side to your other hand to preserve as much volume as possible.
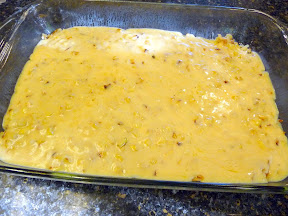
    Put in the next quarter of egg whites, and repeat the casual folding and turning, until all the whites are added. You do not need to worry about blending all the whites streaks, remember the key is to add and keep as much air as possible. You are barely mixing the two together, it does not need to look homogenous.
  11. Gently pour the soufflé batter into the buttered mold. Now I forgot this step, but you can use a knife to flatten and swirl the top of your soufflé and then depress all around the edges by the dish so when it does rise, it will have a center plateau like in those professional versions. I was getting hungry and just put it straight into the heated oven after the pour.
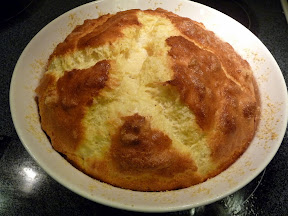
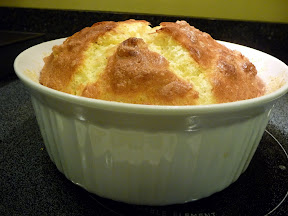
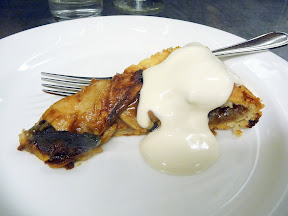
    Oh well- it pretty much gets destroyed when you dig in for your serving anyway, so its a brief moment of fluffy looking loveliness- and is also why I don’t know why people make such a big deal about it looks a bit deflated, though I do understand the accomplishment of making something that looks so professional and you have heard for so long is difficult (say, Beef Bourguignon, which sounds both delicious and so classic but is really an insane amount of work for a beef stew). As you can see from this recipe for soufflé though, it is more straightforward as long as you pay attention to the timing.
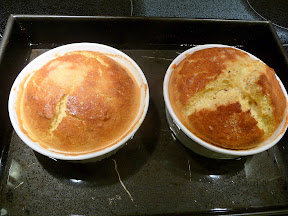
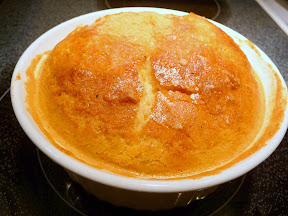
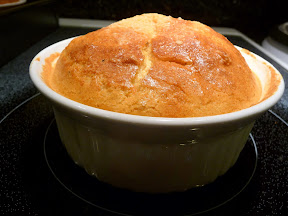
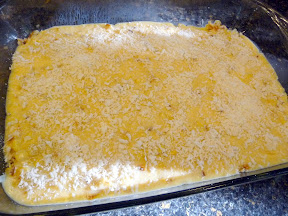
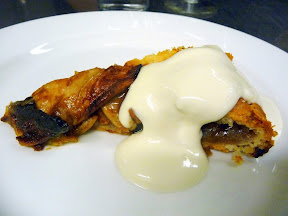
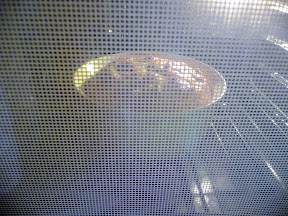
    As I had mentioned before, toppings can help make it look more attractive, and it should still be fluffy and light inside for actual eating. I actually was a bit charmed how mine sort of reminded me of a hot cross bun, or a volcano, either way it was teasing me by showing me its airy cheesy insides as a tease.
  12. Cook until the soufflé is a golden brown on the top, approximately 22 to 30 minutes. I don’t know if this is true enough, but I’ve heard to not open the oven for the first 20 minutes or the soufflé may fall. If you insert a knife it should come out clean so you know the liquid has cooked through. For smaller bowls, I have put it in a pan and then poured water in the pan so that it goes up halfway up the smaller dish.
    alt= alt=

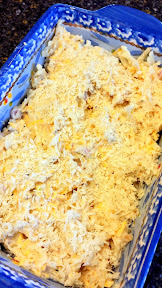
It will deflate as you take it out of the oven, and then continue to further do so over time, so you want to serve this immediately. To serve, you probably want to put your soufflé dish on a platter, with a towel underneath the soufflé dish.

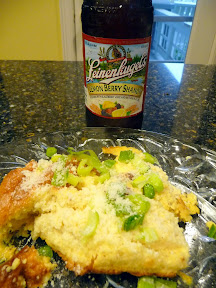
Consider serving your soufflé with some fresh crusty french bread and a bright salad, and a French wine, or try it topped with a tapenade or salsa. I went with a citrusy berry beer that happened to be on sale at the grocery store, Leinelkugel Lemon Berry Shandy, a Weiss style beer with blackberry juice and lemon flavor, and topped my serving of soufflé with more grated Parmesan and chopped green onion.

alt= alt=alt="cheese alt= alt= alt=

Signature

Hash Brown Casserole

My kitchen remodel is finally done! It looks great- now instead of all the white which always had me looking around to wipe up food stains and splatters and spills, I can relax with the darker tone. I also love the Cambria quartz countertop, so much more useful than the countertops we got with the house in that they are so easy to clean and keep clean and can be used as a great workspace since it is a harder surface. Unlike granite it is also more durable, while still looking like beautiful natural stone (it actually is a combination of natural quartz and man made extras) and without worrying about sealing it.  And, the best part of which was part of the costs of the countertops was gifted by Floform Countertops!

Yes, that’s right! I had entered their national contest hoping to win their grand prize, which included both a kitchen remodel and a catered party, but I was so excited to have won a secondary price which was a generous credit towards countertops. Even when we were purchasing the house, a kitchen update has been on my wishlist. One thing led to another as we were looking at our many countertop options, and we went from just replacing our wine stained white countertops to wanting better looking cabinets to go with the beautiful quartz.

And then we decided on redoing our floors so we had more flexibility in our cabinet layout (particularly the “island” which was meant to have breakfast stools was never used that way, and we wanted more depth for in-cabinet garbage cans) and which would be more comfortable to stand on and clean than old Italian terra cotta tiles, some of which were cracked from the previous owners. And, we repainted the kitchen walls a “Butter Up” yellow.

Amazing what those countertops inspired us to do because they were so elegant. Here are before and after pictures of the previous green walled, white kitchen to the new look. I particularly love how we have so much more room for all our beverage glasses…

Hash Brown Casserole, a breakfast casserole that feeds a group and is vegetarian and easy Hash Brown Casserole, a breakfast casserole that feeds a group and is vegetarian and easy
Hash Brown Casserole, a breakfast casserole that feeds a group and is vegetarian and easy Hash Brown Casserole, a breakfast casserole that feeds a group and is vegetarian and easyHash Brown Casserole, a breakfast casserole that feeds a group and is vegetarian and easy Hash Brown Casserole, a breakfast casserole that feeds a group and is vegetarian and easy

During the kitchen remodel though, I was out of a kitchen for 5 months, from late spring to early autumn! Oh well. At least now I love coming into my beautiful new kitchen! During the kitchen outage though, there were some ingredients that just sat around since the stove and oven were unavailable, and when I unpacked everything back into my new cabinets I started to realize I needed to start using some of these pantry items up soon before they expired.

Some of these ingredients included some dehydrated dried hash browns from Costco, panko bread crumbs from Trader Joes’s, a can of condensed Campbells cream of chicken soup, leftover Mexican shredded cheese from a taco dinner, and some corn kernals in the freezer. What immediately came to mind was this recipe, which I have seen passed around on several websites, a copycat recipe for Cracker Barrel’s Hashbrown Casserole. I’ve only been to Cracker Barrel’s once, and I didn’t even have the Hash Brown Casserole when I was there, but I’ve seen the signs and saw rave reviews for it, so was curious to try it anyway.

Ingredients:

  • 2 pounds frozen hash browns, thawed (my package had 24 oz, and was dried and I had to use water, but I used it anyway)
  • 1/4 cup olive oil
  • 2 cups corn kernals. The original recipe uses 1/2 cup chopped onion, but I didn’t have any on hand but I did have corn, and I upped the amount since I was using 24 oz of hash browns.
  • 1 tablespoon butter
  • 1 can (10.75 ounces) condensed cream of chicken soup + 1 can of water (the recipe just calls for 1 can of regular cream of chicken, but I only had condensed. This is going to make my version more mushy)
  • 8 ounces sour cream, though you can also use tofu sour cream or yogurt as a substitute
  • 1 cup grated colby cheese, although I used reduced fat shredded Mexican Cheese instead
  • 1/4 cup panko bread crumbs – or you can also use crumbled potato chips or crunchy onion

Directions:

  1. Preheat oven to 400 degrees F. Spray 11 x 14 inch casserole or baking dish with cooking spray.
  2. Fry the hash browns until they are crispy in a pan with the olive oil (I put in half the olive oil to cook the first side, and then the second half for browning the second side of the hash browns). Remove and put into an even layer in the casserole dish.
    Hash Brown Casserole, a breakfast casserole that feeds a group and is vegetarian and easyHash Brown Casserole, a breakfast casserole that feeds a group and is vegetarian and easy
  3. Meanwhile, I used the same hot pan right after removing the hash browns to pan fry the corn until a little burnt with the 1 tablespoon of butter.
    Hash Brown Casserole, a breakfast casserole that feeds a group and is vegetarian and easy
  4. Combine all the ingredients (except the hash browns and panko) and stir together. Pour the mixture on top of the hash browns in the casserole dish. Top with the panko.
    Hash Brown Casserole, a breakfast casserole that feeds a group and is vegetarian and easy Hash Brown Casserole, a breakfast casserole that feeds a group and is vegetarian and easy Hash Brown Casserole, a breakfast casserole that feeds a group and is vegetarian and easy
  5. Bake for 45 minutes until top is golden brown. Let cool for 15 minutes so when you cut the casserole it will stay more together as wedges.
    Hash Brown Casserole, a breakfast casserole that feeds a group and is vegetarian and easy Hash Brown Casserole, a breakfast casserole that feeds a group and is vegetarian and easy

Other twists you can add into this casserole is adding meat (Italian sausage particularly comes to mind), or some spiciness or other veggies (especially that which could add some crunch- such as adding chopped celery) and chopped nuts, it is very versatile and I can see it as a good base for many side dish variations. Who says hash browns are only for breakfast?

When I had my piece, I sprinkled a little bit of crushed red pepper on it and ate it in front of the tv, cuddled under a blanket with my kitty while F was out of town for work. Other pieces were fine during the rest of the week warmed up for lunch. Serves as a side dish 6 people.

Hash Brown Casserole, a breakfast casserole that feeds a group and is vegetarian and easy

You can also halve this recipe, and do it without the corn, as in below for just the 2 or 4 of you!

Hash Brown Casserole, a breakfast casserole that feeds a group and is vegetarian and easy Hash Brown Casserole, a breakfast casserole that feeds a group and is vegetarian and easy Hash Brown Casserole, a breakfast casserole that feeds a group and is vegetarian and easy
Hash Brown Casserole, a breakfast casserole that feeds a group and is vegetarian and easy

Signature

Caprial + John’s Sunday Supper Tuesday

I recently attended a Caprial + John cooking class. This class was titled “Sunday Supper Tuesday” because the class was being held on Tuesday Oct 9th at 6:30pm, but was composed of recipes that would be perfect for a family Sunday dinner. The various menu items for the class included

  • Roasted Garlic Goat Cheese Dip with Crostini
  • Cappy’s Biscuits
  • Bacon Cured Pork Chops with Honey Glaze
  • Roasted Cauliflower with Crispy Breadcrumbs and Garlic
  • Parsnip and Caramelized Apple Puree
  • Apple Pie with Cheddar Crust

All my previous experiences with John and Caprial had happened to be in the summer, where they had held a supper club dinner and one cooking class both which were held at their beautiful home property (and which I blogged about previously). This time, I got to experience a class at a more professional location, Abby’s Table for the Kitchen at 609 SE Ankeny.

Similar to the setup at their home, they had lots of tall stools/chairs placed around the kitchen area so we could observe as they demonstrated the cooking techniques and their recipes coming to life, step by step. They also had long tables set up for when we could then eat the results of their demonstrations as our dinner not far away. Their recipes are already printed out and stapled together at the beginning of class so that as they were talking through creating each dish, you can write down any notes or extra tips they shared. As before, it is BYOB, whether your beverage be soda or beer or in most cases, bottles of wine.

We started out with the appetizer of roasted garlic goat cheese dip, which was placed in the oven and then we were served while we continued the class. I appreciate this pacing where we were allowed a snack, especially since as we get into more of the dishes the kitchen begins to smell torturously tantalizing. This dish was very quick, though they had already prepared the roasted garlic beforehand and just summarized what it took and showed us the end result because, well it is slow-roasted garlic.

Caprial + John’s Sunday Supper Tuesday cooking class roasted garlic goat cheese dip Caprial + John’s Sunday Supper Tuesday cooking class roasted garlic goat cheese dip Caprial + John’s Sunday Supper Tuesday cooking class roasted garlic goat cheese dip

Meanwhile, Cappy carefully instructed us on how critical it is not to overmix the pie dough or the biscuits, and showed us how even though the mix didn’t look that smooth or pretty, how it would turn into moist tenderness later. She also advocated not using biscuit cutters because of the extra dough you end up having to reform and cut again, resulting in tougher biscuits- instead, she utilized a pastry dough scraper to create triangle pieces.

Seeing an experienced chef who’s done them hundreds of time from start to finish is definitely a great way to see exactly what it needs to look like, including how to eye it, which you can’t get just from following a recipe or watching a video or quick segment on show.  The fact that biscuits was on the menu was specifically one of the reasons I signed up for this class, and it was a successful lesson I hope (we’ll see when I try this myself next month).

Caprial + John’s Sunday Supper Tuesday cooking class making biscuits Caprial + John’s Sunday Supper Tuesday cooking class making biscuits

Meanwhile, we were shocked to find that she was not putting the pie dough in any pie tin- instead it went straight onto a baking sheet for more of a “free form” pie in which the dough is just folded into the center over the filling (sort of like a giant galette). I did not take a photo of the finished pie before the oven, but I do have the piece that was cut for dessert during dinner… personally I think I would added X-sharp cheese, and more of it… both in the crust, and probably sprinkled on top afterwards. Never can have too much cheese! And, pair it with a port.

Caprial + John’s Sunday Supper Tuesday cooking class apple pie Caprial + John’s Sunday Supper Tuesday cooking class apple pie

The other two vegetable sides included Parsnip and Caramelized Apple Puree and Roasted Cauliflower with Crispy Breadcrumbs and Garlic. Although the flavors of the puree were fine, I think I still prefer mashed potatoes or “faux” mashed using cauliflower. However, I appreciated learning the trick of heating the sheet pan in the oven so that when you pour the seasoned cauliflower onto the sheet to start the roasting process, you can get a sear on the side resting on the pan as well.
Caprial + John’s Sunday Supper Tuesday cooking class parsnip apple puree
Caprial + John’s Sunday Supper Tuesday cooking class roasted cauliflower

The main dish were these thick cuts that were marinated and then quickly seared Bacon Cured Pork Chops with Honey Glaze. You can also use chicken instead of pork chops. I knew I was with fellow peers when the other guests at the cooking class at my end of the table all poured a little bit of juice from the family style platter after serving themselves a chop.
Caprial + John’s Sunday Supper Tuesday cooking class pork chops

John and Caprial also talked a bit about the new micro restaurant Basa Basa they recently opened that specializes in Korean Fried Chicken and a few sides (rice, mac salad, ramen fries with Cappy’s special sauce) which seems remiscent of a Hawaiian plate lunch- carbs and chicken. The other neighboring micro restaurants in the same space specialize in meatballs, burgers, and tacos apparently- mega meats around the world! I haven’t thought about Korean Fried Chicken for a while and now I’m craving it, dammit. I might need to wait a bit to visit  though after the amount of butter and cream I saw going into the Sunday Dinner recipes. I know they were making enough for 2 dozen guests, but a few of us guiltily giggled how we’ve never seen cream in half gallon containers before… and they used multiple containers of them during our class. Same with bricks of butter as wide as the size of my hand. The roasted cauliflower is definitely the healthiest dish on the menu (and the only recipe without butter and cream- second place is the pork chop that doesn’t have cream or cheese at least).

While they are working through the new restaurant, John and Caprial are still going to be teaching classes once a week, and supper clubs once a month- check out their website for the menu details of each event they have scheduled.

Signature

Broccolo romanesco: The Fractal Veggie

This vegetable caught my eye at the Portland Farmers Market at PSU for its fractal looking florets of spikes in logarithmic spirals. It is basically a relative of the cauliflower (in fact it is sold as one of the "colored cauliflower" at the farmer market stand of DeNoble's Farm), though its greenness might make you think of broccoli. Why not both?

In fact, this is Broccolo romanesco, also known as Roman Cauliflower or broccoflower, a typically Italian vegetable that goes sublimely with fresh pasta with good olive oil and some Italian cheese. And so that's exactly how I decided to have it.

First, I separated the florets and chopped the stalks.

I did a quick blanch and shock of the broccolo romanesco after the chop- my kitchen is still in a state of remodel, so I have an oven but no sink, and I couldn't really wash these in the bathroom sink or tub, so this was my way to get around that (filling a pot with water from a sink is do-able. I saved the water from the blanching to also briefly cook the fresh pasta later (I got fresh pasta from the Farmers Market stand Pasta Del Sol, he always has an interesting quote on a whiteboard at the market too). Also, I admit I did sneak in several bites of strands of the raw pasta. Quality checking.

Next, I used a few tablespoons of extra virgin olive oil and heated up some smashed fresh cloves of garlic in a pan, and then added some (but not all) of the florets and chopped stalk for a saute. Pepper and salt to taste. After the saute I also smashed all the chopped stalk portions in a  food processer to get them to a creamy consistency so that they could coat the pasta.

I left some of the florets to keep a cool texture and look to the dish  by taking those and after a spray of misty butter-flavored cooking spray, then roasted them in the oven at 400 for about 15 minutes for a bit of char.

Then, the al dente pasta and the smashed garlic/broccolo romanesco mixture were then mixed together in a big serving dish. It was all finished with the roasted florets of broccolo romanesco and a generous sprinkling of fresh grated parmesan romano and a few red pepper flakes for heat. The photo below is pre-mix- I had put all of the broccolo romanesco in, but in hindsight, wait for the roasted florets after the mix.

Signature

Early Summer Bounty: Asparagus and Sugar Snap Pea Salad, Strawberries and Creme Fraiche

Ingredients and Directions

  1. 1/2 a bunch of Asparagus that has been steamed and then refreshed in cold water. Cut the asparagus into pieces about 3 inches long
  2. About 2 cups of Sugar Snap Peas that has been blanched (boiled and then plunged into ice cold water)
  3. For the dressing, whisk together the following
    • 1/3 cup extra virgin olive oil
    • juice of 1 lemon or to taste
    • big squeeze of honey to taste- I used agave nectar
    • a couple of grinds of sea salt
    • a couple of grinds of black pepper
  4. Pour the dressing over the cooled combined vegetables. Toss thoroughly so the dressing coats everything.

So all the prep probably only took 15 minutes… but now cover and let sit in the fridge for about 30 minutes to let the flavor get more infused and then enjoy chilled on its own, or during that 30 minute wait make your other dishes- to make this a main instead of just a salad, put it atop some quinoa. Tasty yet healthy too, great for a hot day.

Follow up with dessert of freshly washed Hood strawberries (a little more expensive then other kinds and smaller, but the flavor is more intense while being both tart and sweet) and the other accompanying farmer's market find of Jacobs Creamery creme fraiche

Signature