I’ve always preferred the savory over the sweet, so the “muffins” I’ve made almost always are cheese muffins or mini pot pies. For the upcoming St Patrick’s day I decided to go for something green, so today I’m sharing how I made Broccoli and Cheese Muffins. They only require a handful of ingredients and I prefer if I have to make something green to use something already naturally colored green like broccoli rather then food dyes. I’ve also shared other recipes that would be perfect for St Patrick’s day and are naturally green previously plus a mini Reuben recipe to get bites of your corned beef perfect for a party.
Recipe for Broccoli and Cheese Muffins
Green Beans with Walnut and Feta and Mint Vinaigrette
When I realized that I had way too much feta from my Costco order which I had delivered via Instacart (which I’ve raved about before for bringing me needed items at the last minute right to my door – and I don’t need a Costco membership), I immediately thought of this recipe for Green Beans with Walnut and Feta and Mint Vinaigrette for the next potluck at work in order to help use it up.
I had the recipe idea pinned from The Kitchen is My Playground for a while, with it’s intriguing promise of fun textures of the firm green beans, walnuts, and feta while highlighting a fresh mint vinaigrette.
Ingredients:
- 1 1/2 pounds fresh green beans, trimmed and cut into 1-2 inch or so pieces
- 3/4 cup of diced red onion
- 1 cup of chopped walnuts
- 1 cup of crumbled feta cheese
- 3/4 cup of olive oil
- 1/4 cup of white wine vinegar
- 1/4 cup of minced fresh mint leaves
- 3 cloves garlic, minced
- 1/2 teaspoon of salt or to taste
- 1/2 teaspoon of black pepper or to taste
Directions:
- Bring a large pot of water to a rolling boil. Add the cut 1 1/2 pounds of green beans and cook for only 3 minutes – we want it to turn bright green only. Drain the hot water and immediately plunge the green beans into ice water to stop the cooking process. Drain again and pat dry with paper towels.
- In a mixing bowl set the dried blanched green beans. Add the 1 cup walnuts, 3/4 cup diced red onion, and 1 cup crumbled feta; toss to combine.
- In a food processor combine the 3/4 cup olive oil, 1/4 cup white wine vinegar, 1/4 minced fresh mint, 3 cloves worth of minced garlic, salt, and pepper for 30 seconds or so.
- Add the dressing to the mixing bowl and toss everything. Chill for about an hour before serving.
So this salad was definitely great for lunch for a couple days… great for the potluck for a group as it was easy to transport to work and leave out. For later lunches it was a nice crispy side of veggies and nuts with a bit of acid to balance out a grilled cheese sandwich.
Simple and Crisp Fruit Crackers
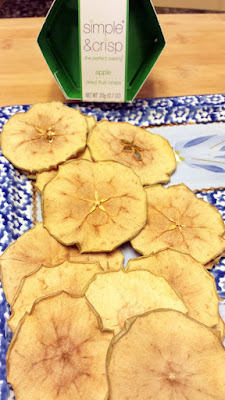
Have you ever heard of the Simple and Crisp Fruit Crackers before? This is a great healthy alternative to crackers that also satisfy those in the party group who may be gluten-free. They are 100% fruit that are simply thinly sliced, dried, and that’s it. Simple and healthy since unlike a regular cracker vehicle they offer fiber and antioxidants, and after a month of parties it’s a welcome change from the regular cheese and crackers.
The crackers pair great with wine – whether red or white – and a variety of cheeses, here you can see I have a cream cheese and vegetable spread. Cheddars, Swiss, Brie, Blue cheeses and more work equally well. We didn’t finish all the crackers at the wine party, and I snacked on some of the leftover fruit with cheese and tea too. If I had chocolate around I might melt it and dip the fruit crackers in the chocolate too.
There are four types of fruit they offer:
- Blood Orange (my favorite)
- Orange (second favorite for me)
- Pear
- Apple
As you can see, they look fancy even though I did nothing but dump it out of the package, so perfect for the holidays. I’m not being compensated for this post – I just really like this product.
Simple and Crisp fruit crackers are a Northwest non-GMO local product created from Seattle by Jane Yuan a couple years ago. So not only are you supporting local, but also a female entrepreneur. The apples and pears are sourced from Washington and Oregon partners, and the oranges from California.
S&C Producer Profile: Jane Yuan, Founder & Chief Pairing Purveyor from Simple & Crisp on Vimeo.
Especially during this time of years when I’m attending many get togethers, I appreciate something that looks impressive but is so stupid easy to put together, especially when I have to go straight from after work.
I get these Simple and Crisp crackers at Whole Foods, though I’ve seen them at other specialty markets too (for instance Zupan’s here, and nationally at Williams Sonoma).
Which of these fruit crisps sounds most appealing to you? What is your favorite combo to bring to a get together that is easy when you are going straight from after work?
Potluck Dish: Quinoa with Roasted Cauliflower and Mushrooms
Attending a neighborhood potluck/bbq earlier this month, I signed up for a vegetarian main dish that could feed the possibly 24 people who had signed up as a yes. The potluck/bbq was occurring on a Thursday evening, a night which I also have a regular scheduled call with someone at work in India after my normal full work day, so I wanted something that was very easy to prepare. I love sharing food to entertain, but mentally I just haven’t wanted to “cook” as much and seem to keep picking recipes that are more prep heavy than on cooking execution. This is pretty much why you never see any dessert recipes- I am NOT a baker. I always admire the photos and how beautiful they are, and then my eyes glaze over when it comes to the recipe portion, much less the directions. Heh heh, glaze…
At the same time of wanting something easy to make, I wanted it also be healthy, as well as satiating since I was unsure there would be enough hearty filling food for those who are vegetarian. Besides, all omnivores can always eat a vegetarian dish: it’s a win win for everyone. I had a few options to choose from, and then let F select the final dish. This recipe for quinoa with roasted cauliflower and mushrooms was the winner.
I quadrupled up on the Quinoa with Roasted Cauliflower and Mushrooms recipe in order to make enough, and when I brought it back there was probably only enough for two servings left! The original recipe makes enough for 4-6 depending on whether it’s a main or side, and what you see below is what I used to make enough for a crowd at a potluck. This is a very adaptable recipe based on your own tastes and preferences.
Weather-wise, it was one of the few days this summer where we have had rain in Portland, and it was because of that a little bit cool, so I thought having the dish hot (it could be served cold as well) was the way to go. The leftovers were great the next day, and even the next day after that, just eaten cold straight from the refrigerator!
Ingredients:
- 2 cups of Quinoa, or a Sprouted rice and quinoa blend like I used that included sprouted brown and red rice, quinoa, and wild rice from truRoots
- 1 1/2 to 1 3/4 stock or water- see directions on your quinoa
- 2 heads of cauliflower
- 16 ounces mushrooms
- 4 tablespoon olive oil
- 2 tablespoon thyme
- 2 tablespoon rubbed sage
- 2 tablespoon dill weed
- 2 tablespoon coriander
- 1 tablespoon red pepper flakes
- salt and pepper to taste
- 2 tablespoons of lemon juice
- Optional: sprinkles of Parmesan
- Greens of your choice- I used radish sprouts, but you can bed the entire thing on top of sauteed or fresh spinach, kale, lettuce, etc!
Directions:
- Heat up a vegetable stock: the amount depend son your quinoa so check your package: mine uses 1 3/4 cups liquid for every cup of quinoa. I prefer to use vegetable stock to impart flavor- other options might be to use water, or water with added flavorings like tomato paste. Rinse the quinoa. When the vegetable stock is boiling, add the quinoa and cover, lowering the heat or whatever the instructions are for your quinoa or quinoa/rice. This part can be prepared beforehand if you wish. I did this step the evening before, and then after the quinoa was done, I put it in the serving container and put in the refrigerator overnight. It’s one of the great things about quinoa- besides being healthy, you can easily prepare a cup or two that you can utilize to add to dishes all week!
- When you are preparing to roast, preheat the oven to 425 degrees F. Put aluminum foil on two baking sheets in order to make cleanup easier, and then put the baking sheets in the oven during the preheating.
- While the oven is heating up, cut the cauliflower into florets. Also slice the mushrooms. You want to try to have flat surfaces to it can lie flat on the pans in one layer. In a large mixing bowl (I had to use two), put mix the cauliflower and mushrooms with the olive oil and seasonings from above. If you are using two mixing bowls like I did, obviously you split 1 tablespoon in one bowl and 1 in the other in terms of the oil and seasonings. You can use any combination of seasonings you would like to your taste, or keep it simple with salt and pepper. Roasting the cauliflower makes it tender and you get lots of caramelized edges, so it will be guaranteed good flavor already! Mix everything well with your clean hands.
- Once you are ready, take out the hot pans and place the mixed cauliflower and mushrooms on top so they are arranged in one flat even layer. Roast in the oven for 30-45 minutes: however long it takes until they get tender and golden brown. Make sure that halfway you turn them over to evenly brown them. If you’d like, during that turn you can add more flavor by sprinkling in the lemon juice, and also parmesan. I went with just lemon juice.
- When they cauliflower and mushrooms are done, add them on top of your hot or cold quinoa. I used radish sprouts that I mixed in throughout, and I used an amount that gave a greater ratio to the cauliflower and mushrooms and quinoa so it was more a hearty dish than a salad. But you can salad this up as well by adding the greens of your chocie! Or, leave the greens out and it could easily be a main course also!