Pumpkin Mac and Cheese Recipe

I’m so excited! I know people have been complaining about the “arctic” temperatures that Portland has had for the past few days- though being originally from Chicago, the temperatures felt right at home and a reason to wear the puffy coat I brought from Chicago winters when I moved here. The only thing I was hoping for was not a warm-up, but for snow! Holiday snow!

And it came today! Yay! (Imagine me running around with Kermit arms as the snow falls gently from the sky).

This kind of weather just makes you crave comfort food- hot, bubbling, warm you up from the inside food. For a while, I was receiving complimentary issues of Better Homes and Garden- I think it came from when I was renting from Budget they might have thrown in a few free issues for a quarter or 6 months. This pumpkin mac and cheese recipe is a $500 price award winning one from Susan Telleen of Minneapolis, Minnesota. Susan uses canned pumpkin, fresh sage and nuts to emphasize fall flavors, and the pumpkin flavor is subtle but adds creaminess so you can use less cheese.

Pumpkin Mac and Cheese Recipe: After making the cheese sauce, stir it into the pasta until well mixed, then pour into a baking dish Pechluck's Pumpkin Mac and Cheese Recipe- uses less cheese because the pumpkin adds creaminess

I chose to use panko with the bread crumbs for more crunch. Despite the number of ingredients listed, it is only a 4 step recipe and yields 8 servings of the pumpkin mac and cheese, so enough for several meals, a great dish to bring to a potluck, to make for a dinner as you gaze at the snow outside, or in my case, a side that I had for Thanksgiving weekend!

Pumpkin Mac and Cheese on my plate at Thanksgiving

Ingredients:

  • 2 cups dried elbow macaroni (8 ounces)
  • 2 tablespoons butter
  • 2 tablespoons all-purpose flour
  • 1/2 teaspoon salt
  • 1/2 teaspoon ground black pepper
  • 1 cup whipping cream
  • 1 cup whole milk
  • 4 ounces Fontina cheese, shredded (1 cup)
  • 1 15 ounce can pumpkin
  • 1 tablespoon snipped fresh sage or 1/2 teaspoon dried leaf sage, crushed
  • 1/2 cup bread crumbs or panko for topping- I used 1/4 cup of bread crumbs and 1/4 cup of panko
  • 1/2 cup grated Parmesan cheese for topping
  • 1/3 cup chopped walnuts
  • 1 tablespoon olive oil
  • Sage leaves (optional)

Pechluck's Pumpkin Mac and Cheese Recipe- uses less cheese because the pumpkin adds creaminess, and the toppings add great crunchy layer with the combination of panko and breadcrumbs, walnuts and parmesan

Directions:

    1. Preheat oven to 350 degrees F. Cook pasta in a large pot following package directions. Drain cooked pasta, then return to pot. If you do this beforehand, I usually put a teaspoon or so of olive oil and stir this in so the pasta does not stick together.
    2. Ideally, while the water in the pot is preparing to boil before you put in the pasta, you are working on the cheese sauce. For cheese sauce, in a medium saucepan melt butter over medium heat. Stir in flour, salt, and pepper. Add whipping cream and milk all at once to make your white sauce from the roux. If you are looking for a gluten-free version of white sauce, instead of the flour use sweet rice flour/glutinous rice flour instead of your regular flour. Cook and stir over medium heat until slightly thickened and bubbly, it should be browned slightly. Stir in cheese, pumpkin, and sage until cheese is melted.
      Pumpkin Mac and Cheese Recipe: After making the white sauce, stir in cheese, pumpkin, and sage until cheese is melted Pumpkin Mac and Cheese Recipe: After making the white sauce, stir in cheese, pumpkin, and sage until cheese is melted. Yummy cheese sauce- actually it uses less cheese because the pumpkin also makes it creamy!
    3. Stir cheese sauce into pasta to coat. You can add more salt and pepper to taste at this point, and when the cheese sauce is incorporated into the pasta, transfer macaroni and cheese to an ungreased 2-quart baking dish.
      Pumpkin Mac and Cheese Recipe: After making the cheese sauce, stir it into the pasta until well mixed, then pour into a baking dish Pumpkin Mac and Cheese Recipe: After making the cheese sauce, stir it into the pasta until well mixed, then pour into a baking dish
    4. In a small bowl combine bread crumbs, Parmesan, walnuts, and oil; sprinkle over pasta as your mac and cheese topping! Now bake, uncovered, for 30 minutes or until bubbly and top is golden. Let stand 10 minutes before serving or you will definitely burn your tongue! If desired, sprinkle with sage leaves.
      Pumpkin Mac and Cheese Recipe: After making the cheese sauce, stir it into the pasta until well mixed, then pour into a baking dish and top with a mix of parmesan, walnut, panko and breadcrumbs Pumpkin Mac and Cheese Recipe: After making the cheese sauce, stir it into the pasta until well mixed, then pour into a baking dish and top with a mix of parmesan, walnut, panko and breadcrumbs

Mmmm comforting mac and cheese hugs on the inside of my belly. Mac and cheese and ramen are my favorite foods when the weather outside is frightful (though I am actually finding it delightful now!), but I only make mac and cheese and get ramen at restaurants. What’s your favorite cold weather comfort food?
Pechluck's Pumpkin Mac and Cheese Recipe- uses less cheese because the pumpkin adds creaminess, and the toppings add great crunchy layer with the combination of panko and breadcrumbs, walnuts and parmesan  Pechluck's Pumpkin Mac and Cheese Recipe- uses less cheese because the pumpkin adds creaminess, and the toppings add great crunchy layer with the combination of panko and breadcrumbs, walnuts and parmesan

Signature

Vegetarian Side Dishes: Corn Niblets in Butter, Roasted Carrots with Dill, Green Beans in Parmesan

I made all three of these vegetarian side dishes this past Thanksgiving, for the sake of nostalgia.

Growing up, the corn I had were either on the cob (which we boiled/steamed) or Green Giant Corn Niblets frozen boxes. Essentially, it’s just corn niblets in butter, but the butter sauce is slightly thickened. When I grew up, I learned about grilling corn, and I gave up the processed Green Giant that uses the additive of xanthan gum because it just seemed unnecessary with the cornstarch- and what is enzyme modified butter and why do I need annatto extract color?

Corn Niblets in butter recipe

Sometimes though, I still want to remember the days when my family attempted an American style Thanksgiving, albeit that by high school it was Boston Market that was providing us our meal, after a lineage of various grocery stores’ precooked items (my favorite that I remember was Auchon, though I have never quite forgotten the soft rolls from Cub Foods). My family was not really a turkey family- we were all about honey ham. I vaguely remember one time my mom bought sliced ham, and we were roasting each slice in the oven on a baking sheet, and we brushed each side with some sort of honey mixture. We only did that once (apparently we discovered we could just buy partial pre-sliced hams- thanks HoneyBaked Hams), but I loved the motion of brushing each piece lovingly.

Instead of the Green Giant original, I now use this Food.com Green Giant Corn Niblts in Butter copycat recipe every time, and can pick local sweet corn and I can make more since I can eat a whole box of the frozen stuff by myself thanks.

Meanwhile, my main experience with carrots were in TV dinners in my childhood, thanks to Banquet. My family had almost all Asian food, with the once in a while exception of spaghetti, everything else was usually prepared (varying from Gordon’s fish sticks to Micromagic cheeseburgers) so it was thanks to Banquet that I learned about meat loaf, chicken parmigiana, Salisbury steak, and pot pies.

Roasted Carrots with Dill recipe

This recipe for roasted carrots brings back memories of those little super tender carrots in their little compartments with the little ridges, and the little inch long green beans cut in perfect tubes almost like pasta, but without the chance for mushiness for either (depending on how much you vented the TV tray!). I know it may not sound like an endorsement to say it brings back those nostalgia food of the 80s via TV Tray, but it is!! The recipe for the Sauteed Carrots are based from one from the Barefoot Contessa and the green beans from Sandra Lee’s Haricot Verts with Shaved Parmesan. Can you tell I was watching Food Network for a while?

All of these recipes yields enough for about 6 servings as a side dish.

Corn Niblets in Butter

Corn Niblets in Butter recipeCorn Niblets in Butter recipe
Ingredients:

  • 16 ounces of corn niblets (this equals about 1 bag of frozen corn, I like sweet corn but you can use any type you wish)
  • 1 teaspoon salt
  • 1/4 cup butter, cut up
  • 1/2 teaspoon sugar
  • 1/2 cup water
  • 3/4 teaspoon cornstarch
  • 1/2 teaspoon rosemary (optional)

Directions:

  1. Add corn to large sauce pan along with all ingredients except water and cornstarch.
  2. Stir corn mixture over medium heat until butter is melted.
  3. Combine water and cornstarch and stir until cornstarch is dissolved. Slowly add water to corn in sauce pan, stirring constantly.
  4. Reduce heat to simmer and stir occasionally, until corn is tender and sauce thickens. If you’d like, you can optionally add in a little ot of rosemary or other seasoning you’d like to additionally flavor the butter sauce.

Roasted Carrots with Dill

Roasted Carrots with Dill recipe
Ingredients:

  • 2 pounds (6 cups) of carrots
  • 4 tablespoons olive oil
  • 1 teaspoon kosher salt + more to taste
  • 1/2 teaspoon freshly ground black pepper+ more to taste
  • 2 tablespoons chopped fresh dill + more to taste

Directions:

  1. Preheat the oven to 400 degrees F.
  2. If you bought the whole carrots, peel the carrots and cut them diagonally in 1/4-inch slices. Or if you’re into a Thanksgiving where you are drinking wine and eating cheese instead of cutting carrots, buy baby carrots or my favorite, already crinkle cut carrots.
  3. Toss the carrots in a bowl with the olive oil, black pepper, and salt. On two foil covered baking sheets, place the carrots flat, try not to have them overlap too much so they can be touching the baking sheet, lying flat on 1 layer. Roast in the oven for 20 minutes, turning them halfway through- you should be able to fit more flat because the carrots will shrink as they cook and brown. I admit I roasted mine for much longer because I was making mac and cheese and forgot what time I put them in, I just kept checking on them until they were as browned as I liked.
  4. Off the heat, toss with the dill. Sprinkle with salt and pepper and serve to taste.

Green Beans with Shaved Parmesan

Green Beans with Shaved Parmesan Green Beans with Shaved Parmesan
Ingredients:

  • 3/4 pound ready-to-cook haricots verts/green beans
  • 2 tablespoons sour cream
  • 1 teaspoon lemon juice
  • 1/4 cup shaved parmesan cheese
  • Freshly ground black pepper

Directions:

  1. Place the haricots verts in a large microwave-safe bowl. Cover and microwave on high for 5 to 7 minutes. Remove and drain, if necessary.
  2. In a small bowl, whisk together the sour cream and lemon juice. Pour over the haricots verts and toss to coat. Serve immediately with shaved parmesan and freshly ground pepper. I totally admit I used much more than 1/4 cup of parmesan.

Do you have simple side dishes like this that you make, thinking back to microwavable food memories?

Signature

Pão de Queijo Recipes- Three Ways!

Have you ever had Pão de Queijo?

A fluffy homemade Pão de Queijo Recipe: How to Make Pão de Queijo (Brazilian Cheese Bread)

It’s a little cheese bread bun. They are popular in South America, and I first had it at churrascarias in Chicago where you are supposed to avoid them in order to focus on the all you can eat served tableside by the gaúchos, but these pãos were the highlight for me. So of course I had to figure out how a Pão de Queijo Recipe to make them at home without having to also eat all that meat! I was reminded of Pão de Queijo recently because I am jealous of a couple I know who are spending a few months in Uruguay- what a fun adventure! I wish I could go off and stay in a country for a few months. I suppose I did that when I was in college- I was in China for a summer- but I would appreciate living abroad so much more now that I am experienced and bolder.

Also, since I made and shared those Mini Cream Cheese puffs earlier, I thought about how they were the fourth variation of cheese bread I have made- which is the only kind of breads I make. The kind with cheese (I’ve also made gougeres- maybe I’ll cover those for New Year’s as those are great with sparkling!). Cheese and bread = win!

I have done Pão de Queijo two ways in the past. One starts with making a roux on the stovetop, and then adding the tapioca flour, then the cheese and egg to form the dough and then make drops on a cookie sheet.
Recipe: Roux Method for Pão de Queijo Recipe: Roux Method for Pão de Queijo

The other uses a blender with all the ingredients together, and results in lighter pão, but it is much faster because after mixing you just pour them into muffin tins and bake in the oven, an easy 3 steps!
Recipe: Blender Method for Pão de Queijo Recipe: Blender Method for Pão de Queijo

However, there is a chewy dense texture to pão you won’t get as much with that shortcut method. The dough of the roux method allows you to make balls/buns or you can make it in large or small muffing tins. The easy way requires muffin tins because it will be a liquidy dough before you bake it (see the difference in the photos above?).

I have made both kinds below to show you since the last time was a couple years ago and the photos aren’t very good/non-existentm I and my co-workers gobbled both up so rest assured, both are still yummy. And I’m going to show you both!

By the way, since they use tapioca flour, Pão de Queijo are gluten free! I used Bob’s Red Mill tapioca flour, because Bob’s Red Mill is the best.

In both of these I just use cheese, but you can also upgrade your pão by using garlic, caramelized onion, and herbs or spices of your choice. Sometimes I like to sprinkle mine with red pepper flakes. And, as you will see in my Ingredients list, I totally doubled up on the cheese but you don’t have to! I personally prefer the roux method version the best. I like having them with a nice glass of wine- I think the last time I made these actually was for a wine and cheese party I hosted! I had them all prepped already, so once the oven timer went off I would dump them into a basket for everyone, and often it would be empty before the next batch came out!

Recipe: Roux Method for Pão de Queijo, sprinkled with red pepper flakes Recipe: Roux Method for Pão de Queijo, sprinkled with red pepper flakes

Roux Method for Pão de Queijo – cheesy Biscuit-look version

So, I have two ways I use the roux method. First I’ll list my favorite, more cheesy version.

Yields 10 large pao (about half your palm size) or you can make smaller balls. This yielded about 10 pãos for me.

Ingredients:

  • 1/2 cup water
  • 1/3 cup butter or olive oil
  • 1/3 cup milk or soy milk
  • 1 teaspoon salt
  • 2 cups tapioca flour
  • 2/3 cup freshly grated Parmesan and Romano cheeses with queso fresco if you have it. I will admit though the original recipe calls for 2/3 cup, I used 2/3 cup parmesan and 2/3 cup queso fresco for more cheesiness. And then while I was measuring it I kept breaking off and eating more of the Cacique queso fresco. And I also ate it while it was cooking. I had to stop myself so I would have some left for the blender version of this recipe. If you are looking for this in the grocery store, I usually find queso fresco by the cream cheese which is by the pre-shredded and sliced deli cheese rather than in the cheese case.
  • 2 beaten eggs, room temperature

Directions:

  1. Preheat oven to 375 degrees F.
  2. Pour the water, olive oil, milk, and salt into a large saucepan, and place over high heat. When the mixture comes to a boil, remove from heat immediately, and stir in tapioca flour until smooth. This will probably take 10 minutes, unless like me you can use a dough hook on a stand mixer for this then it will only take a few minutes. Doing it by hand works too- I’ve done it that way before I owned the mixer. Either way, once mixed, set the dough aside to rest for 10 to 15 minutes.
  3. Stir the cheese and egg into the tapioca mixture until well combined. The mixture will be chunky like cottage cheese.
    How to Make Pão de Queijo (Brazilian Cheese Bread)
  4. Drop rounded, 1/4 cup-sized balls of the mixture onto an ungreased baking sheet, or you can choose to make ones in muffin or mini muffin tins or make smaller balls, your call.
    Recipe: Roux Method for Pão de Queijo Recipe: Roux Method for Pão de Queijo
  5. Bake in preheated oven for 15 to 20 minutes or so- look for the tops to be lightly browned.
    Recipe: Roux Method for Pão de Queijo

As you would expect, the better the cheese complexity, the better the pão, and also if you use butter and real milk it will taste better.

Recipe: Queso Fresco for Pão de Queijo Recipe: Parmesan and Queso Fresco for Pão de Queijo

They taste great fresh and hot, or rewarmed later!
Recipe: Roux Method for Pão de Queijo Recipe: Roux Method for Pão de Queijo

I personally like the “biscuity” one because of it’s cheesiness ratio and the chewiness. So taste and texture win. But I admit it is not round like the original Pão de Queijo should look like. I have made that version, which is more aesthetically close to the original and looks a bit more like gougeres, that “other” cheese bread). Follow all the exact same steps as above, but with the following ratios (this yielded about 20)

  • 1 cup of whole milk
  • 1/2 cup of vegetable oil
  • 1 teaspoon of salt
  • 2 cups of tapioca flour
  • 1 1/2 cup of parmesan
  • 2 beaten eggs

Recipe: How to Make Pão de Queijo (Brazilian Cheese Bread) Recipe: How to Make Pão de Queijo (Brazilian Cheese Bread) Recipe: How to Make Pão de Queijo (Brazilian Cheese Bread) Recipe: How to Make Pão de Queijo (Brazilian Cheese Bread) Recipe: How to Make Pão de Queijo (Brazilian Cheese Bread)   Recipe: How to Make Pão de Queijo (Brazilian Cheese Bread) Recipe: How to Make Pão de Queijo (Brazilian Cheese Bread)
To make more perfect circular buns, use an ice cream scooper instead of a regular spoon like I did, and you can dip it in water to prevent it from sticking.

Mini-Muffin with Blender Method Pão de Queijo

Yields about 24 mini muffin sized cheese breads.

These are so easy- you can make it with one eye closed. Which I literally did because I had to stay home from work one day because I couldn’t open my left eye because it kept stinging/tearing. But that didn’t stop me from successfully making these even as one eye just kept crying. The hardest part turned out to be pouring when you only have one eye open- messes with your depth perception. I like these because of the yield and ease, and they are much more light and airy. The roux method will have a bit more of a crunch on the outside and soft chewy inside rather than this poofy chewiness.

  • 1 egg, room temperature
  • 1/3 cup olive oil
  • 2/3 cup milk
  • 1 1/2 cups tapioca flour
  • 1/2 cup packed grated cheese, your preference, parmesan, romano, or  queso fresco, mix of the three… ok I totally used 1/2 cup of Parmesan and 1/2 cup queso fresco for more cheesiness
  • 1 teaspoon of salt (or more to taste)

Directions:

    1. Preheat oven to 400°F. Grease a mini-muffin tin.
    2. Put all of the ingredients into a blender and pulse until smooth. Don’t forget to use a spatula to scrape down the sides of the blender so that everything gets blended well. At this point you can store the batter in the refrigerator for up to a week if needed.
      Recipe: Blender Method for Pão de Queijo Recipe: Blender Method for Pão de Queijo Recipe: Blender Method for Pão de Queijo
    3. Pour the batter (it should be thick but liquidy) into each of the mini-muffin openings- they will rise so leave some space at the top, maybe about 1/8 of an inch from the top. Bake in the oven for 15-20 minutes, until all puffy and just lightly golden browned- if you wait too long it will start to lose it’s light fluffyness inside.
      Recipe: Blender Method for Pão de Queijo Recipe: Blender Method for Pão de Queijo

Recipe: Blender Method for Pão de Queijo Recipe: Blender Method for Pão de Queijo

Eat while warm or save to reheat later.

Recipe: Blender Method for Pão de Queijo Recipe: Blender Method for Pão de Queijo

Which version of the Pão de Queijo Recipe are you interested in?

Signature

Recipe: Four Greens with Garlic Saute

Next on the Thanksgiving sides/vegetarian options list is this Four Greens Saute. I love that it layers four different kinds of greens for flavor and texture. This recipe originally was inspired from Neelys for Food Network Magazine, and I’ve adapted it based on the fact I didn’t have turnip greens and yields 6-8 servings. Other than the slicing of the greens though, this is so easy to make. Greens with garlic is classic, and I think is a welcome, simple break from the vegetable dishes with cream and cheese.

Four Greens with Garlic Saute with mustard greens, kale, turnip or dandelion greens, and swiss chard. Have it with rice, as a side dish to a protein, top it with nuts or with a poached egg Four Greens with Garlic Saute with mustard greens, kale, turnip or dandelion greens, and swiss chard. Have it with rice, as a side dish to a protein, top it with nuts or with a poached egg

You cook the greens at different times because the chard cooks faster- if you substitute other greens, like collard, you will want to do the collard greens as the first greens because they take a longer to get out the bitterness. Tender, young green leaves fresh from your garden will cook faster. I don’t like gritty greens and maybe I’m a bit anal about cleaning, so I soak mine in cold water for a few minutes and do this a few times until there is no dirt at the bottom of the bowl to clean them before cutting, and then maybe again before cooking. F was glad to see I was getting a lot of use of my salad spinner.

There are a few ways to eat this- plain, you can chop up some nuts of your choice for some crunch and add on top, F likes this with hot sauce. I also like this with a poached egg on top.

Now, don’t laugh too much at my photos. I am starting to try to learn and experiment with my camera and in the process, I have these portrait photos of greens… Though I admit, it cracks me up too.

Mustard Greens. Recipe for Four Greens with Garlic Saute with mustard greens, kale, turnip or dandelion greens, and swiss chard. Kale. Recipe for Four Greens with Garlic Saute with mustard greens, kale, turnip or dandelion greens, and swiss chard. Recipe for Four Greens with Garlic Saute with mustard greens, kale, turnip or dandelion greens, and swiss chard. Here is the chard Dandelion Greens for a Recipe for Four Greens with Garlic Saute with mustard greens, kale, turnip or dandelion greens, and swiss chard. Have it with rice, as a side dish to a protein, top it with nuts or with a poached egg

Ingredients:

  • 1 bunch mustard greens, cleaned
  • 1 bunch dandelion greens, cleaned
  • 1 bunch kale, cleaned
  • 1 bunch Swiss chard, cleaned
  • 2 tablespoons extra-virgin olive oil
  • 1 large yellow onion, thinly sliced
  • 4 cloves garlic, thinly sliced
  • Kosher salt and freshly ground pepper
  • 1 1/2 cups broth – I used vegetable broth

Directions:

  1. Remove the center stems from all the greens and slice the leaves into 1/2-inch ribbons. Ok, I admit I did not do this with the dandelion greens, but I think if you were using the original turnip greens that makes sense. If you do this while the radio is playing and maybe dance a little, or you talk to your cat, that would be just like what I do, but optional of course.
    Recipe for Four Greens with Garlic Saute with mustard greens, kale, turnip or dandelion greens, and swiss chard. Have it with rice, as a side dish to a protein, top it with nuts or with a poached egg Recipe for Four Greens with Garlic Saute with mustard greens, kale, turnip or dandelion greens, and swiss chard. Have it with rice, as a side dish to a protein, top it with nuts or with a poached egg
  2. Pour the olive oil into a large saute pan and set over medium-high heat. Once hot, add the onion and garlic and saute until tender and fragrant. As usual, I like to see some char on mine, but you can just wait for them to be translucent. Season with salt and pepper  liberally.
  3. Stir in the ribbons of mustard greens, dandelion greens and kale in batches, adding the next batch as the one prior wilts down. Once those three greens are added to the pot, pour in the broth and cook 15 minutes. Then add the ribbons of Swiss chard and cover with a lid. Let simmer 5 more minutes. Taste for seasoning and adjust accordingly- obviously this varies based on the flavor of the broth you use. Spoon the greens into a large serving dish.
    Recipe for Four Greens with Garlic Saute with mustard greens, kale, turnip or dandelion greens, and swiss chard. Have it with rice, as a side dish to a protein, top it with nuts or with a poached egg Recipe for Four Greens with Garlic Saute with mustard greens, kale, turnip or dandelion greens, and swiss chard. Have it with rice, as a side dish to a protein, top it with nuts or with a poached egg

How would you eat these greens? Plain as a side accompaniment? With hot sauce? With chopped nuts? Or with the poached egg? Ooo, or instead of hot sauce you could throw in some sliced hot cherry peppers for heat! No, I still like the poached egg… why not both?
Recipe for Four Greens with Garlic Saute with mustard greens, kale, turnip or dandelion greens, and swiss chard. Have it with rice, as a side dish to a protein, top it with nuts or with a poached egg Recipe for Four Greens with Garlic Saute with mustard greens, kale, turnip or dandelion greens, and swiss chard. Have it with rice, as a side dish to a protein, top it with nuts or with a poached egg Recipe for Four Greens with Garlic Saute with mustard greens, kale, turnip or dandelion greens, and swiss chard. Have it with rice, as a side dish to a protein, top it with nuts or with a poached egg

This is the third of a series of posts of recipes I am going to cover on dishes to consider for Thanksgiving- the other two were the Harvest Quinoa with Apple and Walnuts and the Butternut Squash Lasagna in Béchamel. All the recipes in this series will be vegetarian, so you might consider it for a side dish or if you have a vegetarian at your table like I do, be a way to provide something more hearty than the usual sides of rolls, cranberry sauce, mashed potatoes, and green beans. Check out my Recipes Index page for other dishes that I have covered in the past.

Summary of the Vegetarian Thanksgiving Sides Series 2013:

Thanks for reading!

Signature

Book Club Review: Apron Anxiety Book Review, and Buckeye Balls

Last month, I joined a new online book club, called the Kitchen Reader. There is a new book selected for every month, each book is related to food, and members write a review on their blog during the last week of that month. For October, the book club selected reading was Apron Anxiety by Alyssa Shelasky, based on her life/blog of the same name. So here is my Apron Anxiety Book Review!

My Summary: Apron Anxiety is the memoir of a young, pretty, popular and privileged “it” city girl Alyssa Shelasky and her complicated love affair a celebrity chef that introduces her to the kitchen and food appreciation. Expect the tone to be chick lit, with a wry New York humor to it. Essentially, the book is about her being able to find some center through food that grounds her previously flighty social life and her self-identity as she documents her time back and forth in New York City, Washington DC, and LA. She does “dish” a lot- lots of name dropping in all three cities of celebrities, and although she is vague on who her love, “Chef” is, you can google and find the answer pretty easily though I don’t think knowing his name is essential to the story. But, I know you will totally look it up.

My Humble Opinion: If you are hoping for a lot of stories about how she conquers the kitchen, you won’t see them here- not the way you are told tales by Julie & Julia–My Year of Cooking Dangerously by Julie Powell. Alyssa only shares a few- though the few stories she does share (mac and cheese, banana bread loaves, and cherry pie) are great. I and probably everyone has major oops like that in a dish which still end up being served and eaten hoping no one will notice the screw-ups.

Overall, I thought it was an interesting take on the opposite side of what was Cooking for Mr. Latte by Amanda Hesser where she was the foodie trying to educate her man, but this time Alyssa is the one who knows nothing about food. Both books pair sharing recipes with personal stories of how that recipe fit in with her life.

As you would expect, all three of these books (Julie and Alyssa’s books both come from their blogs, Amanda’s from her column) are self-indulgent, and there were times I had to put each of them down to give myself a break from being irritated. This was particularly the case with Alyssa.

There are a lot more details about to be revealed about what happens through the book below the picture- I think most of the point of the book is not what happens, but the journey so I’m going to go into specifics. But in case you don’t want to know… stop now!

Alyssa Shelasky

You have to get through the first few chapters, before cooking gets into the tale, to get to the good part of the story. Apron Anxiety first few chapters were especially hard to get through (I did resort to skimming, and maybe put it down a couple times distracted or annoyed). For page and pages, she talks about essentially and incessantly being a popular fun girl in high school and all the partying she does in her 20s as a gossip and celebrity writer, being paid to essentially live it up on the edge of celebrity world and write about it.

That is, until she gets whisked away to Greece after 3 months of dating Chef and drops her life to follow him. Then for the next 9 months makes no friends and doesn’t work. She writes in these chapters essentially of shutting that social life/career down to be celebrity-supported eye candy that waits for him to get home in order to make sandwiches or cereal- she doesn’t even clean because they have a weekly housekeeper.

It’s amazing in that it seems she is able to paid/supported to be living it up not through any moment of hard work (just existing and dealing with the world already seems to be hard work for her), but mostly courtesy seemingly of her looks, the luck of being well-connected with influential people, wit and charm. Fortunately, these latter two characteristics spills over into the voice in her writing. Reading the book’s first few chapters you may want to skip it, but at least skim it – it does help establish a baseline of how crazy she was and how low she goes before food and cooking saves her.

Apron Anxiety at least has the bonus that  Alyssa can write well, turning phrases such as “As I cope with the collapse of us, Zagat is my Zoloft” which keeps you reading for how she might describe something dramatically next. She also has a knack for writing honestly and openly like a girl friend in your early-mid 20s talking all night at a sleepover after you’ve opened your third bottle of wine and are getting into the “confessional/emotional truths” part of the late night. Example: her admitting that rather than dining out a lot because she loves exploring, she is using lists of Best Bloody Mary or Favorite Fish Taco “as arrows, as I have no idea what else to do with myself, or where I belong”.

Come on, I know you know what part of the night I am talking about. This whole book is basically Alyssa and you having that part of the night- with only Alyssa doing the talking.

Alyssa Shelasky, Apron Anxiety blog header

She does a pretty good job of capturing the ups of the relationship with chef (that she dubs “relationchef”) which they just watch reality shows and toasted cheese sandwiches when he is around, and the disappointment and hurt of being second after his push for his career and fame because most of the time, he is not around. I think every woman can relate to at one point, putting herself second to a man, and defining herself by trying to live in his world- it’s an easy mistake of youth that in using society as a mirror, when that first intense love comes along he becomes the entire mirror.

The kitchen and food are what pull Alyssa up finally from her way too dependent life she was existing in for almost a 9 months since moving to DC. Great… but seriously, it took her the amount of time that other women might have a baby to figure out she needed to do something with herself instead of waiting for him to come home from work.

She talks about how she is lonely in DC, but you are told early on about all the people she knows that she leaves behind when she moves, but yet are told not much at the same time. We are mostly told rather than shown friends and family. Their personality is summarized by her in a few sentences, and then it boils down to what they are doing for/to her. I think that is probably understandable in a blog entry, but in a book, her feeling abandoned is an important theme of the story. Yet being told about her amazingly awesome her close friends are for a page or two and then they disappear so long I started forgetting/mixing them up until they appear again to help her out. It is a fracture in the narrative.

At the same time, she is quickly judgmental, dismissing her neighbors when she moves to a new city as too ordinary and all possible friends in DC as profoundly conservative or crazy (she does eventually take back the neighbors judgement, calling it one of the dumbest moves of her life).

For me, that makes it difficult to build a lot of empathy for her as I was reading the book as it presents her as a character who seems so self-centered as she wrings her hands about how she’s frustrated and sad and alone, but then her friends seem to do her giant, selfless favors and provide access to elite connections and opportunities. She even describes herself at one point as “I am the stray who C Street has taken in”, and when hearing a real tragic situation, feels ashamed for “whining about my utterly pathetic bubblegum BS” but then returns to it a few pages later. I kept wondering how long this quarter life crisis was going to go on- and she was having it in her late 20s/early 30s.

It wasn’t until I thought about how I just read Quiet: The Power of Introverts in a World That Can’t Stop Talking that I began thinking of her in another perspective- someone who keeps really going to the extreme ends of the scale of an extrovert needing the energy of others to feed from- which certainly seems to explain why she fades so much in being alone and is not very introspective. Yet, she seems to also have an awkwardness like an introvert where she just wants to stay inside from the world. Making that connection helped me see this book at an interesting level.

The only way she seems to be able to give to others is through food, once she begins- which is already 1/3 of the book in. In Alyssa’s case, you follow along to see how cooking and food becomes an outlet for her to take the edge off, and is way for her to provide for those she cares about. She doesn’t spend much time talking about the flavors of food as much as the process  and care of cooking, and the enjoyment she sees when her friends are taken care of by the food. Food tells a story, or evokes emotions for her. Because of this, even when she is alone, she can find energy through food. This seems to be the prime intent of the book, and a fine subject to explore. The way she writes it though, there’s just a lot more of her than writing about food.

Apron Anxiety book cover

She is a maddening mess of totally un-relatable and relatable.

In visiting a lot of dodgy dive-y cheap hole in the walls, she  writes “Our bills are always under thirty bucks; I am always too scared to use the bathroom””, but also admits that he opens her eyes to secret gems.

After ducking out of a NY food industry party and changing out of her Louboutins, she walks through the streets of the Village “looking for fresh air and maybe a falafel”.

For the first time she attempts a home-cooked meal, she writes a list in a fuchsia Sharpie, spends $200 and takes multiple selfies to text to Chef, and describes the drive with feeling “pretty cool pretending to be a home cook, with my important grocery list and Made In Brooklyn bag. The car windows are down, the National is playing, and my long, layered hair is pinned up just right. I look good in foodie.”

I can’t help but sometimes roll my eyes as she writes that her wishlist changed from Lanvin flats ($500-$900) to pizza stones and spoontulas or mentions she is walking into an event where her first Herve Leger bandage dress. But then I’m lured back into continuing to read as I laugh at how goofy and self depreciating she can be as she admits into walking into a glass door, undershooting the distance between a car and a wall, or thinking about Madonna as she targets her upper arm muscles while whisking. She also talks about cheese many times.

Basically, how much you will enjoy of this book depends on your ability to enjoy the obnoxious but also fun, emotional somewhat drunk evening with Alyssa.

Food Focus: Very few of the recipes are original- they include a few from her family (a simple “The Pasta”, Banana Bread, 3 ingredient salad dressing, 3 ingredient cocktail among a few)  and , and then really common ones like the Neiman and Marcus Chocolate Chip Cookies, and excerpted from others repertoire, like Sarabeth’s tomato soup, a turkey BLT from Gwyneth Paltrow’s My Father’s Daughter cookbook, Nigella’s Fusilli with Toasted Pine Nuts and Feta from Nigella Lawson’s book Nigella Kitchen, etc. I mean one of the recipes is for making cheese toast or making homemade pizza- with pizza dough and tomato sauce from a pizzeria or store-bought. It’s clear her roots as a home cook – and which is refreshing for a book of someone writing about food to not have been culinary trained and schooled in Europe.

One of the recipes is for “Herb-Crusted Chicken for Hungry and Important People”, and she calls it her signature chicken dish.  I scaled the recipe down from the original 6 servings to 2, and made this my test of her taste, because who doesn’t love toasted cheese on bread, duh. You can find the recipe here on Elle’s site. I plan to make that sometime in the future.

Along with name dropping of all the amazing restaurant industry people who give her tips (including tweeting with Gael Greene on what to cook!), she also shares a home cook family recipe for Buckeye Balls. I decided to make these as well because they seem to represent her life, a wild juxtaposition of the glamorous with the simple living. And this is probably what you would be doing while draining the bottles of wine and listening to her tell you these tales from her book. I brought these to work for Halloween and they were gone in 10 minutes!

Buckeye Balls

Makes about 60 Buckeye Balls
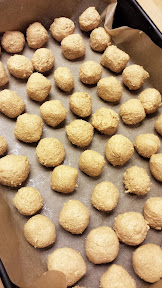
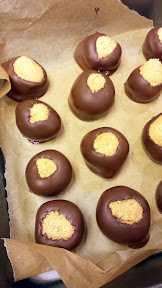
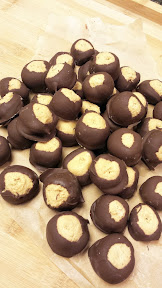
Buckeye Balls - peanut butter, vanilla, sugar, then dipped in chocolate
Ingredients:

  • 1 1/2 cups creamy peanut butter (this is the whole 18 ounce jar)
  • 8 tablespoons unsalted butter, at room temperature (so yeah, a stick of butter. It gets to room temp faster if you slice it up)
  • 1/2 teaspoon vanilla extract
  • 3 cups confectioners’ sugar
  • 4 cups good quality semisweet chocolate chips (2 12 ounce bags)
  • 2 teaspoons vegetable shortening or vegetable oil

Directions:

  1. In  a large bowl (or the bowl of an electric mixer with a paddle attachment), combine the peanut butter, butter, and vanilla extract. Gradually add the powdered sugar until it is well incorporated. It should be a smooth firm dough. If you don’t have an electric mixer you can supposedly mix this with your hand but yeah, I used the electric mixer or who knows how much peanut butter I would have eaten!
  2. Line a baking sheet with waxed paper. Using your of course clean washed hands, roll the mixture into round balls using 1.5 teaspoons of dough (about the size of strawberries) and place them on the baking sheet. Stick a toothpick to be used as a handle for dipping later in the top of each of the balls, and then place the whole baking sheet in the freezer for about 30 minutes at least.
    Buckeye Balls - going into the freezer to harden after I put in the toothpicks Buckeye Balls - going into the freezer to harden after I put in the toothpicks Buckeye Balls - going into the freezer to harden after I put in the toothpicks
  3. When the balls are firm, it is dipping time. First, the dip. She talks about using a double boiler, which I don’t have. She also mentions filling a small saucepan with water and bring to a boil. Reduce it to a simmer and set a heatproof bowl that fits over the pot. Another way is to use a microwave at 50% power at 30 seconds until melty, and then rewarming at 15 seconds or so. I like to use a small ovenware dish at 250 degree F which is deep so I only need to do a cup of chocolate chips at a time with 1/2 teaspoon veg oil for smoothing. Whatever way the point is to melt the chocolate chips and vegetable shortening/oil, stirring frequently until smooth (you might not tell how melty it is unless you stir because the chips keep their shape until stirring).
    Melted Chocolate for dipping
  4. Holding each peanut butter mix ball by the toothpick, dip into the melted chocolate, leaving a little bit of peanut butter showing at the top of each ball. Place the finished buckeye back on the baking sheet with the wax paper still underneath to catch dripping chocolate to cool and remove the toothpick and smooth over the holes by using the toothpick to refill/roll it. Refrigerate everything for at least 2 hours to set before serving.
    Buckeye Balls - going into the freezer in order to set after being dipped in chocolate and the toothpick removed and hole smoothed over

Buckeye Balls - peanut butter, vanilla, sugar, then dipped in chocolate Buckeye Balls - peanut butter, vanilla, sugar, then dipped in chocolate

Coming up for my reading for this book club in November: Best Food Writing 2013, edited by Holly Hughes. If you are interested in joining the book club, check out the Kitchen Reader.

Signature