Gluten-free Cheddar Fondue Recipe

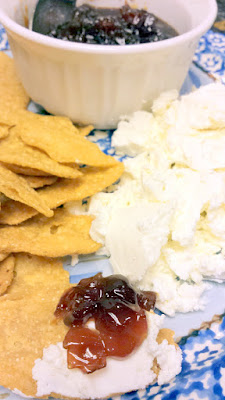
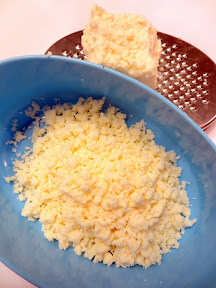
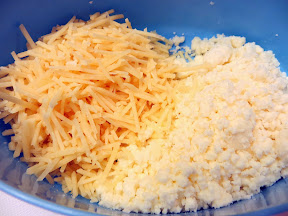
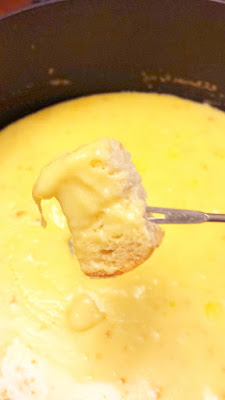
Last week, for a ladies wine night I hosted at my home, I prepared a Cheddar Fondue. This is so easy to do- the most time consuming part will be grating the cheese. You want to use freshly grated cheese rather than pre-grated because the kind that come in the bag already have starches and powder added to them during packaging. I generally do this while watching TV – I did this while watching Amazing Race and Walking Dead!
Gluten-free Cheddar Fondue Recipe with broccoli as your dipper instead of bread is healthier. You can have the broccoli raw or blanch it quickly to soften it (but not too much) Cheese fondue with cauliflower as your dipper instead of bread is healthier. You can have the cauliflower raw or blanch it quickly to soften it (but not too much)

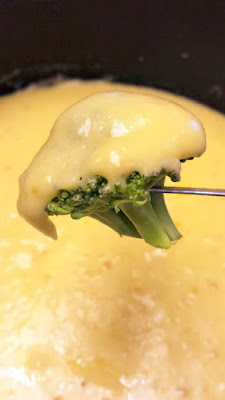
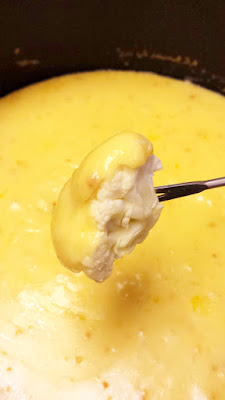
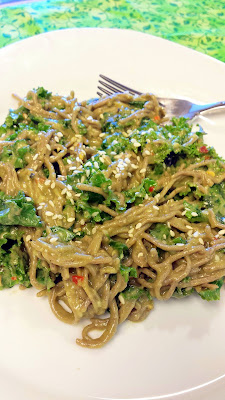
Otherwise, it’s pretty straightforward, but so worth it for a party. Or dinner. Or lunch. Is there ever a wrong time to enjoy melted cheese?  My secret for this version is that besides the cheddar, I add additional flavors via a pinch of nutmeg, dry mustard, and sometimes a  few tablespoons of pesto (you can make your own or buy it from the store, whatever works for you) if no one in your party has a nut allergy. Other optio nsmight be to add in diced tomatoes or red peppers.

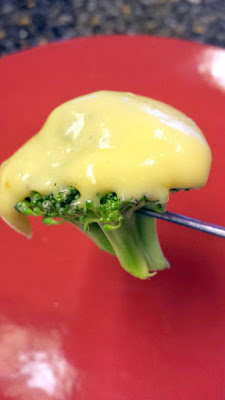
For dippers, I sliced up apples and had blanched broccoli, but other veggies would work like cauliflower, asparagus – and this was too time consuming for me, but boiled fingerling potatoes would be a perfect addition too. If you’re not trying to be vegetarian, you could also slice up some cooked sausage. Since this time I was intentionally striving to be gluten free I didn’t have bread – though you could seek out gluten free bread if you’d like.
Great dippers for a cheese fondue that is healthier than bread - broccoli and cauliflower! Just quickly blanch them to soften them up

Since this time I was intentionally striving to be gluten free I didn’t have bread – though you could seek out gluten free bread if you’d like.
Cheddar fondue, a fun interactive way to eat together

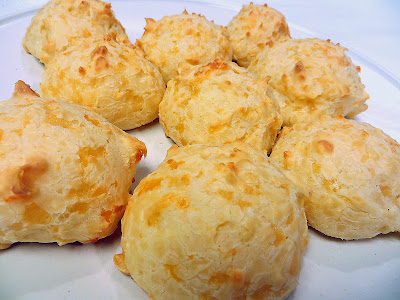
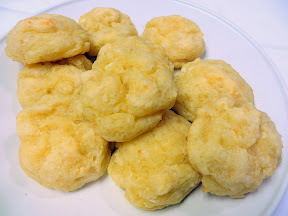
A particular guest I had coming not only was gluten-free, but also has corn allergies. So, as a subsitute for the cornstarch that most fondue recipes call for, I used tapioca flour! Tapioca flour, also known as tapioca starch, is gluten free as it’s made with a root. I first became acquainted with tapioca flour when making pao de quejio Brazilian cheese bread rolls in the past, and often have it on hand.

I also admit I had 3 times as much of all the ingredients below- as I was making the fondue I measured 8 ounces of recipe at a time, but I prepped more than that in case the cheese ran low so I could add another 8 ounces or 4 ounces as desired. You should do this even if you aren’t sure of your party size because having a little bit of extra cheese or wine available will mean you can adjust the thickness and amount of your cheese as you need based on the way your cheese is melting to get the desired melty texture.

Make sure you don’t get your cheese too hot, as it will start to glomp together and fats will ooze from it. You want it just warm enough to be melted.

Ingredients:

  • 8 ounces of sharp Cheddar cheese, grated
  • 2 cloves of garlic
  • 1 cup of dry white wine
  • 4 teaspoons of tapioca flour
  • 1/4 teaspoon of nutmeg
  • 1/2 teaspoon of dry mustard
  • 2 tablespoons of pesto –  regular basis or red pepper sauce
  • Blanched broccoli (you can also use raw or steamed, but I like blanched because it softens it slightly but not too much so you still get great green color and firmness to stay on your fondue fork)
  • Sliced apples
  • Whatever else you’d like to dip into your cheese!

Directions:

  • Grate the sharp Cheddar cheese and then set aside – it will melt better if it’s closer to room temperature rather than cold from the refrigerator when you start to melt it.
  • In a small bowl, mix the 4 teaspoons of tapioca flour with 2 tablespoons of cold water. Stir until it dissolves.
  • Peel the 2 garlic cloves  and rub the inside of the surface of your pot or saucepan with the cloves. I then minced the garlic and put it in the pot along with 1 cup of the white wine. Heat the wine until it is simmering.
  • Slowly whisk in a handful of the 8 ounces of cheese at a time so that it will melt evenly. The liquid cheese should still be at a simmer.
  • Once the cheese has melted, whisk in the tapioca and water mixture, then the 1/4 teaspoon of nutmeg and 1/2 teaspoon of dry mustard until it is smooth and fully incorporated.
  • Swirl in the 2 tablespoons of pesto at the end for a little extra depth of flavor
  • If you want to use a slow cooker to keep it warm, you may have to start this on a pot on the stove to get the heat needed to first melt and incorporate everything, and now move it into the slow cooker.

From here, just dip and eat! If for some reason you have leftovers, I will often refrigerate it and add it in an omelette or on open faced sandwiches or other veggies later.
Cheese fondue with broccoli as your dipper instead of bread is healthier. You can have the broccoli raw or blanch it quickly to soften it (but not too much)

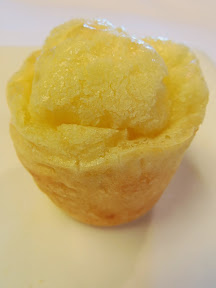
Other fondues we had were broth (a great shortcut for this is to buy pho broth!) with meat and seafood, chocolate (dip crackers, cookies, fruit, cream puffs and eclairs…). It’s a fun theme for a party as it kept everyone standing around my table to move around to the various stations and accompaniments. Or, it’s lovely for a dinner with close friends or your loved one because the constant dipping as you eat helps with conversation as you are interacting with your food together!

What’s your favorite type of fondue?


Signature

Caramelized Onion Jam with Goat Cheese and Sweet Potato Tortilla Chips

For a get together with a neighbor to discuss some shared property plans, they provided the wine and fruit plate along with cheddar, and I pondered what to bring with my wine. I wanted something that was a snack, but was above and beyond just regular chips and dip, or throwing more sliced cheese on a platter.

A recipe that I recall several of the reps from a Food Should Taste Good event mentioned came to mind. They had raved about one of the recipes on the website, a Caramelized Shallot Jam with Goat Cheese for being super easy and tasty. I had onions instead of shallots in my pantry, but otherwise I had the ingredients on hand and decided to give a try.
Caramelized Onion Jam with Goat Cheese and Sweet Potato Tortilla Chips and Willamete Valley Farmstead Brindisi

I paired this with sweet potato tortilla chips. Food Should Taste Good chips are gluten free, vegan, non GMO, low sodium and ingredients that when I read the list, I understand and recognize: Stone Ground Corn, High Oleic Sunflower Oil and/or Safflower Oil and/or Canola Oil, Dried Sweet Potatoes, Cane Sugar, Sweet Potatoes, Sea Salt. No weird science names.
Caramelized Onion Jam with Goat Cheese and Food Should Taste Good gluten free GMO free Sweet Potato Tortilla Chips Caramelized Onion Jam with Goat Cheese and Food Should Taste Good gluten free GMO free Sweet Potato Tortilla Chips

The sweet potato chips were one of the discoveries I made when I attended a Food Should Taste Good promotional event a couple months back – I have always stood by the multigrain chips. That event, plus the fact that while I was in Denver, they had these sweet potato chips at Denver Airport’s beer flight event, put them onto my radar for a great chip that embodies fall without having to go to pumpkin spices and apple cinnamon donuts and ciders.

This Caramelized Onion Jam with Goat Cheese and Sweet Potato Tortilla Chips is great for a small get together for 6-10. You will want to start making the jam at least an hour ahead of time so it has time to cool off from hot to warm before you serve it. At the same time, make sure you have your goat cheese out from the fridge so it can soften and warm to room temperature to be spreadable.
Caramelized Onion Jam with Goat Cheese and Food Should Taste Good gluten free GMO free Sweet Potato Tortilla Chips

Ingredients:

  • 1 tablespoon olive oil
  • 1 cup of diced onions (or 4 large shallots, thinly sliced to equal about 1 cup)
  • 1/2 cup brown sugar
  • 1/4 cup red wine vinegar
  • 1/8 teaspoon salt
  • 6 oz plain goat cheese
  • 1 bag of Food Should Taste Good Sweet Potato Tortilla Chips (or other chips or bread or vehicle of your choosing for the onion jam and goat cheese)

Directions:

  1. In medium saucepan over medium-high heat, heat the oil for a few minutes. Now add the 1 cup of diced onions and saute for a minute or until the onions start turning translucent.
  2. Add the 1/2 cup of brown sugar. Stir constantly to combine the two for the next 5 minutes or so. Turn down the heat to medium and let cook, stirring once in while, so that it all reduces into a consistency like jam.
  3. Then carefully pour in the 1/4 cup red wine vinegar (it may steam up) and generous pinch of salt to your caramelized onion and brown sugar jam. Stir well, let reduce for another couple minutes, and then remove from heat.
    Caramelized Onion Jam uses onions, brown sugar, some red wine vinegar and heat and just a lil patience for it to reduce! Caramelized Onion Jam uses onions, brown sugar, some red wine vinegar and heat and just a lil patience for it to reduce!
  4. Place the Caramelized Onion Jam in a small serving dish and let it cool from hot to warm. Now place it on a serving platter or alongside a small serving dish of your softened goat cheese (mash it down if it comes in a tube or other odd shape to encourage spooning and spreading it).
  5. Serve with the Sweet Potato Tortilla Chips and it’s all fancy when you know this was all silly easy.

Caramelized Onion Jam with Goat Cheese and Food Should Taste Good gluten free GMO free Sweet Potato Tortilla Chips Caramelized Onion Jam with Goat Cheese and Food Should Taste Good gluten free GMO free Sweet Potato Tortilla Chips

Even if you don’t make this recipe for Caramelized Onion Jam with Goat Cheese (I could also see the combo working in a sandwich), you should definitely check out these delicious Sweet Potato Chips!

Signature

Recipe: Cashew Cheese on Cucumbers

With the heat wave in the past couple weeks,  I wouldn’t be surprised to hear that you might want to keep things simple when making food. I have been mostly doing quick sautés or dishes that require no cooking at all.

This recipe for Cashew Cheese on Cucumber does require a little forethought to soak the cashews in water for a few hours. Otherwise you only need a processor and a knife plus the ingredients to put together appetizers for a potluck or picnic, or just a healthy snack at home.
Cucumber with cashew ricotta and pesto

I like this combination for the refreshing cool crunch of the cucumber,  creamy but cheesy flavors with hint of garlic of the cashew cheese, and touch of salty herb from the pesto. I eyeballed a lot of these so make sure you taste to see what amounts fit your taste levels. The more nutritional yeast you use, the cheesier the flavor while being dairy free. Nutritional yeast is also a great topper to sprinkle on popcorn to have cheese popcorn with your movie!

Ingredients:

For the Cashew Cheese

  • 1 1/2 cups raw cashews soaked in water for 2 hours
  • 1/4 cup – 1/2 cup water; the more water used, the thinner and creamier the cashew cheese will be, so you want to add to your liking for consistentcy a bit at a time
  • 3 or so tablespoons of freshly squeezed lemon juice, more to taste if you’d like
  • 1-2 tablespoons of nutritional yeast, or more to taste if you’d like
  • 1 clove of minced garlic, or more to taste if you’d like
  • Dash of onion powder
  • 1 teaspoon sea salt or more to taste
  • 1 teaspoon of freshly ground pepper or more to taste

For the Pesto – this is more of a rough guideline as I often just eye it after grabbing handfuls from my plant

  • 2 cups fresh basil
  • 1/4 cup or so of olive oil
  • 1/8 cup or so of pine nuts (for more flavor, toast the pine nuts in a dry skillet for a few moments until aromatic, but be careful it doesn’t burn)
  • 1/2 tablespoon of minced fresh garlic
  • pinch or so of salt
  • a few grounds of freshly ground pepper

Directions:

For the Cashew Cheese

  1. First, you will need to soak the raw, unsalted cashews in water for about 2 hours. The water level should cover the tops of your cashews.
    1 1/2 cups of unsalted cashews Soak 1 1/2 cups of unsalted cashews in water for 2 hours
  2. Then, drain the water. Place the cashews, nutritional yeast, 1/4 cup water, lemon juice, the minced garlic and onion powder and salt in the food processor and pulse until roughly blended.
    After 2 hours of soaking, drain the water from the cashews To make the cashew cheese, place the drained pre-soaked cashews, nutritional yeast, 1/4 cup water, lemon juice, the minced garlic and salt in the food processor and pulse until roughly blended
  3. Now as you continue to taste, add in the remainder of the water to get the consistency you would like. If you’d like, you can choose to add more lemon juice, or more nutritional yeast, or more minced garlic or salt to your preference depending on how garlicky, cheesy (from the nutritional yeast), lemony, etc you enjoy.
    To make the cashew cheese, place the drained pre-soaked cashews, nutritional yeast, 1/4 cup water, lemon juice, the minced garlic and salt in the food processor and pulse until roughly blended. Add more water if you want it to be creamier, or leave it rustic and more dense To make the cashew cheese, place the drained pre-soaked cashews, nutritional yeast, 1/4 cup water, lemon juice, the minced garlic and salt in the food processor and pulse until roughly blended. Add more water if you want it to be creamier, or leave it rustic and more dense
  4. Add a few grounds of freshly ground pepper. You can serve as is immediately, but if you refrigerate it for a couple hours the flavors will develop more and texture get a bit thicker so  it will be even more tasty the next day – put it in a container to be used as a dip for a picnic with veggies, or spread on a sandwich, so many possibilities!

For the Pesto

Blend all the ingredients for pesto together – you may want to add a little bit more olive oil, salt, or pepper to taste. Puree until the mixture is smooth. Make sure you pause once in a while to scrape the sides of the bowl with a rubber spatula as needed to make sure it all gets mixed well, as well as to taste and adjust to your liking.

For the final Cucumber Cashew Cheese appetizers

Slice the cucumbers and slather on a bit of the cashew cheese. With a spoon, add on a bit of the pesto. Serve!

Cucumber with cashew ricotta and pesto Cucumber with cashew ricotta and pesto

I put this combo on cucumbers buy it’s also great in sandwiches and the cashew cheese can be substituted in pasta like Ricotta in pasta shells or lasagna too.

What have you been making in the kitchen during this extended heat wave in Portland (or wherever you may be when it’s hot in the summer!)?

Signature

Soba Noodles with Kale, Miso, and Avocado

Recipe for Soba Noodles with Kale, Miso, and Avocado, vegetarian and gluten free and healthy and easy!
When I was gifted a few avocados from the California Avocado Commission, I knew that I wanted to try one of the recipes I’d seen and pinned a while ago from A House In the Hills: Soba Noodles with Kale, Miso, and Avocado.
Recipe for Soba Noodles with Kale, Miso, and Avocado, vegetarian and gluten free and healthy and easy!

I added ginger and red pepper flakes for mine for a little more heat and burn, and used the kale that I could find even though she had recommended dino kale. After prepping and mixing it, I then put it in the refrigerator to chill for a couple hours to make for a refreshing lunch on a hot summer day that is also healthy!
Recipe for Soba Noodles with Kale, Miso, and Avocado, vegetarian and gluten free and healthy and easy!

Make sure you taste your miso avocado sauce several times- the guidelines here may vary based on how salty your miso may be and your preference levels. Serves 4.

Ingredients:

  • 2/3 package of buckwheat soba noodles (enough for 4 servings – usually 1/2 a bunch is 1 serving. I used King Soba Organic Sweet Potato and Buckwheat Noodles)
  • 1 teaspoon of sesame oil
  • 1 small bunch of kale – mine came out to about 4 cups
  • 1 ripe avocado
  • 1 clove of garlic
  • 1 tablespoon olive oil
  • 3 tablespoons miso – I used shiso miso
  • Juice from 1/2 lime (about 1 tablespoon)
  • 3/4-1 cup of water
  • 1/2 teaspoon of ground ginger
  • 1 teaspoon of red pepper flakes
  • 1 tablespoon of sesame seeds plus additional to garnish
  • freshly ground pepper to taste

Directions:

  1. Cook the soba noodles according to directions in unsalted boiling water. Be careful that you do not overcook them as when you add the avocado miso dressing later it will be adding a lot of moisture and can make them soggy (unfortunately I made that mistake with this batch, but I’m warning you not to!). After they are ready, drain and rinse with running water at least twice to wash off the extra starch. I might even recommend using chopsticks or a fork to lift and swish the noodles a little bit in the new water to make sure the starch is washed off all the noodles. Then mix with 1 teaspoon of sesame oil, distributing well so the noodles will not stick together. Let cool.
  2. While the soba noodles are cooking, cut the kale leaves from the stalk and into either ribbons or small bite size pieces. I then mixed in the kale leaves with the still steaming hot noodles and sesame oil so they did wilt a little. Depending on how much you like kale, you could also consider a quick blanch to soften it further, but the mixing with the hot soba for me was enough.
  3. In a food processor, combine the pitted avocado, 1 clove of garlic, 1 tablespoon olive oil, juice from the 1/2 lime and 1/2 cup of water. Puree, and then taste and continue to add the water and mixing until to your taste. The consistency should be a silky sauce. I happened to have used 1 cup or so to balance out the saltiness of my miso. bring large pot of salted water to boil, add noodles and follow the package instructions to cook
  4. In a large bowl, mix the soba noodles, kale, and avocado miso dressing until well combined. This is when I also added the ground ginger, red pepper flakes, and tablespoon of sesame seeds and ground pepper to taste.
    Recipe for Soba Noodles with Kale, Miso, and Avocado, vegetarian and gluten free and healthy and easy! Recipe for Soba Noodles with Kale, Miso, and Avocado, vegetarian and gluten free and healthy and easy!
  5. When well mixed, chill in the refrigerator for a couple of hours if you can, and enjoy cold! When serving, feel free to garnish with another little sprinkle of sesame seeds. You could also add tofu or fish or other protein of your choice on top!

Recipe for Soba Noodles with Kale, Miso, and Avocado, vegetarian and gluten free and healthy and easy!

This goes well with a crisp white wine and sitting outside on a summer day.

Signature

Pão de Queijo Recipes- Three Ways!

Have you ever had Pão de Queijo?

A fluffy homemade Pão de Queijo Recipe: How to Make Pão de Queijo (Brazilian Cheese Bread)

It’s a little cheese bread bun. They are popular in South America, and I first had it at churrascarias in Chicago where you are supposed to avoid them in order to focus on the all you can eat served tableside by the gaúchos, but these pãos were the highlight for me. So of course I had to figure out how a Pão de Queijo Recipe to make them at home without having to also eat all that meat! I was reminded of Pão de Queijo recently because I am jealous of a couple I know who are spending a few months in Uruguay- what a fun adventure! I wish I could go off and stay in a country for a few months. I suppose I did that when I was in college- I was in China for a summer- but I would appreciate living abroad so much more now that I am experienced and bolder.

Also, since I made and shared those Mini Cream Cheese puffs earlier, I thought about how they were the fourth variation of cheese bread I have made- which is the only kind of breads I make. The kind with cheese (I’ve also made gougeres- maybe I’ll cover those for New Year’s as those are great with sparkling!). Cheese and bread = win!

I have done Pão de Queijo two ways in the past. One starts with making a roux on the stovetop, and then adding the tapioca flour, then the cheese and egg to form the dough and then make drops on a cookie sheet.
Recipe: Roux Method for Pão de Queijo Recipe: Roux Method for Pão de Queijo

The other uses a blender with all the ingredients together, and results in lighter pão, but it is much faster because after mixing you just pour them into muffin tins and bake in the oven, an easy 3 steps!
Recipe: Blender Method for Pão de Queijo Recipe: Blender Method for Pão de Queijo

However, there is a chewy dense texture to pão you won’t get as much with that shortcut method. The dough of the roux method allows you to make balls/buns or you can make it in large or small muffing tins. The easy way requires muffin tins because it will be a liquidy dough before you bake it (see the difference in the photos above?).

I have made both kinds below to show you since the last time was a couple years ago and the photos aren’t very good/non-existentm I and my co-workers gobbled both up so rest assured, both are still yummy. And I’m going to show you both!

By the way, since they use tapioca flour, Pão de Queijo are gluten free! I used Bob’s Red Mill tapioca flour, because Bob’s Red Mill is the best.

In both of these I just use cheese, but you can also upgrade your pão by using garlic, caramelized onion, and herbs or spices of your choice. Sometimes I like to sprinkle mine with red pepper flakes. And, as you will see in my Ingredients list, I totally doubled up on the cheese but you don’t have to! I personally prefer the roux method version the best. I like having them with a nice glass of wine- I think the last time I made these actually was for a wine and cheese party I hosted! I had them all prepped already, so once the oven timer went off I would dump them into a basket for everyone, and often it would be empty before the next batch came out!

Recipe: Roux Method for Pão de Queijo, sprinkled with red pepper flakes Recipe: Roux Method for Pão de Queijo, sprinkled with red pepper flakes

Roux Method for Pão de Queijo – cheesy Biscuit-look version

So, I have two ways I use the roux method. First I’ll list my favorite, more cheesy version.

Yields 10 large pao (about half your palm size) or you can make smaller balls. This yielded about 10 pãos for me.

Ingredients:

  • 1/2 cup water
  • 1/3 cup butter or olive oil
  • 1/3 cup milk or soy milk
  • 1 teaspoon salt
  • 2 cups tapioca flour
  • 2/3 cup freshly grated Parmesan and Romano cheeses with queso fresco if you have it. I will admit though the original recipe calls for 2/3 cup, I used 2/3 cup parmesan and 2/3 cup queso fresco for more cheesiness. And then while I was measuring it I kept breaking off and eating more of the Cacique queso fresco. And I also ate it while it was cooking. I had to stop myself so I would have some left for the blender version of this recipe. If you are looking for this in the grocery store, I usually find queso fresco by the cream cheese which is by the pre-shredded and sliced deli cheese rather than in the cheese case.
  • 2 beaten eggs, room temperature

Directions:

  1. Preheat oven to 375 degrees F.
  2. Pour the water, olive oil, milk, and salt into a large saucepan, and place over high heat. When the mixture comes to a boil, remove from heat immediately, and stir in tapioca flour until smooth. This will probably take 10 minutes, unless like me you can use a dough hook on a stand mixer for this then it will only take a few minutes. Doing it by hand works too- I’ve done it that way before I owned the mixer. Either way, once mixed, set the dough aside to rest for 10 to 15 minutes.
  3. Stir the cheese and egg into the tapioca mixture until well combined. The mixture will be chunky like cottage cheese.
    How to Make Pão de Queijo (Brazilian Cheese Bread)
  4. Drop rounded, 1/4 cup-sized balls of the mixture onto an ungreased baking sheet, or you can choose to make ones in muffin or mini muffin tins or make smaller balls, your call.
    Recipe: Roux Method for Pão de Queijo Recipe: Roux Method for Pão de Queijo
  5. Bake in preheated oven for 15 to 20 minutes or so- look for the tops to be lightly browned.
    Recipe: Roux Method for Pão de Queijo

As you would expect, the better the cheese complexity, the better the pão, and also if you use butter and real milk it will taste better.

Recipe: Queso Fresco for Pão de Queijo Recipe: Parmesan and Queso Fresco for Pão de Queijo

They taste great fresh and hot, or rewarmed later!
Recipe: Roux Method for Pão de Queijo Recipe: Roux Method for Pão de Queijo

I personally like the “biscuity” one because of it’s cheesiness ratio and the chewiness. So taste and texture win. But I admit it is not round like the original Pão de Queijo should look like. I have made that version, which is more aesthetically close to the original and looks a bit more like gougeres, that “other” cheese bread). Follow all the exact same steps as above, but with the following ratios (this yielded about 20)

  • 1 cup of whole milk
  • 1/2 cup of vegetable oil
  • 1 teaspoon of salt
  • 2 cups of tapioca flour
  • 1 1/2 cup of parmesan
  • 2 beaten eggs

Recipe: How to Make Pão de Queijo (Brazilian Cheese Bread) Recipe: How to Make Pão de Queijo (Brazilian Cheese Bread) Recipe: How to Make Pão de Queijo (Brazilian Cheese Bread) Recipe: How to Make Pão de Queijo (Brazilian Cheese Bread) Recipe: How to Make Pão de Queijo (Brazilian Cheese Bread)   Recipe: How to Make Pão de Queijo (Brazilian Cheese Bread) Recipe: How to Make Pão de Queijo (Brazilian Cheese Bread)
To make more perfect circular buns, use an ice cream scooper instead of a regular spoon like I did, and you can dip it in water to prevent it from sticking.

Mini-Muffin with Blender Method Pão de Queijo

Yields about 24 mini muffin sized cheese breads.

These are so easy- you can make it with one eye closed. Which I literally did because I had to stay home from work one day because I couldn’t open my left eye because it kept stinging/tearing. But that didn’t stop me from successfully making these even as one eye just kept crying. The hardest part turned out to be pouring when you only have one eye open- messes with your depth perception. I like these because of the yield and ease, and they are much more light and airy. The roux method will have a bit more of a crunch on the outside and soft chewy inside rather than this poofy chewiness.

  • 1 egg, room temperature
  • 1/3 cup olive oil
  • 2/3 cup milk
  • 1 1/2 cups tapioca flour
  • 1/2 cup packed grated cheese, your preference, parmesan, romano, or  queso fresco, mix of the three… ok I totally used 1/2 cup of Parmesan and 1/2 cup queso fresco for more cheesiness
  • 1 teaspoon of salt (or more to taste)

Directions:

    1. Preheat oven to 400°F. Grease a mini-muffin tin.
    2. Put all of the ingredients into a blender and pulse until smooth. Don’t forget to use a spatula to scrape down the sides of the blender so that everything gets blended well. At this point you can store the batter in the refrigerator for up to a week if needed.
      Recipe: Blender Method for Pão de Queijo Recipe: Blender Method for Pão de Queijo Recipe: Blender Method for Pão de Queijo
    3. Pour the batter (it should be thick but liquidy) into each of the mini-muffin openings- they will rise so leave some space at the top, maybe about 1/8 of an inch from the top. Bake in the oven for 15-20 minutes, until all puffy and just lightly golden browned- if you wait too long it will start to lose it’s light fluffyness inside.
      Recipe: Blender Method for Pão de Queijo Recipe: Blender Method for Pão de Queijo

Recipe: Blender Method for Pão de Queijo Recipe: Blender Method for Pão de Queijo

Eat while warm or save to reheat later.

Recipe: Blender Method for Pão de Queijo Recipe: Blender Method for Pão de Queijo

Which version of the Pão de Queijo Recipe are you interested in?

Signature