Pan Roasted Corn Salad with Mozzarella and Tomatoes in Lemon Dressing

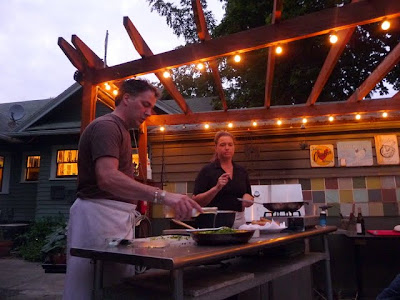
I learned at the Caprial + John cooking class that to add that taste of smoky char flavor to corn, I don’t necessarily need to roast it on the grill while on the cob. I put this new learned execution method to use yesterday when making a dish for a Labor Day barbecue.

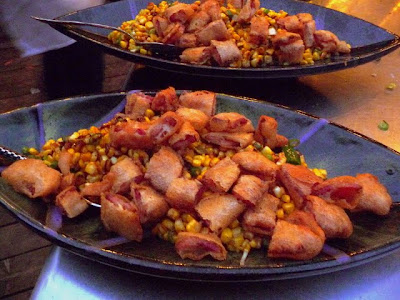
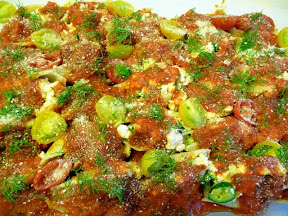
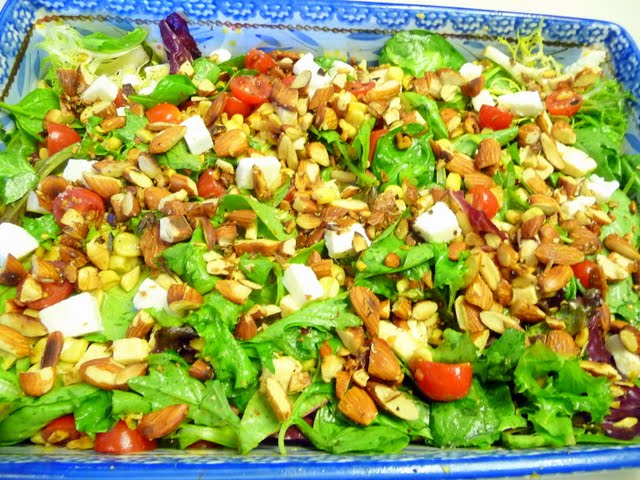
I also made a dressing for this recipe modified from one on Food Network which I chose because the dressing uses lemon juice instead of vinegar, specifically what I wanted to give the greens zing without too much acid so it would be a counter to the babyback ribs I knew would be at the bbq and the fact that the weather would be more then 90 degrees. I thought that having the sweet and smoky corn with the burst of tomatoes and tartness in a salad would go well, and had mozzarella for some bits of creaminess and toasted almonds for crunch.

 Ingredients:

  • 6 cups of spinach and spring mix greens
  • 3 tablespoons of butter
  • 5 cups of sweet corn niblets
  • 2 cups of cherry tomatoes
  • Juice of 1 lemon or 2-3 tablespoons lemon juice
  • 2 tablespoons (or to taste depending on what you use) of your favorite bbq seasoning. I used Weber Grill Kickin Chicken seasoning
  • Ground salt and pepper to taste
  • 1/2 pound of fresh mozzarella (optional).
  • 1 cup of unsalted almonds (optional)

Directions:

  1. First, I defrosted the frozen sweet corn and cooked it slightly by putting it in a wide pan with 1 cup of water and heating it on medium for about 15 minutes or so until all the corn is no longer frozen but still firm. This will take less time if you cut the corn kernals fresh from the cob instead. Drain the corn in a colander.
  2. In that same pan on med-high, I heated about 3 tablespoons of butter until it was sizzling and distributed throughout the pan. Pour in the corn and spread it out so the most amount of corn is touching the pan bottom and butter. Do not touch the corn for about 7 minutes or so in order for the corn to brown, and then stir to distribute the char and remove from heat. Pour into your planned serving container (I used a 4 qt dish) and let cool.
  3. I cut all the cherry tomatoes in half, and once the corn was cool, added it to the dish of corn kernals.
  4. Cut up the fresh mozzerella into small squares and add to the top (again to the cooled corn so it doesn’t melt)
  5. In a bowl, I whisked the lemon juice, olive oil, ground some salt and pepper, and the bbq seasoning to make the dressing
  6. Add the greens, and then the dressing and toss. When the greens and dressing mix it will wilt a bit, so depending on size of your container you may have to add, mix, and then add, mix like I did.
  7. Take the almonds and cut them into slivers or pieces toast them in the saucepan until golden brown and top them on the salad for more crunch – you can also add them raw but I like them warm and toasty to bring out more flavor while softening the nut slightly

The recipe above serves 6 as salad courses and fed 9 as a side the barbecue. Total time was 45 minutes, mainly as there was some waiting to cool time so it is easy to make this while also mulitasking another dish. While the corn is initially warming in the water step, cut your tomatoes. You can keep yourself busy and away from the temptation from touching your corn while it is browning by cutting and toasting your almonds if you don’t need them warm on your salad. Then while the corn is cooling spend your time cutting the mozz and making the dressing.

You can also make all of this ahead of time and just leave out the greens and dressing and combine right before mealtime. Or, you can skip the greens and dressing part and just use a handful or so of fresh basil and make it more focused on the corn and tomatoes and cheese. F is a baby and didn’t like the creaminess of the cheese, so another alternative woudl be to use fresh tofu instead to still get that texture and not the flavor (even though I think mozz is already a really light cheese). If you want more cheesy kick, try goat cheese, or feta.

Signature

The Last Days of Summer: A cooking class with Caprial + John

I signed up for a cooking class last night with Caprial + John’s Kitchen. Last year I was able to attend one of their supper clubs, which was my first taste of their food in a family-style dining atmosphere in their beautiful backyard of their home (they usually hold it in their Kitchen, but circumstances had them move it to their backyard so it was like a wonderful summer party with friends). As fate had it, this class also would get moved to be held at their home instead of their kitchen/classroom, so I got to have another summer evening with food and friends and strangers thanks to Caprial and John. Even though it was unseasonably autumn chilly, John pulled out various sweatshirts for some of the participants, and there was warmth from their outdoor pizza oven too as well as their grill, burner, and various torches they had lit,

The cooking class gave me an opportunity to try another venue besides HipCooks, and also allowed me to dig into some Caprial + John Pence recipes which are more Pacific Northwest cuisine inspired. As a plus, the class offerings can be used to pace out a full formal meal (appetizer, salad, entree, side dish, and a dessert). Caprial and John are professionals- they used to run a quite famous restaurant, Caprial hosted a television cooking show and authored several cookbooks, and this duo is part of the movement and history that  helped give Northwest cuisine a name in American food.

The format for the classes is a demonstration by this husband and wife team that allows the participants to watch food preparation while asking questions and taking notes on their tips for variations or execution, and then dine one those products in a BYOB atmosphere (you can enjoy the BYOB from prep to dessert). It is also fun to be part of their banter and hear them tell their stories from their days working the line, running the restaurant, and making the dish for their family, all under the twinkling lights of their backyard and under the late summer sky with a glass of wine in hand.

On the list for the “Last Days of Summer” class included:

  • Slow Roasted Tomato Salad on a bed of Mozzarella with Warm Anchovy Dressing
  • Stuffed Grilled Pork Loin with Fontina, Roasted Garlic and Herbs
  • Corn Salad with Bacon Tempura
  • Potatoes in Parchment with Sweet Onions
  • Grilled Peaches with Mascarpone Bacon Caramel Sauce

Our first bites were enjoyed while still in the demonstration part of the class, the appetizer of slow roasted tomato salad with mozzarella and anchovy dressing. You can barely taste the anchovy… and I know when I make this salad to serve it with bread to mop up that dressing afterwards.

The highlight was making bacon tempura in their backyard kitchen/grill/pizza oven area for the corn salad with bacon tempura. We talked about lots of wonderfulness that can be made with the pan roasted corn niblets. But, watching that bacon tempura in progress was enough to make several of us pull out our cameras (after being discreet during the earlier part of the class) to capture that food pron…

We learned how to butterfly and stuff these grilled pork loins. John taught us the adult way to tie the loins, and then the children’s way involving a bunny, tree, and fox… which is totally the one I wrote down and still remember today. They came out of the grill all oozy like this

Dinner Plate for the dinner dining part

And finally dessert, the Grilled Peach with Mascarpone Bacon Caramel Sauce. Caprial carefully ensured we knew enough to be patient and leave the pot alone for the sugar browning, all saw the color for when to finally start stirring, and tales of smokestacks coming from the pot if you don’t keep your eye on your sugar.

Signature

Fresh Ricotta, butternut squash, baby zucchini in Pasta Shells

For someone who loves food, and enjoys cheese, and pork, and enrichment of flavors often thanks to fat, trying to make a dish that does not contain much fat and is not too cheesy and is vegetarian but tastes good is an interesting challenge in trying to please a fussy vegetarian palate instead of what I would personally pick.

I had a craving for fresh ricotta and decided to make stuffed shells for dinner. In order to make it vegetarian and not “overloaded” with cheese (I love it with multiple kinds of cheese myself) or too rich, I didn’t follow any recipe that called for sausage or egg, and only used the ricotta, which turns out is most of them. So I decided to wing it. To add more flavor rather then just ricotta in shells, I decided to use butternut squash and baby zucchini, heirloom tomatoes, and fresh chopped sage and dill from the herb garden.

Ingredients: (enough for 4 people as a main dish, 6 as a side)

  • 1 gallon of whole milk. It needs to be not be ultra-pasteurized
  • 1 pint of buttermilk
  • 1 box of large shell pasta
  • 2.5 cups of cubed butternut squash
  • 5 baby zucchini, chopped
  • 3 tablespoons of sage, chopped. As an optional step you can brown the sage with butter first for extra flavor
  • One jar of marinara sauce of your choice
  • 2 tablespoons of dill
  • 1 pint of heirloom cherry tomatoes
  • 1/4 cup of Italian seasoned breadcrumbs or parmesan cheese as topping

Directions:

It is important that you don’t use Ultra-Pasteurized milk, because it does not have the important calcium chloride which is needed for coagulation and curds (the pasteurization process removes calcium). Whole milk is better because it will also taste richer, as the flavor of the cheese is related to the amount of butterfat in the milk.

  1. First, I heated up the gallon of whole milk and a pint of buttermilk under medium heat. I kept stirring with a wooden spoon to make sure none burned at the bottom and no skin would form at the top, and would also monitor the temperature once in a while. It only needs to reach 175 degrees Farenheit. As it heats up, you can watch the curdles start to form, and the white curds begin to separate from the yellowish liquid whey.
    Fresh Ricotta, butternut squash, baby zucchini in Pasta Shells Fresh Ricotta, butternut squash, baby zucchini in Pasta Shells
  2. Once it reaches the desired temperature, take it immediately off the heat, and using a slotted spoon, I started moving the curds onto a strainer that had cheesecloth sitting on another pot to drain more whey. This whole first step maybe took 20 minutes, and then let the whey drain for another 15 minutes or so.
  3. As it is draining, at the same time boil another pot of water in which I placed 25 shells, cooked al dente, and then drained them and quickly ran some cold water on them.
    Fresh Ricotta, butternut squash, baby zucchini in Pasta Shells Fresh Ricotta, butternut squash, baby zucchini in Pasta Shells
  4. As I was waiting for the ricotta and whey to drain some more, I steamed some cubed butternut squash (a little more then 2.5 cups probably once cubed) and five baby zucchini, which I then chopped up, along with the sage (maybe 3 tablespoons chopped). Mix these all together. If I had any lemon juice I might have added some in, but unfortunately someone drank it all. Something I thought of afterwards is that I could have browned the sage in a little bit of butter first- I love browned butter sage as it is a little crunchy. I restrained from adding spice this time because I wanted to let the flavors of the vegetables shine.
    Fresh Ricotta, butternut squash, baby zucchini in Pasta Shells
  5. Finally, the assembly time. While pre-heating the oven to 350 F, I first poured some basil marinara (from a jar thanks to Trader Joe’s) onto a 9×13 baking dish. Then, I would basically put a tablespoon of the ricotta/vegetable mixture into each shell, and line them up. The fact that after they were cooked I had immediately ran cold over them and separated each kept every shell intact.
  6. After they were all filled, I topped the whole dish with the remaining sauce. Next, sprinkle the dill (I used about 2 tablespoons), and this is when I added the heirloom tomatoes basically between every shell- the ones I had were all about cherry tomato size.
  7. Sprinkle some Italian seasoned breadcrumbs instead of more cheese (which again, would be my preference- that way it gets all bubbly crunchy with a bit of burnt parmesan cheese), and bake in the oven for about 40 minutes.

Fresh Ricotta, butternut squash, baby zucchini in Pasta ShellsFresh Ricotta, butternut squash, baby zucchini in Pasta Shells  Fresh Ricotta, butternut squash, baby zucchini in Pasta ShellsFresh Ricotta, butternut squash, baby zucchini in Pasta Shells

Seriously, making ricotta is so easy, and you get so much more yield for the same dollar then if you bought a container (maybe 25 oz, instead of the packaged 15 oz). And it tastes so much better, perhaps like me you will be ruined and no longer like what it tastes like coming from a container.

After all this, the fussy vegetarian pulled out nutritional yeast in order to add a bit more nutty cheesy flavor! What a loser.  ^_^ I had to say though, overall the dish ended up tasting pretty good and I didn’t miss the other cheeses or egg that other stuffed shell recipes use, and I think these were better veggies then spinach as stuffing- I prefer spinach in pasta with simpler sauces so you can taste the spinach instead of just the texture which gets overwhelmed by tangy marinara. Also the bursts of flavor and juice from the heirloom tomatoes are always awesome.

And, there is still leftover ricotta so I can use it inside endive leaves, or as topping on slow-roasted roma tomatoes with a bit of olive oil and dot or so of aged balsamic, the next couple days. Great for some cooler temperature snacks as the weather heats up as summer if arriving in Portland this week with a return to 80 degrees (only the 2nd time this year so far), and summer officially starts tomorrow.

Signature

Another Hipcooks class: A Romantic Dinner for Two

The description on the Hipcooks website for the class of “A Romantic Dinner for Two” read

“The way to the heart is through the stomach, my friends! Learn delectable, delicious, succulent foods that will knock their socks off (and more!) They knew you were sexy, but did they know you were so talented?”

  • Sexy bruschettas
  • Mouth-watering butternut squash, garlic, sage risotto
  • Exotic wild mushroom risotto
  • Peppery, palate-refreshing salad
  • Ginger-raspberry & Grand Marnier crème brûlée

How could I resist? It was also being taught by Nick, who was the appetizer instructor for my previous Cocktails class at Hipcooks.

What I didn’t know is that as part of the class, we would also be getting a chance to get some knife skills including how to choose a good knife (we used Wüsthof chef knives) and care for it and practiced drawing, slicing, chopping, and chiffonade- a term I had only just learned on Top Chef Masters earlier in the week.

Rather then just making one kind of bruschetta, we learned how to make a bruschetta bar that had a variety of toppings so everyone could make their own kind of crostini with toppings that included homemade goat cheese, homemade mozzarella, olive tapanade, and roasted red peppers.

Besides learning how to infuse the arborio rice with flavors (including celery, onion, garlic, and white wine) we also practiced eyeballing the liquid ratio as we cooked it, and Nick was right on the mark for the amount of time it would take each of our three pots of risotto. Also, we got tips on how to flambe the mushrooms for the mushroom risotto- which we did twice, once with the portobello and cremini mushrooms and also with the oyster mushrooms. Fire! Here are some pictures of progress at the end when it was deemed looking and tasting al dente with the rice so time to add the freshly grated parmesan

We made the butternut squash one in two different batches- one with chicken stock and one with vegetable stock (both stocks were homemade earlier) to taste the difference but with the vegetable stock one we added lemon juice. The vegetable stock with lemon juice was my favorite. We didn’t quite cut the mushrooms small enough for my taste, though others liked that it was chunky so it had a more meaty texture. Overall the salad was a bit too salty for me, though he validated that mixing with your hands (which I also do at home) is the best way to make a salad.


And of course, using fire to caramelize that crunchy top for creme brulee. We made two kinds of creme brulee- one with vanilla and raspberry, and the other with orange ginger and Patron Citronge Orange Liqueur. It was so ridiculously easy to make- I definitely want to get those little torches at Home Depot, which was a great tip from Nick.

As all three of the classes I have taken at Hipcook (I also took a cheesemaking class), it was casual and fun like learning from a good friend with other new friends. We didn’t have to worry about measurements and we did a lot of looking to check in on various stages of making items, and tasting along with our hands on. We did things off the cuff, and we got lots of verbal tips on where to get ingredients, things you can pre-make, how longs things keep, etc. that no recipe can tell you. Thanks for teaching the class how to impress your loved one/one night love (hee). It was as it has always been, fun but educational at Hipcooks.

Signature

Bacon Takedown: Sty Wars! Chewbaccon and Ham Solo

One of my friends sent me a link about a Bacon Takedown.

On a whim, I emailed the organizer because the website said that it was an amateur's competition and they had various prizes, and just for competing you got 15 pounds of Hormel Black Label bacon. I thought I would make the bacon potato cheese pie (the pie I made for my Bacon Party last month). I had to switch from the bacon pie because I had to make enough for 250 tastes- which would be too much work. The next thing you know, I'm making 11 batches of Bacon Rice Krispies (after a 1.5 batch two days before to test baconizing Rice Krispies) and the whole house smells like 12 pounds of bacon.

What 14 lbs of bacon looks like in the fridge

After playing with a few different team names, we fell into "Chewbaccon" and the Team "Sty Wars! Chewbaccon and Ham Solo" were soon on its way with a theme. Thanks to Free Icons Download.com artist for helping to populate the characters on our station… and Miss Melly for this awesomeness which I will forever treasure also on a T shirt and an apron

We didn't win any prizes- the team that won People's Choice took home the giant check for People's Choice… as well as a year's supply of bacon and cookware. Part of me just wants a giant check, forget the year's supply of bacon. They were crazy though: their station had a heck of different stuff, including bacon bruschetta, bacon thyme ciabatta, three cheese garlic bacon spread, bacon and basil tomato sauce, and chicken fried bacon, and a little toaster oven to make them fresh and hot right there. I didn't go upstairs (my area was downstairs) until late, and I only got to try the bruschetta. It's sort of full circle… I discovered the bacon cheese potato pie from Reddit, and the winners also are Redditors.

There were 20 total offerings, both sweet and savory, such as Bacon Jalapeno Cornbread with homemade butter, mini Bacon Maple Cheese Pies, Bacon Hash with Fig Jam and Dijon Mustard Potatoes that came on a bacon mat, Chocolate Bacon Truffles (great presentation), Bacon Coffee Flan (made with Stumptown coffee), Bacon Bourbon Pecan Mini-pies, Bacon Bourbon Maple Pralines, Bacon Maple Milkshakes and even a homemade cured Bacon Lettuce Tomato offering (the latter was my favorite… and the milkshake was the weirdest to me).

Picture 1: Bacon milkshake in the cup, Bacon cheese pie in the back, Bacon Jalapeno Cornbread with homemade flavored butter, and Chocolate Bacon truffles in the front. Not pictured are the bourbon bacon peach crumble and the bacon bourbon maple pralines, which were the station immediately left and right of us which we were the first to sample

Picture 2: In the cups in front, bacon butternut squash enchiladas, on the paper the home-cured bacon made into a BLT (my favorite of the night) made by the People's Sandwich of Portland, another bacon milkshake in the cup in the back, bacon oatmeal cookie with cherries and almonds next to that, and bacon pizza (the latter two are from Gaufre Gourmet and Slice Brick Oven Pizza food carts)

Picture 3: In the blue paper was a bacon cinnamon roll with maple bacon frosting I think, underneath that are bacon bourbon pecan pies, and bacon profiterole on top of blue bacon! The bacon baklava is on top of a bacon spanish tortilla. In the front there is Bacon Hash with Caramelized Onion & Kale in the plastic cups, Bacon Chocolate Salty balls

Here are some shots (from her camera and mine) from Bacon Takedown 2011 in Portland. Unfortunately, since I was behind the station instead of just attending (a mere $10 admission to sample from all the bacon stations), I didn't do a more thorough photo documentation- but I know someone did go around to all the stations to do so, so hopefully it will be on the internet eventually. Yes, that is the Millenium Falcon & Death Star made out of Rice Krispie treats. Miss Melly is awesome. And the guy who organizes does this on a national tour so see if it's coming to your city (if you are a reader from somewhere else) and also does other kinds like chili, avocado, etc, and he's crazy in a contagiously enthusiastic way. This whole event was a little last minute insaneness but fun.

My Bacon Rice Krispies

Ingredients- yield is 24 rice krispies

  • 1 lb of bacon
  • 5 cups of Rice Krispies
  • 3 cups of mini-marshmallow

Steps

  1. Cook the bacon but save the drippings. I like to prepare mine by lining a pan with aluminum foil to lay out all the bacon and putting it in the bottom rack of my oven at 400 degrees F for about 20 minutes- but watch the bacon the last 5 minutes because that's the difference between crispy bacon and burnt bacon. Usually after 15 minutes I will take out the tray and pour our the bacon drippings into a little corningware container. However you cook the bacon, save at least 5 tablespoons worth of drippings.
  2. Dry the bacon between paper towels. Take the crunchiest pieces and crumble enough to make 1/2 cup of bacon crumbles. You should still have several strips of bacon left.
  3. In a big pot (enough that will fit 5 cups of Rice Krispies and allow you to stir) add 4 tablespoons of bacon drippings and the 3 cups of mini marshallow on medium heat until they are melted.
  4. When the marshmallow is all melted, remove the pot from heat and add the 5 cups of Rice Krispies and do a quick initial stir so there are no big clumps of marshmallow because it is spread on the krispies, but don't stir too much.
  5. Add the 1/2 cup of bacon crumbles now and stir some more until the bacon crumbles are distributed evenly.
  6. Pour 1/2 the rice krispie mix into a 13x9x2 pan that is lined with parchment paper or wax paper (makes it not stick to the pan) and also brush the paper with a little bit of the bacon drippings. Use another piece of paper on top and press to flatten this 1/2 of the mix to the pan. Using the paper helps you not get it stuck on your fingers.
  7. Now add a thin layer of the bacon strips across the entire pan.
  8. Pour the second 1/2 the rice krispie mix into the pan and flatten. Let cool for at least 30 minutes
Signature