Another Hipcooks class: A Romantic Dinner for Two

The description on the Hipcooks website for the class of “A Romantic Dinner for Two” read

“The way to the heart is through the stomach, my friends! Learn delectable, delicious, succulent foods that will knock their socks off (and more!) They knew you were sexy, but did they know you were so talented?”

  • Sexy bruschettas
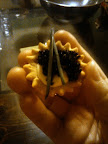
  • Mouth-watering butternut squash, garlic, sage risotto
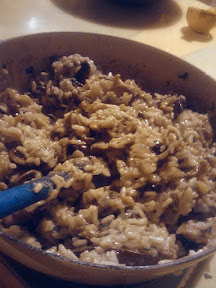
  • Exotic wild mushroom risotto
  • Peppery, palate-refreshing salad
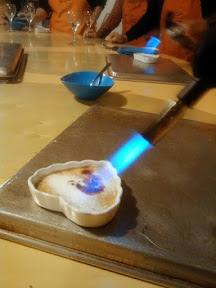
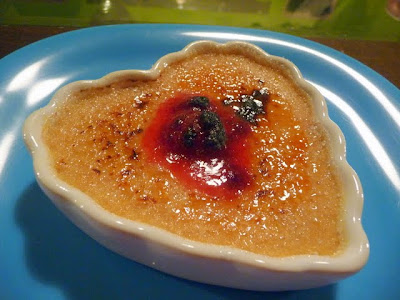
  • Ginger-raspberry & Grand Marnier crème brûlée

How could I resist? It was also being taught by Nick, who was the appetizer instructor for my previous Cocktails class at Hipcooks.

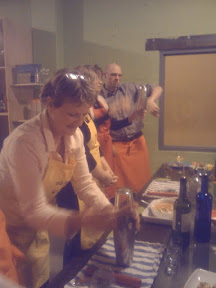
What I didn’t know is that as part of the class, we would also be getting a chance to get some knife skills including how to choose a good knife (we used Wüsthof chef knives) and care for it and practiced drawing, slicing, chopping, and chiffonade- a term I had only just learned on Top Chef Masters earlier in the week.

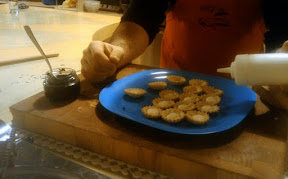
Rather then just making one kind of bruschetta, we learned how to make a bruschetta bar that had a variety of toppings so everyone could make their own kind of crostini with toppings that included homemade goat cheese, homemade mozzarella, olive tapanade, and roasted red peppers.

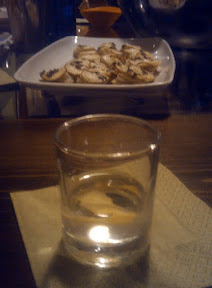
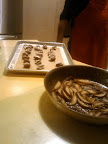
Besides learning how to infuse the arborio rice with flavors (including celery, onion, garlic, and white wine) we also practiced eyeballing the liquid ratio as we cooked it, and Nick was right on the mark for the amount of time it would take each of our three pots of risotto. Also, we got tips on how to flambe the mushrooms for the mushroom risotto- which we did twice, once with the portobello and cremini mushrooms and also with the oyster mushrooms. Fire! Here are some pictures of progress at the end when it was deemed looking and tasting al dente with the rice so time to add the freshly grated parmesan

We made the butternut squash one in two different batches- one with chicken stock and one with vegetable stock (both stocks were homemade earlier) to taste the difference but with the vegetable stock one we added lemon juice. The vegetable stock with lemon juice was my favorite. We didn’t quite cut the mushrooms small enough for my taste, though others liked that it was chunky so it had a more meaty texture. Overall the salad was a bit too salty for me, though he validated that mixing with your hands (which I also do at home) is the best way to make a salad.


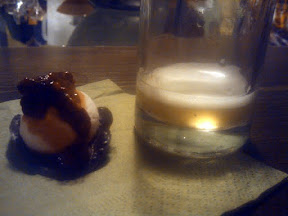
And of course, using fire to caramelize that crunchy top for creme brulee. We made two kinds of creme brulee- one with vanilla and raspberry, and the other with orange ginger and Patron Citronge Orange Liqueur. It was so ridiculously easy to make- I definitely want to get those little torches at Home Depot, which was a great tip from Nick.

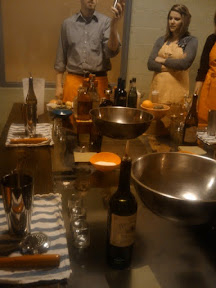
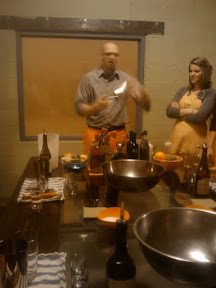
As all three of the classes I have taken at Hipcook (I also took a cheesemaking class), it was casual and fun like learning from a good friend with other new friends. We didn’t have to worry about measurements and we did a lot of looking to check in on various stages of making items, and tasting along with our hands on. We did things off the cuff, and we got lots of verbal tips on where to get ingredients, things you can pre-make, how longs things keep, etc. that no recipe can tell you. Thanks for teaching the class how to impress your loved one/one night love (hee). It was as it has always been, fun but educational at Hipcooks.

Signature

Hipcooks Cocktail Party Review

Last week I returned to Hipcooks Portland on NE Failing and Williams for a class called “A Cocktail Party”. This is my second class with Hipcooks (after my cheese class with Cheyenne) but I had such a good time I wanted to try another one. The purpose of the cocktail party class is to learn how to make lots of things for a cocktail party. This turned out to be nine hors’dourves taught by a chef, and six drinks taught by a bartender. This class fills up pretty quickly and I kept forgetting to sign up online as soon as the new classes are posted (one month or so in advance). But recently I finally got into one. It was on Friday evenings starting at 6:30 (it looks like the next classes starting in April start at 7), which means you just have time after work to grab a quick happy hour bite to eat at Tasty N Sons before coming to class.

The hors’ dourves and drinks were divided basically into 3 parts. First we started a few appetizers, then we learned about a couple cocktails at the big communal table where 4 bar stations were laid out and we would nibble on some of the appetizers we just finished prepping while learning drinks. Then, back to the kitchen part for making a few more appetizers, back to the bar station for two more cocktails and eating the fruits of our appetizer labor…  and then the final few canapes and we sat down to learn our last couple of drinks and finish with a sweet bite.

Each time, as we were working on the drinks, some of the appetizers would come out of the oven or be finished in prep by the chef and assistant so we could snack while tasting the beverages so we only had to worry about the creation and not watching any ovens or finishing enough for the group. We were able to get the hands on instruction and then just move on. This was a great way to break up the class so you didn’t get overwhelmed by the number of things the class offered to teach you or bogged down making enough for a dozen people of every single recipe so efficient in using the learning time as well.

Here’s the list of what was on the class menu, including when we broke out for mixology:

  1. Spicy candied nuts
  2. Warm crab dip
  3. Crisp potato cakes with goat cheese and thyme
  4. Cups with caviar, crème fraîche and chive
  5. The Perfect Martini
  6. Vanilla Martini
  7. Endives stuffed with gorgonzola and roast pear
  8. Warm goat cheese prosciutto-wrapped dates
  9. Mojitos
  10. Caiprinhas
  11. Leek and goat cheese tartlettes
  12. Tuna tartar on cucumber strips with wasabi roe
  13. Dark chocolate hearts with raspberry cream
  14. Ginger Lemon Drops
  15. Amaretto sour with cracked pepper

We started the class with items that we would not enjoy until a later appetizer, but needed time in the oven. So, we rolled out the dough, cut with  glass,  and put in the muffin tins so they could be returned to the fridge/freezer to form into tartlettes  before filling. And, we started the pears so they could caramelized in the oven. Then we went right into the four appetizers that we would be having with our first pair of drinks we would learn.

First step of making Candied Almonds, Cashews and Pecans: nuts and butter with heat to melt the butter… The spicy candied nuts was a simple recipe, but the highlight is that we all were being taught and practiced how to flip food in the pan. Since these were nuts and not an omelet or something more invested before the flip, it was something pretty safe and any nuts that got lost onto the counter, since we had just wiped down the counter, could return back to the nut family in the pan. The finished product, after adding rosemary and brown sugar and Tabasco, were returned to the fridge briefly to harden but could still be eaten while a bit warm and were finger licking salty spicy sweet. Perfect for when you are making a perfect martini with just vodka/gin and dry vermouth.


Next up was Warm Crab Dip served with my favorite kind of crackers, Triscuits. This was super easy to make, and you can prep this earlier, keep it in the fridge, and just put it in the oven so it will be hot when guests need to snack. The second photo shows a closer look at the top which has paprika and parsley sprinkled for color, and the creamy crab underneath which is almost equal parts crab and cream cheese and bit of mayo.

The third was the Crisp Potato Cakes with Goat Cheese and Thyme. This one was a bit more of a cheater, since the potatoes that we were layering with the cheese and thyme were already prepped for us with a mandolin.

The fourth canape we made was Caviar Cups with Crème Fraiche and Chive. The key here was learning where to get very affordable caviar… would you believe Ikea? And we talked about how buying premade pastry shells is so worth it in saving the mess and time to make them from scratch, and having at least one squeeze bottle (which we would see used a few different ways in the recipes that night) can also make your life so much easier. Sorry for the blurriness of these caviar cups with creme fraiche and chive. I took all the pics during class with my camera phone instead of my camera since we were standing at the counter in a hands on class, and it had to fit in my pocket. I particularly like how the caviar cup looks so expensive and fancy, but takes minutes to make and only 4 ingredients.

A better perspective on the size of the Caviar Cups with Crème Fraiche and Chive: just a bite

In our first round of bartending, we learned about how to properly shake cocktails, how to twirl lemon peel after we have wiped the rim of the glass with the lemon oils from the peel, and practiced with and without a pourer how to to count out a 2 oz pour instead of measuring with a shot glass.

Learning about how to properly shake cocktailsLearning about how to properly shake cocktailsLearning how to twirl lemon peel after we have wiped the rim of the glass with the lemon oils from the peelLearning to count out a 2 oz pourShaka shaka... these two to my left were a mother and daughter taking the clasdTasting our perfect martini. In the background, the Crisp Potato Cakes with Goat Cheese and Thyme

Next round of appetizers. The pears came out of the oven smelling wonderful and all caramelized, so we each got to stuff one endive with the gorgonzola and roast pear and gush about what a wonderful finger food vehicle endives are and color they bring to the table (red and green leaves). In disappointing news, we were supposed to make Warm Goat Cheese & Nut-Stuffed, Prosciutto-Wrapped Dates, but when they opened the prosciutto package that they had just bought the day before, there was a little mold on it so they didn’t want to serve it to us, understandably. We each still got to stuff a date, but no meat wrapping. Then we were sent back to the bartending area to learn to make Mojitos and Caipirinhas, which are more time consuming since now we had to start dealing with squeezing juices (no mixes here!) and muddling.

In the back, prepping the Warm Goat Cheese & Nut-Stuffed, Prosciutto-Wrapped Dates (but without the prosciutto wrapping), and in the pan caramelizing the pears for the Endive, Gorgonzola and Roast Pear canape To the left the Warm Goat Cheese & Nut-Stuffed, Prosciutto-Wrapped Dates minus the prosciutto because the package when opened turned out moldy, and the Endive, Gorgonzola and Roast Pear to the right

Third round of appetizer making. In preparing Tuna Tartar on Cucumber Strips with Wasabi Roe, we were impressed with how easy something that looks so fancy can be.

This last hors’dourves was the favorite of almost everyone. This was one we had done a little bit of prep in round 1, but I put all the photos together here. In the first round, we had prepared the little tartlettes. Now we sauteed leeks in butter and white wine to the tartlets. The cooking leeks make the room smell incredible… better than any air freshener in welcoming guests to a home. Only fill the tartlets halfway because when spooning the leek mixture in because next… we added eggs and cream into a squeeze bottle and shook vigourously, and then squeezed the mixture (minimizing things to clean up!) into the tarts. And then… top with got cheese. Delicious.

After this step, put it back in the fridge or freezer briefly to let the shapes harden

We finished off with Dark Chocolate Hearts with Raspberry cream, again making use of having a squeeze bottle in the kitchen. At this point, everyone was getting more tired, and we were content with the chef instructor showing us by doing it himself, and then returning to focus on drinks.


This last lesson from the bartender was for the Lemon Drop, including the sugar rim. My favorite was the last drink though, Amaretto Sour, using all fresh squeezed juices from the fruit, and then talking about the use of egg whites. I’ve had egg whites before in libations in Chicago and in Portland from Clyde Common and The Secret Society, so I already love the frothy light foam touch it adds- more than any sugared rim could do. However, I also learned that I really like Disaronno- and don’t think I would have a Amaretto Sour that uses this with a mix because I don’t want the sourness to ruin it, making it to just balance the sweet is what I’m looking for.

Just like the cheese class, we didn’t need to worry about writing anything down- everything was emailed the next morning. A lot of it was just by watching and listening and putting in a little practice, just like if you were learning a well loved recipe from a family member. I thought the email I got from the cheese class, which has more details about where to buy ingredients and Plan B when things might not quite turn out perfectly, was more thorough and thoughtful then the one for this cocktail class. Although it wasn’t in the email, he did verbally cover tips on ways to flavor to your taste and balance as you taste, where to get some of the ingredients, things to look for when examining the ingredients to purchase, and what could be done and in the fridge the day before and what ones are sorta fun to do as guests are arriving and they can give you a hand! Just like in the cheese class, we all got a chance to have hands on experience, taste stuff in progress and eye what it looks like until its ready

Because of the breaks between the prep food/prep drink stations, we also got to do a bit more informal socializing and get tastes of everything more often throughout the class time. Bouncing between two people also gives the other a break to “recharge” during the 3-3 1/2 hour class so they was a lot of positive energy and keeping us pumped as the night continued (after all, I did work all day on Friday too!). This class turned out to be all ladies although the instructors were male, and the assistant female, so guys certainly are not unwelcome- and could have had some flirting time with the single ladies. Still, I suppose that’s pretty apropros based on who usually preps hors’dourves for a party- most men would lay out nuts and chips and salsa and some beer and call it a day without too much worry for the mixed drinks, even though it would impress any female guest. I would definitely recommend taking this class with girlfriends, or as two ladies did in my class, with their mom! This would also make a fun gift to a foodie.

I’m keeping my eye out for the dim sum class and cajun classes that matches up to my schedule, so don’t be surprised if you see another Hipcooks class blog entry later this year. I also keep looking at Caprial and John’s (I’ve only attended a supper club so far) but menus and dates haven’t matched up yet, but it has been highly recommended by friends if you are looking for another alternative in the same price range. Caprial and John’s are only in the evenings, but allow you to bring your own beverages (such as wine and beer). I like HipCooks slant in pairing and incorporating learning about beverages in the class but they don’t allow you to BYOB. The fact that they have classes on Sat and Sun during the day just fits better schedule-wise than mostly T-Th evenings at least for me, and they have a large number of classes to choose from. Did you also notice how many things they cover in the class? I also know about In Good Taste but they are almost twice the cost per class.

Wherever you may look and/or decide, cooking classes is a fun way to go out and enjoy food which doesn’t involve just eating and blowing your calories per day, or cooking so much that you are then stuck eating the 6 portions for the next few days, or having to wait for guests coming over to learn and try a recipe while panicking that it might not turn out and then what… From my experience with Hipcooks Portland, everyone has been engaging and laid back like a friend you know, but also an expert at their recipes like they make it home off the cuff all the time and know lil tips and tricks and variations from all that experience. You are both learning and relaxed and having fun all at the same time in a no pressure environment. Having hands-on step by step experience is particularly important to me as the visual is more important than the recipe’s measurements (I dislike cookbooks that don’t have lots of pictures), and Hipcooks definitely gives you that.

Signature

Cheese Whiz: A Cheese Class with HipCooks

I woke up at 6am this morning, excited that today I was making cheese. Actually, I did that on Thursday too, but then realized I still had to go through Friday. But, today was the day!

HipCooks
is a studio located in Northeast Portland, actually tantalizing only a few steps away from Tasty N Sons and  Pix Patisserie. The Cheese Whiz class, taught by Cheyenne, ran from 11am to a little past 2pm, but she made sure to let know in advance that as we were classing through lunch, we should plan to have eaten beforehand. I found out later that most of the classes they teach there's a lot more eating apparently and this one is more "workshop". Have breakfast and you'll be good.

We made 5 fresh cheeses,which included from easiest to hardest, fromage fort, mascarpone, ricotta, goat cheese, and mozzarella, though actually we made the fromage fort last as it took the least amount of prep time and waiting until it was ready to eat. The cheeses were made in a shared hands-on experience of generally groups of 4-5 and a total class size of 14. We also then ate each of these cheeses in her suggested recipe for serving, though at that point with the breaking out of the wine, a light effervescent white Vinho Verde, we also broke out into more socializing and conversation subgroups during actual recipe/eating time and she had to recruit single/pairs of helpers for the "using the cheese in a recipe" preparation.

BTW, the Vinho Verde is an easy to drink wine that would please anyone with its light flavor with little bubbles, and has low alcohol content so everyone can drink freely with less worry about quantity! During the class, they also had water and a pitcher of minty tea to keep us hydrated. After class, she had put together some small cheese starter kits that were optional for purchase, a great idea since otherwise you might have to stop at a few locations. I almost wish they stocked everything they used equipment, and the wine. Particularly I strongly feel the need for a Creuset.

Fromage fort is the meatloaf equivalent to using a bunch of random cheeses, and is more assembling and putting together then real preparation of cheese, though you need a food processor and some already existing cheeses (though whatever leftover cheese you use doesn't matter). This was garlicky cheesy goodness that we spread onto some baguettes that had just been toasted in the oven. It takes longer to toast the bread then it does to do any of the prep/putting together! Awesome hat trick to pull out for easy entertaining snacks if you like to have cheese in the fridge to snack on anyway.

Meanwhile, the mascarpone only needed a few steps, literally heat the milk, add the acid, flavor, and chill. We talked about different options for flavoring mascarpone since so many mascarpone you can purchase in the store already come somewhat flavored… and we all got passed spoons to taste virgin mascarpone right then and there, and then after flavoring, and then it went to the fridge for a couple hours and that's it. The particular recipe for this class was to use the mascarpone, sweetened with vanilla paste and lemon zest, into mini-sandwiches between sliced poached apricots and rolling the outside with pistachios to make very light dessert bites.


The ricotta was our first visit into really seeing the curds and whey separating after heating, and using the cheese cloth to assist in that separation over time. It was funny as we passed the bowl around to poke the curd (with clean fingers!) to get a feel for it. The final recipe for the ricotta was to pipe it into roasted tomato halves and drizzle some olive oil and fresh basil.

The goat cheese was only more difficult because it was more a test of patience. Unlike the fromage fort which had no wait until you could eat it, or the mascarpone which would sit in the fridge chilling, or the ricotta which would sit draining, the goat cheese includes putting the curds into molds and waiting for the whey to drain. As the whey drains, the curd compresses into the mold, which means you can fit more curd… so it was almost like watching water boil in the sense that you had a bowl of curd still and really wanted to stuff it all into the mold, but had to wait for draining. 


After the molds are finally really full and you've got all the curd you can fit, the goat cheese can be left to age much longer then the other fresh cheeses we learned about- more patience testing. The cheese below was made using the molds in the photo above- look at all that compression, it's like half the size! Although Cheyenne was using a fancy mold she had been gifted with, she explained we could use anything as long as there was drainage for the whey- including empty yogurt containers with holds punched in. We talked about various ways to flavor the goat cheese, both during the making of it or as we did in this class, by rolling it in extra flavor such as freshly chopped herbs. After that, the spreading of the herb goat cheese chevre onto toasted crusty bread is super easy.


The fresh mozzarella took the most steps, and is apparently a fussy fresh cheese. She explained how many times she failed in trying to make it, how she kept a cheese journal on all her attempts trying to track her attempts, and how to tell it's not turning out as it's much more temperature sensitive and milk sensitive, and what to do if the mozzarella doesn't quite turn out (put it in lasagna/treat it like ricotta!)

Everyone in class all made a watery mess everywhere on the counter in forming our mozzarella balls as we kneaded and stretched by hand cheese that had just been poached in hot whey. Mozzarella also has an extra complication in which after you have separated the curd from whey, you then return the curd to hot whey later in order to make balls step… which leeches out whey which you want somewhat but you don't want the mozzarella to be dry either, which can be based on how much handling of the cheese you do or the temperature of the whey. Temperate mozzarella!

The shape of the balls and size didn't matter though in this case, since they were then cut to be used for pizza bianca (just on top of dough with olive oil and basil).

This class was really fun, and the entire 3 hours well thought out to keep everyone interested. Her teaching style is laid back but also detailed because she had a lot of knowledge and experience, and explained in a way understandable to anyone. She emails after class out all the instructions, including where to buy various supplies/ingredients and tips for preparation/Plan B if the cheese making didn't work out, and the recipes as an initial idea of what to do once the cheese was finished. This makes you less focused on reading a list of instructions or writing notes and more on just listening and watching and feeling and tasting, like a bunch of little apprentices. It was like she was a friend you have that knows how to cook but also knows better then to try to impress you with techniques or references to what others in the professional industry do- she knows you care about putting together good food not being fancy, so focuses on teaching in a very practical way, including her own personal stories from the everyday attempts. The entire format made this Cheesemaking 101 very approachable and seemingly easy.

I would recommend this Cheese Whiz class to anyone who loves cheese and is interested in getting a good basic introduction to what is the cheesemaking process and foundation of some easy make at home cheese with very little time, effort, or equipment. No special terminology of French words that have you looking for a dictionary or chemistry science in this class beyond reading a thermometer- just practical DIY cheese loving that includes making and eating and is a mix of demonstration by the instructor as well as a little hands on, sampling and touching mid process to get a feel, and then enjoying samples of the fruits at the end of class.

Despite telling us to eat beforehand, everyone left really stuffed from tasting milk and cheese as we were working, and then the final products which included basically 3 appetizers (on bread or tomato), a main (the pizza) and a dessert (the apricot and mascarpone) from the 5 fresh cheeses we had practiced creating.  In fact, I was so full after this class I couldn't make it back to the Bite… though admittedly we got distracted exploring Mississippi Avenue as well. I do plan to go tomorrow.


Signature