Dinner: Wild Mushroom Stroganoff

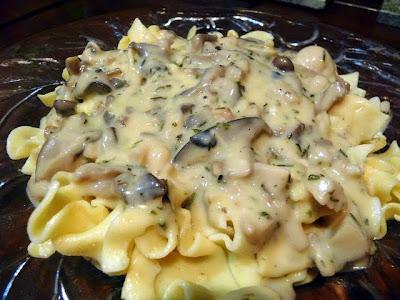
The bourbon chicken and most of the Thanksgiving dishes were new dishes for me. This mushroom stroganoff is one of my safe, tried and true dishes. Living in Portland, with so many mushrooms available, this is an easy regional staple, it’s hearty while being meat-free. Everytime I make mushroom stroganoff, it’s a little bit different based on what mushrooms are fresh at the market – although in Chicago, sometimes to be interesting I ended up using dried mushrooms along with the fresh (generally only portabella and white button were at the grocery store anyway) and it was still tasty. There is really no way to go wrong here with whatever mushrooms you use and whatever combination you put in, and it gives it a slightly different flavor and texture every time.

For this dinner, I used a cup of Oyster mushrooms (one of my favorite mushrooms for its rich taste), a cup of Alba and Brown Clamshell, and cup that was a mix of a few Trumpet Royale (a meatier texture mushroom). I also added an extra 1/4 a cup of shitake to make the sauce more meaty and less creamy. I left out the shallot/onion to also give more spotlight to the mushrooms when I prepared it.

The base recipe yields 4 servings and takes about an hour to cook with a mere 10 min prep:

Wild Mushroom Stroganoff (serves 4)
Ingredients:

  • 2 tablespoons butter, and
  • 2 tablespoons butter
  • 1 large shallot, minced (or you can use an onion)
  • 1/2 teaspoon crushed garlic or a crushed garlic clove
  • 3 cups mushrooms (the original calls for portabella or cremini cubed)- you can slice instead of cube the mushrooms depending on the size/texture you want
  • 1 1/2 cups vegetable broth
  • 1/4 cup white wine
  • 3 tablespoons flour
  • 1/4 cup heavy cream
  • 1/4 cup parmesan cheese, grated
  • 1/8 cup of thyme (original recipe calls for 1/4 cup fresh parsley, chopped- I am not a fan of parsley though so I used thyme)
  • salt and pepper  to taste

Directions:

    1. Melt the first amount of butter over medium heat and add the shallot, cook until tender.
    2. Add the garlic and mushrooms to the pot and cook until tender.
    3. Add the broth, wine, and salt and pepper if desired. Bring to a boil and then turn down heat and simmer for about ten minutes.

Before adding the roux:
Wild Mushroom Stroganoff

    1. While the sauce is simmering, in a separate pot melt the second amount of butter over medium heat.
    2. Stir the flour into the butter until absorbed to make a roux.
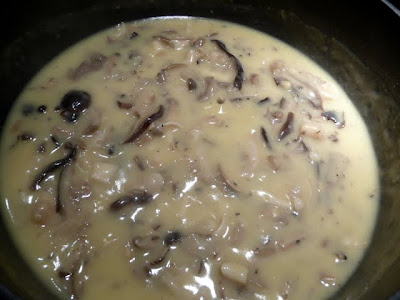
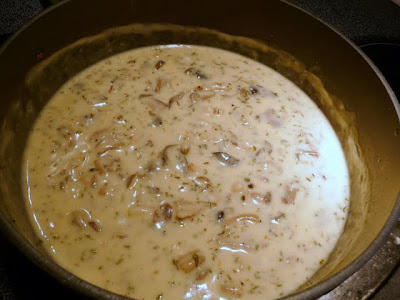
    3. Pour the mushroom mixture into the roux and bring to a boil, turn down the heat and stir until thickened.
    4. Stir in the cream and parmesan cheese, and stir in the thyme/parsley to taste.

Wild Mushroom Stroganoff

You can choose to serve this over pasta- I always pick an egg noodle- or over rice, or by as a thick broth of its own in a bread bowl (with the former insides of the bowl for you to dunk in).

Wild Mushroom Stroganoff

Signature

Dinner: Bourbon Chicken Recipe

I have very good memories of discovering bourbon chicken when the mall in our area finally updated itself from an outdoor to an indoor mall, so suddenly we had access to a food court. Similar to when we discovered Auntie Anne’s (the first food establishment to open in this mall), my family went a little overboard, perhaps eating it weekly.

Sometimes, I still get tempted when I smell the aromas as someone generally is offering a sample from a plate. But, you don’t have to go all the way to a food court to get bourbon chicken if you ever have a craving! Here is a copycat recipe, but I happened to use vegetarian chicken to substitute for real meat chicken.

Bourbon Chicken

Ingredients:

  • 1 lb boneless chicken breasts cut into bite-size pieces – in this case I used vegetarian chik’n tenders from Quorn
  • 2 -4 tablespoon olive oil
  • 1 crushed garlic clove or 1/2 teaspoon of  crushed garlic from jar
  • 1/4 teaspoon ginger
  • 3/4-1 teaspoon crushed red pepper flakes (to taste depending on how spicy you want it)
  • 1/4 cup apple juice
  • 1/3 cup brown sugar
  • 2 tablespoons ketchup
  • 1 tablespoon cider vinegar
  • 1/2 cup water 
  • 1/3 cup light sodium soy sauce
  • Rice

Directions:

  1. Heat 1-2 tablespoons of olive oil in a skillet.
  2. Cook the chicken until lightly browned. When finished, remove the chicken to a plate for now.
  3. In the skillet, put in 1-2 tablespoons of olive oil and heat the crushed garlic until it sizzles to release the flavor
  4. Next, lower to medium heat. Add the apple juice, cider vinegar, soy sauce, and water first, and then the ginger, sugar, ketchup, and red pepper until well mixed and dissolved
  5. Add the chicken and bring to a hard boil. Then lower the heat and simmer for 20 minutes at the lowest heat setting so the chicken can absorb the juices and sauce can reduce, but watch carefully so chicken does not dry

Just added chicken to sauce:
Bourbon Chicken Recipe
Then letting it marinate…the black flecks are a mix of red pepper flakes and perhaps I burned the crushed garlic slightly because the pan was still hot from warming the chicken and I put in the new oil/garlic right after I removed the chicken, so as soon as I tossed in the garlic it got dark real fast. Oops. Next time, turn down the heat and check the oil before adding garlic.
Bourbon Chicken Recipe
In 20 minutes, there will be less liquid as the chicken soaks it all in like a sponge
Bourbon Chicken Recipe

Serve over hot rice

Bourbon Chicken Recipe

Optional Notes on this Recipe

  1. You can also saute onions with the chicken, or add other ingredients (carrots, broccoli, etc).
  2. Using chicken with the skin tastes better, but I made this with fake chicken (that is what is pictured above)- which you can simmer longer to get soft as you don’t have to worry as much about it drying out
  3. The sauce is really made separately, so before adding the chicken make sure to season to taste. I like mine a little spicier, and less vinegary, so I ended up adding more red pepper and a little extra water to dilute the vinegar a bit more. Some people substituted orange juice for the apple juice, and used balsamic vinegar instead of the cider vinegar, so you have to make it your own.
  4. If you want the sauce to be thicker, add a tablespoon of cornstarch (optional).

If you are looking for the bourbon part… it’s not in the recipe. This is totally mall food court style, not the authentic southern+chinese cajun bourbon chicken style, you don’t think they use bourbon just to let it evaporate away in those chafing dishes do you? This copycat recipe is pretty distributed on the internets, it is not invented by me; the key is just in making the sauce to keep tasting to season it to what you personally would enjoy.

Signature

Thanksgiving 2010- a Vegetarian Version of Thanksgiving

This year it was all about My Thanksgiving Battle Plan. My Plan was a strategic and tactical thorough scheme. The overall concept- a Vegetarian Version of Thanksgiving.

My Plan, which I had carefully been considering for 2 weeks so that the ingredients I purchased would all be wholly used, so

  1. I picked recipes that together would result in using overall packaged amounts of ingredients that came in pints and 16 oz and such,
  2. planned for post-holiday meals that would finish them off too,
  3. made sure to include the calculations to reduce recipe portion sizes while also accounting for how many leftovers I wanted for the long weekend
  4. while everything would of course play well with each other for the initial Thanksgiving meal and leftover meals for the rest of the week.
  5. My Plan would be settled in advance, which meant I bought everything the weekend before at Trader Joe’s, Fred Meyer, and Safeway.

Well, actually the main course for Lobo and Mew was purchased at Petco. Because My Plan included the pets’ thanksgiving experience.

Lobo was soooo excited his face was in the bowl vacuuming the food before I had put half the can into the two feeding bowls (I had to use two since Lobo’s head was in one and Mew couldn’t even see what was going on). Overall, Mew was more on the confused side of what was this stuff, and not so interested it turned out (he licked it for flavor but didn’t really eat much of it at all). So Lobo needn’t have eaten like a pig stuffing his face so fast we were afraid he was going to choke inhaling it all as if he didn’t eat it all ASAP Mew would get it.

First course. Ever since I took that Hip Cooks cheese class, I can’t help but want to make my own chevre as an appetizer if I happen to be in Trader Joe’s, one of the few places you can buy the necessary goat milk. I started the cheese on the Sunday before Thanksgiving because I wanted to give it time to age, like the last batch. However, this batch did not use a culture or rennet like the last one (the recipe I learned at Hip Cooks), just citric acid and the other instructions by Urban Cheesecraft.

The result was still a fresh light tasting cheese, but it wasn’t as creamy- it was more crumbly and firmish closer to a soft feta- and would have been better topping a summer salad then as an appetizer- I let it marinate in a pinot noir jelly and served it on oven toasted 10 grain bread. Their recipe was easier though, so maybe I would try their cheese recipes on something harder like the mozzarella.

We started snacking on the cheese while tasting a 12 oz Hair of the Dog Matt Commemorative Ale as we were waiting on the potatoes and “meats” and souffle. Matt was just released during Hair of the Dog’s anniversary last Saturday, and is made with two Munich malts, two Smoked malts and two types of Belgian candy sugar then aged in Kentucky Bourbon and Apple Eau de Vie barrels from Clear Creek distilling.

The description from the brewer was that the taste profile would be “deep and lush with notes of apple, chocolate and smoke”. We both thought it was a great beer, though thicker and more chocolatey than we anticipated. But, worth $15 for each bottle? Not so sure about that, though we also have some bottles to age

Main and Side courses. I had made some cornbread on Wed in anticipation of making the stuffing. So on Thursday around 11, and for the next four hours, I made the rest of the meal, minus the mashed potatoes and chestnuts. First up based on oven temperature needs after toasting the bread was the Green Bean and Portabella Mushroom Casserole (topped with crispy onions and parmesan) and Cornbread stuffing with onion, carrots, celery, Thai chili peppers and diced “ham”. Both of these would also emerge super hot from the oven, and could stand a little cooling off while I finished the rest of the dishes. I started the stuffing first since I needed time to sweat the vegetables, and as soon as that was done I started on caramelizing the onions for the casserole.

This was only my second foray into green bean casserole. Last time I had made Campbell Soup’s green bean casserole and was not a fan: however the Trader’s Joe’s recipe features mushroom more because not only is a mushroom broth used but it called for sauteed onions and mushrooms as equal part to the green bean inside the casserole. I am a big fan of mushrooms and caramelized onions, and then add all these crispy fried onions and parmesan on top and this turned out great for my tastebuds. I also thought the texture was much more balanced- not just mushy green beans and crispy onions, because the portabella mushrooms still had a bit of soft shape to give just a slight bit more structure to the dish.


Meanwhile, the cornbread stuffing. I modified a recipe I had seen on Michael Symon on Food network. For some reason I had watched him make this in an episode- unusual because I don’t watch him at all- but what I saw was so intriguing for a stuffing I looked it up to print his recipe.

As mentioned, the cornbread I had made from a mix the day before, but when it came to the smoked ham I used a smoked veggie version, and for the vegetables I replaced his call for red peppers with Thai red chilis (though obviously in less quantity), and removed the corn (I thought there was enough corn in the cornbread which had kernels already in it, and also the fact I had a corn souffle) so also reduced the amount of cornbread because of that. I also did a lot of winging on the seasoning. I’m not a fan of parsley and cilantro, so I went with dill, sage, and rosemary. Rosemary is such a holiday time appropriate seasoning.

The stuffing turned out visually quite pretty, and was even better the next day as a leftover. The “ham” even in the veggie version gave it a hint of smokiness, and the Thai red chilis a bit of extra zing.

Most of what I made used the stove, and by the time he was entering the kitchen to prep these, the range was completely free. Actually, until he entered the kitchen, I had even done a pretty good job of cleaning up dishes and pans and utensils as I had gone. During the rest of the prep for the recipes following this sentence though is when the sink started to stack up. I’m not sure why the photo shows it a bit greenish- these were the last to the table so it was already getting a bit darker by then. The mashed potatoes, not prepared by me, were made with garlic, skim milk, and skin still on red potatoes. No mentions by me about how there was leftover cream in the fridge still would yield any changes.

What’s Thanksgiving cooking without some misadventures in the kitchen? This time around, it first appeared while baking the corn souffle, following a recipe I had cut out of some newspaper several years ago and don’t even remember which newspaper was. It was taking longer to cook than anticipated because the middle was still wet. There were a lot of little toothpick holes suffice it to say as I kept maniacally checking it because I also didn’t want it to be overdone.

Meanwhile, the higher oven temperature required for finishing the souffle was also throwing off my meat cooking temperatures and times. Also, I had used a Food.com recipe for Almond crusted chick’n breasts drizzled with rosemary dill lemon butter (well, hers was basil butter but I was sick of basil after this summer. And I like dill.)- and the chick’n wasn’t picking up the flour and egg dredge well so the almonds didn’t stick as well as hoped. I got all 10 fingers messy in trying to somehow cover up those cutlets with almond on both sides- every place I can fit an almond I tried to.

I don’t usually eat chick’n so I’m not sure what it tastes like normally, but to me the whole thing turned out dry, though that might have been a characteristic of the chick’n and if I had used real meat chicken (or perhaps not Quorn brand chicken cutlets) this might have turned out better. Another option might be pan frying the chicken so I can season more flavor then drizzling the rosemary dill infused butter offered.

The rebellious food:

I also used a Kittencal recipe for the Parmesan Melt turk’y which I hesitated on adding the salt the recipe called for (not big salt fans) but did it anyway- and what do you know, it was too salty for our tastes. But I did love how much the turk’y round looked like a lot like turkey! The saltiness of the parmesan melt around it almost was like turkey skin in a way. And this Quorn fake meat version that was turk’y wasn’t dry like the chick’n, so some of that salt probably helped retain the moisture.

In the end, my Thanksgiving 2010 plate doesn’t even look like its missing out on options just because it is a vegetarian version.

Signature

Cheese practice

Examples of the pao de queijo… I decided to try a new version of the recipe I found because it is less fat (uses olive oil, less cheese) then the version I usually make. It also uses a blender instead of hand-kneading, which resulted in much more fluffy version.

However, I think I may still make the other version which is denser and chewier, and offers more savory cheesiness.


Current homemade chevre progress… just unmolded yesterday morning after 12 hours of curdling, 24 hours of draining in mold. Then it needs 24 more hours of draining through the bamboo. 12 hours to go, and we'll wrap it tonight! We haven't decided what we wanted to roll it in yet. We do have sweet basil, mint, and sage in our herb garden.


Signature

Cheese Whiz: A Cheese Class with HipCooks

I woke up at 6am this morning, excited that today I was making cheese. Actually, I did that on Thursday too, but then realized I still had to go through Friday. But, today was the day!

HipCooks
is a studio located in Northeast Portland, actually tantalizing only a few steps away from Tasty N Sons and  Pix Patisserie. The Cheese Whiz class, taught by Cheyenne, ran from 11am to a little past 2pm, but she made sure to let know in advance that as we were classing through lunch, we should plan to have eaten beforehand. I found out later that most of the classes they teach there's a lot more eating apparently and this one is more "workshop". Have breakfast and you'll be good.

We made 5 fresh cheeses,which included from easiest to hardest, fromage fort, mascarpone, ricotta, goat cheese, and mozzarella, though actually we made the fromage fort last as it took the least amount of prep time and waiting until it was ready to eat. The cheeses were made in a shared hands-on experience of generally groups of 4-5 and a total class size of 14. We also then ate each of these cheeses in her suggested recipe for serving, though at that point with the breaking out of the wine, a light effervescent white Vinho Verde, we also broke out into more socializing and conversation subgroups during actual recipe/eating time and she had to recruit single/pairs of helpers for the "using the cheese in a recipe" preparation.

BTW, the Vinho Verde is an easy to drink wine that would please anyone with its light flavor with little bubbles, and has low alcohol content so everyone can drink freely with less worry about quantity! During the class, they also had water and a pitcher of minty tea to keep us hydrated. After class, she had put together some small cheese starter kits that were optional for purchase, a great idea since otherwise you might have to stop at a few locations. I almost wish they stocked everything they used equipment, and the wine. Particularly I strongly feel the need for a Creuset.

Fromage fort is the meatloaf equivalent to using a bunch of random cheeses, and is more assembling and putting together then real preparation of cheese, though you need a food processor and some already existing cheeses (though whatever leftover cheese you use doesn't matter). This was garlicky cheesy goodness that we spread onto some baguettes that had just been toasted in the oven. It takes longer to toast the bread then it does to do any of the prep/putting together! Awesome hat trick to pull out for easy entertaining snacks if you like to have cheese in the fridge to snack on anyway.

Meanwhile, the mascarpone only needed a few steps, literally heat the milk, add the acid, flavor, and chill. We talked about different options for flavoring mascarpone since so many mascarpone you can purchase in the store already come somewhat flavored… and we all got passed spoons to taste virgin mascarpone right then and there, and then after flavoring, and then it went to the fridge for a couple hours and that's it. The particular recipe for this class was to use the mascarpone, sweetened with vanilla paste and lemon zest, into mini-sandwiches between sliced poached apricots and rolling the outside with pistachios to make very light dessert bites.


The ricotta was our first visit into really seeing the curds and whey separating after heating, and using the cheese cloth to assist in that separation over time. It was funny as we passed the bowl around to poke the curd (with clean fingers!) to get a feel for it. The final recipe for the ricotta was to pipe it into roasted tomato halves and drizzle some olive oil and fresh basil.

The goat cheese was only more difficult because it was more a test of patience. Unlike the fromage fort which had no wait until you could eat it, or the mascarpone which would sit in the fridge chilling, or the ricotta which would sit draining, the goat cheese includes putting the curds into molds and waiting for the whey to drain. As the whey drains, the curd compresses into the mold, which means you can fit more curd… so it was almost like watching water boil in the sense that you had a bowl of curd still and really wanted to stuff it all into the mold, but had to wait for draining. 


After the molds are finally really full and you've got all the curd you can fit, the goat cheese can be left to age much longer then the other fresh cheeses we learned about- more patience testing. The cheese below was made using the molds in the photo above- look at all that compression, it's like half the size! Although Cheyenne was using a fancy mold she had been gifted with, she explained we could use anything as long as there was drainage for the whey- including empty yogurt containers with holds punched in. We talked about various ways to flavor the goat cheese, both during the making of it or as we did in this class, by rolling it in extra flavor such as freshly chopped herbs. After that, the spreading of the herb goat cheese chevre onto toasted crusty bread is super easy.


The fresh mozzarella took the most steps, and is apparently a fussy fresh cheese. She explained how many times she failed in trying to make it, how she kept a cheese journal on all her attempts trying to track her attempts, and how to tell it's not turning out as it's much more temperature sensitive and milk sensitive, and what to do if the mozzarella doesn't quite turn out (put it in lasagna/treat it like ricotta!)

Everyone in class all made a watery mess everywhere on the counter in forming our mozzarella balls as we kneaded and stretched by hand cheese that had just been poached in hot whey. Mozzarella also has an extra complication in which after you have separated the curd from whey, you then return the curd to hot whey later in order to make balls step… which leeches out whey which you want somewhat but you don't want the mozzarella to be dry either, which can be based on how much handling of the cheese you do or the temperature of the whey. Temperate mozzarella!

The shape of the balls and size didn't matter though in this case, since they were then cut to be used for pizza bianca (just on top of dough with olive oil and basil).

This class was really fun, and the entire 3 hours well thought out to keep everyone interested. Her teaching style is laid back but also detailed because she had a lot of knowledge and experience, and explained in a way understandable to anyone. She emails after class out all the instructions, including where to buy various supplies/ingredients and tips for preparation/Plan B if the cheese making didn't work out, and the recipes as an initial idea of what to do once the cheese was finished. This makes you less focused on reading a list of instructions or writing notes and more on just listening and watching and feeling and tasting, like a bunch of little apprentices. It was like she was a friend you have that knows how to cook but also knows better then to try to impress you with techniques or references to what others in the professional industry do- she knows you care about putting together good food not being fancy, so focuses on teaching in a very practical way, including her own personal stories from the everyday attempts. The entire format made this Cheesemaking 101 very approachable and seemingly easy.

I would recommend this Cheese Whiz class to anyone who loves cheese and is interested in getting a good basic introduction to what is the cheesemaking process and foundation of some easy make at home cheese with very little time, effort, or equipment. No special terminology of French words that have you looking for a dictionary or chemistry science in this class beyond reading a thermometer- just practical DIY cheese loving that includes making and eating and is a mix of demonstration by the instructor as well as a little hands on, sampling and touching mid process to get a feel, and then enjoying samples of the fruits at the end of class.

Despite telling us to eat beforehand, everyone left really stuffed from tasting milk and cheese as we were working, and then the final products which included basically 3 appetizers (on bread or tomato), a main (the pizza) and a dessert (the apricot and mascarpone) from the 5 fresh cheeses we had practiced creating.  In fact, I was so full after this class I couldn't make it back to the Bite… though admittedly we got distracted exploring Mississippi Avenue as well. I do plan to go tomorrow.


Signature